Expert
- Control flow (Async tasks, Callbacks):
- Reading and Writing Files:
- Building a Cluster
- Monitoring
- Buffers and Streams
- Memory management
- Express
- Messaging
- Meteor.js
- Hapijs
- Koajs
Control flow (Async tasks, Callbacks)
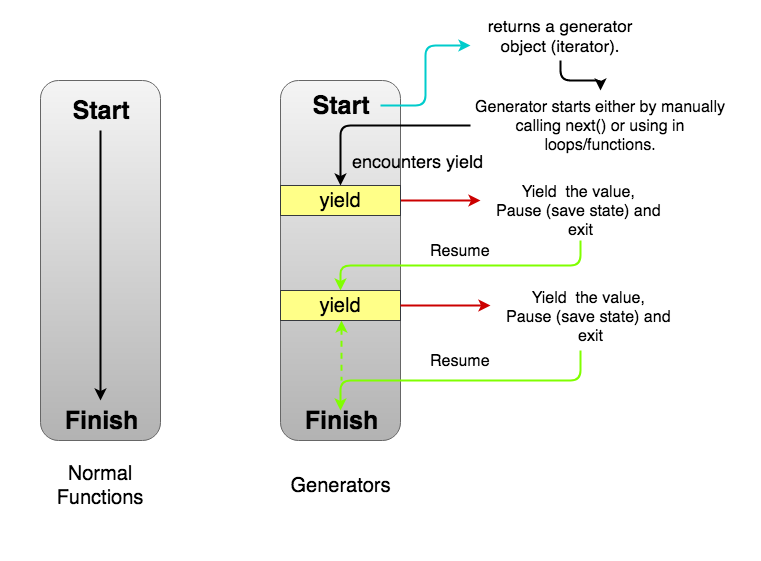
generators
A generator is a function that can stop midway and then continue from where it stopped. In short, a generator appears to be a function but it behaves like an iterator.
- Generators are function executions that can be suspended and resumed at a later point.
- Generators are a special class of functions that simplify the task of writing iterators.
- A generator is a function that produces a sequence of results instead of a single value, i.e you generate a series of values.
In JavaScript, a generator is a function which returns an object on which you can call next(). Every invocation of next() will return an object of shape:
{
  value: Any,
  done: true|false
}
The value property will contain the value. The done property is either true or false. When the done becomes true, the generator stops and won’t generate any more values.
Uses of Generators
Implementing Iterables
When you implement an iterator, you have to manually make an iterator object with a next() method. Also, you have to manually save the state. Often times, it becomes really hard to do that. Since generators are also iterables, they can be used to implement iterables without the extra boilerplate code.
Infinite Data Streams
function * naturalNumbers() {
  let num = 1;
  while (true) {
    yield num;
    num = num + 1
  }
}
const numbers = naturalNumbers();
console.log(numbers.next().value)
console.log(numbers.next().value)
- Generators as observers Generators can also receive values using the next(val) function. Then the generator is called an observer since it wakes up when it receives new values. In a sense, it keeps observing for values and acts when it gets one
Advantages
- Lazy Evaluation
- Memory Efficient
Caveats
Generator objects are one-time access only. Once you’ve exhausted all the values, you can’t iterate over it again. To generate the values again, you need to make a new generator object.
Generator objects do not allow random access as possible with arrays. Since the values are generated one by one, accessing a random value would lead to computation of values till that element. Hence, it’s not random access.
Generator composition
function* generateSequence(start, end) {
  for (let i = start; i <= end; i++) yield i;
}

function* generatePasswordCodes() {

  // 0..9
  yield* generateSequence(48, 57);

  // A..Z
  yield* generateSequence(65, 90);

  // a..z
  yield* generateSequence(97, 122);

}
Set value with next
function* gen() {
  let ask1 = yield "2 + 2 = ?";

  alert(ask1); // 4

  let ask2 = yield "3 * 3 = ?"

  alert(ask2); // 9
}

let generator = gen();

alert( generator.next().value ); // "2 + 2 = ?"

alert( generator.next(4).value ); // "3 * 3 = ?"

alert( generator.next(9).done ); // true
Examples
- Generating Unique identifiers
function * idCreator() {
  let i = 0;
  while (true) yield i++;
}

const ids = idCreator();

console.log(ids.next().value); // 0
console.log(ids.next().value); // 1
console.log(ids.next().value); // 2
// etc ...
Reading and Writing Files
flags for manipulation with files
r+open the file for reading and writingw+open the file for reading and writing, positioning the stream at the beginning of the file. The file is created if not existingaopen the file for writing, positioning the stream at the end of the file. The file is created if not existinga+open the file for reading and writing, positioning the stream at the end of the file. The file is created if not existing
fs.writeFile('/Users/flavio/test.txt', content, { flag: 'a+' }, (err) => {})
fs.readFile(path[, options], callback)- default with r flag. options = [encoding, flag]fs.writeFile(file, data[, options], callback)- file
<string> | <Buffer> | <URL> | <integer>filename or file descriptor - data
<string> | <Buffer> | <TypedArray> | <DataView> - options
<Object> | <string>- encoding
<string> | <null>Default: 'utf8' - mode
<integer>Default: 0o666 - flag
<string>Default: 'w'.
- encoding
- callback
<Function>- err
<Error>
- err
- file
All flags
a: Open file for appending. The file is created if it does not exist.ax: Like 'a' but fails if the path exists.a+Open file for reading and appending. The file is created if it does not exist.ax+Like 'a+' but fails if the path exists.asOpen file for appending in synchronous mode. The file is created if it does not exist.as+: Open file for reading and appending in synchronous mode. The file is created if it does not exist.r: Open file for reading. An exception occurs if the file does not exist.r+: Open file for reading and writing. An exception occurs if the file does not exist.rs+: Open file for reading and writing in synchronous mode. Instructs the operating system to bypass the local file system cache.
This is primarily useful for opening files on NFS mounts as it allows skipping the potentially stale local cache. It has a very real impact on I/O performance so using this flag is not recommended unless it is needed.
This doesn't turn fs.open() or fsPromises.open() into a synchronous blocking call. If synchronous operation is desired, something like fs.openSync() should be used.
w: Open file for writing. The file is created (if it does not exist) or truncated (if it exists).wx: Like 'w' but fails if the path exists.w+: Open file for reading and writing. The file is created (if it does not exist) or truncated (if it exists).wx+: Like 'w+' but fails if the path exists.
Building a Cluster
Each Node.js process runs in a single thread and by default it has a memory limit of 512MB on 32-bit systems and 1GB on 64-bit systems. Although the memory limit can be bumped to ~1GB on 32-bit systems and ~1.7GB on 64-bit systems, both memory and processing power can still become bottlenecks for various processes.
The elegant solution Node.js provides for scaling up the applications is to split a single process into multiple processes or workers, in Node.js terminology. This can be achieved through a cluster module. The cluster module allows you to create child processes (workers), which share all the server ports with the main Node process (master).
what is cluster
A cluster is a pool of similar workers running under a parent Node process. Workers are spawned using the fork() method of the child_processes module. This means workers can share server handles and use IPC (Inter-process communication) to communicate with the parent Node process.
The master process is in charge of initiating workers and controlling them. You can create an arbitrary number of workers in your master process. Moreover, remember that by default incoming connections are distributed in a round-robin approach among workers (except in Windows).
create the cluster from your application
const cluster = require('cluster');
A cluster module executes the same Node.js process multiple times. Therefore, the first thing you need to do is to identify what portion of the code is for the master process and what portion is for the workers. The cluster module allows you to identify the master process as follows:
if (cluster.isMaster) { ... }
The master process is the process you initiate, which in turn initialize the workers. To start a worker process inside a master process, we’ll use the fork() method:
cluster.fork();
This method returns a worker object that contains some methods and properties about the forked worker. We’ll see some examples in the following section.
A cluster module contains several events. Two common events related to the moments of start and termination of workers are the online and the exit events. online is emitted when the worker is forked and sends the online message. exit is emitted when a worker process dies. Later, we’ll see how we can use these two events to control the lifetime of the workers.
Examples
const cluster = require('cluster');
const http = require('http');
const numCPUs = 4;

if (cluster.isMaster) {
    for (var i = 0; i < numCPUs; i++) {
        cluster.fork();
    }
} else {
    http.createServer(function(req, res) {
        res.writeHead(200);
        res.end('process ' + process.pid + ' says hello!');
    }).listen(8000);
}
You can test this server on your machine by starting it (run the command node simple.js) and accessing the URL http://127.0.0.1:8000/. When requests are received, they are distributed one at a time to each worker. If a worker is available, it immediately starts processing the request; otherwise it’ll be added to a queue.
There are a few points that are not very efficient in the above example.
For instance, imagine if a worker dies for some reason. In this case, you lose one of your workers and if the same happens again, you will end up with a master process with no workers to handle incoming requests.
Another issue is related to the number of workers. There are different number of cores/threads in the systems that you deploy your application to. In the mentioned example, to use all of the system’s resources, you have to manually check the specifications of each deployment server, find how many threads there are available, and update it in your code.
const cluster = require('cluster');

if(cluster.isMaster) {
    const numWorkers = require('os').cpus().length;

    console.log('Master cluster setting up ' + numWorkers + ' workers...');

    for (let i = 0; i < numWorkers; i++) {
        cluster.fork();
    }

    cluster.on('online', function(worker) {
        console.log('Worker ' + worker.process.pid + ' is online');
    });

    cluster.on('exit', function(worker, code, signal) {
        console.log('Worker ' + worker.process.pid + ' died with code: ' + code + ', and signal: ' + signal);
        console.log('Starting a new worker');
        cluster.fork();
    });
} else {
    const app = require('express')();
    app.all('/*', function(req, res) {res.send('process ' + process.pid + ' says hello!').end();})

    const server = app.listen(8000, function() {
        console.log('Process ' + process.pid + ' is listening to all incoming requests');
    });
}
The first addition to this example is getting the number of the CPU cores using the Node.js OS module. The os module contains a cpus() function, which returns an array of CPU cores. Using this approach, we determine the number of the workers to fork dynamically, based on the server specifications to maximize the utilization.
A second and more important addition is handling a worker’s death. When a worker dies, the cluster module emits an exit event. It can be handled by listening for the event and executing a callback function when it’s emitted. You can do that by writing a statement like cluster.on('exit', callback);. In the callback, we fork a new worker in order to maintain the intended number of workers. This allows us to keep the application running, even if there are some unhandled exceptions.
In this example, I also set a listener for an online event, which is emitted whenever a worker is forked and ready to receive incoming requests. This can be used for logging or other operations.
how many nodes should we use in cluster
const numWorkers = require('os').cpus().length;
Monitoring
Getting insights into production systems is critical when you are building Node.js applications! You have an obligation to constantly detect bottlenecks and figure out what slows your product down.
An even greater issue is to handle and preempt downtimes. You must be notified as soon as they happen, preferably before your customers start to complain. Based on these needs, proper monitoring should give you at least the following features and insights into your application's behavior:
Profiling on a code level: You have to understand how much time does it take to run each function in a production environment, not just locally.
Monitoring network connections: If you are building a microservices architecture, you have to monitor network connections and lower delays in the communication between your services.
Performance dashboard: Knowing and constantly seeing the most important performance metrics of your application is essential to have a fast, stable production system.
Real-time alerting: For obvious reasons, if anything goes down, you need to get notified immediately. This means that you need tools that can integrate with Pagerduty or Opsgenie - so your DevOps team won’t miss anything important.
Server Monitoring versus Application Monitoring
Server Monitoring
Server monitoring is responsible for the host machine. It should be able to help you answer the following questions:
- Does my server have enough disk space?
- Does it have enough CPU time?
- Does my server have enough memory?
- Can it reach the network?
For server monitoring, you can use tools like zabbix.
Application Monitoring
Application monitoring, on the other hand, is responsible for the health of a given application instance. It should let you know the answers to the following questions:
- Can an instance reach the database?
- How much request does it handle?
- What are the response times for the individual instances?
- Can my application serve requests? Is it up?
For application monitoring New Relic
Buffers and Streams
Streams are objects that lets you read data from a source or write data to the destination in a continuous fashion.
Problems with Large Data:
- Speed: Too slow because it has to load all the requests.
- Buffer Limit: 1 GB
Stream Benefits:
- Abstraction for continuous chunking of data.
- No need to wait for the entire resource to load.
Stream is Used In:
- HTTP request & responses
- Standard input/output(stdin & stdout)
- File reads and write
Streams
многие встроенные модули в Node js реализуют стримы, такие как HTTP requests/responses, fs read/write, zlib, crypto, TCP sockets и другие. Также стримы вам понадобятся, к примеру, при обработке больших файлов, при работе с картинками.
Стрим — это концепция, c помощью которой можно обрабатывать данные небольшими частями, что позволяет задействовать небольшой объем оперативной памяти. Также с ее помощью мы можем разбить обработку каждой части на независимые друг от друга модули (функции либо классы). Например, мы можем сразу сжать часть данных, потом зашифровать и записать в файл. Основная идея в том, чтобы не работать с данными целиком, а поочередно обрабатывать часть данных.
Распространенная задача — парсинг файла большого объема. Например, в текстовом файле с данными логов нужно найти строку, содержащую определенный текст. Вместо того, чтобы файл полностью загрузить в память, и потом начать разбирать в нем строки в поисках нужной, мы можем его считывать небольшими порциями. Тем самым не занимаем память сверх необходимого, а лишь столько памяти, сколько нужно для буферизации считанных данных. Как только найдем требуемую запись, сразу прекратим дальнейшую работу. Или можем передать найденную запись в другой поток по цепочке, например, для преобразование в другой формат, или сохранения в другой файл.
С помощью потоков можно решать практически любую задачу:
- сохранение/чтение данных в/из файла или базы данных;
- архивация файлов;
- шифрование данных;
- передачу данных по сети (модули обмена сообщениями в реальном времени, реализовать трансляцию видео, аудио файлов)
В Node js есть 4 вида стримов:
- Readable — чтение
- Writable — запись
- Duplex — чтение и запись
- Transform — вид Duplex потока, который может изменять данные
// 1 - (используя стримы) загружаем часть файла и отправляем ее, до тех пор пока не отправим весь файл
const getFile = async (req, res, next) => {
  const fileStream = fs.createReadStream('path to file');

  res.contentType('application/pdf');

  fileStream.pipe(res);
};

// 2 - (не используя стримы) загружаем файл полностью в память и затем отправляем
const getFile = async (req, res, next) => {
  const file = fs.readFileSync('path to file');

  res.contentType('application/pdf');

  res.send(file);
};
Разница лишь в том, что в первом случае мы загружаем часть файла и отправляем ее, таким образом, не загружая оперативную память сервера. Во втором случае мы сразу загружаем файл целиком в оперативную память и только потом отправляем
Readable
const { Readable } = require('stream');

class myReadable extends Readable {
  constructor(opt) {
    super(opt);
  }

  _read(size) {}
}
Как видим из примера выше, этот класс принимает набор параметров. Мы рассмотрим только те, которые нужны для общего понимания работы Readable стрима, остальные вы можете посмотреть в документации. Нас интересует параметр highWaterMark и метод _read.
highWaterMark — это максимальное количество байтов внутреннего буфера стрима (по умолчанию 16кб) по достижению которого считывание из ресурса приостанавливается. Для того, чтобы продолжить считывание, нам нужно освободить внутренний буфер. Мы можем это сделать вызвав методы pipe, resume или подписавшись на событие data.
_read — это реализация приватного метода, который вызывается внутренними методами класса Readable. Он вызывается постоянно пока размер данных не достигнет highWaterMark.
readable.push, он непосредственно и добавляет данные во внутренний буфер. Он возвращает true, но как только буфер будет заполнен, то вызов этого метода начнет возвращать false. Он может управляться методом readable._read.
class Counter extends Readable {
  constructor(opt) {
    super(opt);

    this._max = 1000;
    this._index = 0;
  }

  _read() {
    this._index += 1;

    if (this._index > this._max) {
      this.push(null);
    } else {
      const buf = Buffer.from(`${this._index}`, 'utf8');

      console.log(`Added: ${this._index}. Could be added? `, this.push(buf));
    }
  }
}

const counter = new Counter({ highWaterMark: 2 });

console.log(`Received: ${counter.read().toString()}`);
Writable stream
На самом деле он очень похож на Readable стрим, только предназначен для записи данных.
const { Writable } = require('stream');

class myWritable extends Writable {
  constructor(opt) {
    super(opt);
  }

  _write(chunk, encoding, callback) {}
}
Он принимает похожие параметры, как и Readable стрим. Нас интересуют highWaterMark и _write.
_write — это приватный метод, который вызывается внутренними методами класса Writable для записи порции данных. Он принимает 3 параметра: chunk (часть данных), encoding (кодировка, если chunk это строка), callback (функция, которая вызывается после успешной или неудачной записи).
highWaterMark — это максимальное количество байтов внутреннего буфера стрима (по умолчанию 16кб), по достижению которого stream.write начнет возвращать false.
const { Writable } = require('stream');

class Counter extends Writable {
  _write(chunk, encoding, callback) {
    console.log(chunk.toString());

    callback();
  }
}

const counter = new Counter({ highWaterMark: 2 });

for (let i = 1; i < 1000; i += 1) {
  counter.write(Buffer.from(`${i}`, 'utf8'));
}
Duplex stream
Он объединяет в себе Readable и Writable стримы, то есть мы должны написать реализацию двух методов _read и _write.
const { Duplex } = require('stream');

class myDuplex extends Duplex {
  constructor(opt) {
    super(opt);
  }

  _read(size) {}

  _write(chunk, encoding, callback) {}
}
Здесь нам интересны 2 параметра, которые мы можем передать в конструктор, это readableHighWaterMark и writableHighWaterMark, которые позволяют нам указать размер внутреннего буфера для Readable, Writable стримов соответственно. Вот так будет выглядеть реализация предыдущих двух примеров с помощью Duplex стрима.
const { Duplex } = require('stream');
const events = require('events');

class Counter extends Duplex {
  constructor(opt) {
    super(opt);

    this._max = 1000;
    this._index = 0;
  }

  _read() {
    this._index += 1;

    if (this._index > this._max) {
      this.push(null);
    } else {
      const buf = Buffer.from(`${this._index}`, 'utf8');

      this.push(buf);
    }
  }

  _write(chunk, encoding, callback) {
    console.log(chunk.toString());

    callback();
  }
}

const counter = new Counter({
  readableHighWaterMark: 2,
  writableHighWaterMark: 2
});

(async () => {
  let chunk = counter.read();

  while (chunk !== null) {
    const canWrite = counter.write(chunk);

    console.log(`Can we write bunch of data? ${canWrite}`);

    if (!canWrite) {
      await events.once(counter, 'drain');
      console.log('drain event fired.');
    }

    chunk = counter.read();
  }
})();
Transform stream
Этот стрим является Duplex стримом. Он нужен для преобразования порции данных и отправки дальше по цепочке. Его можно реализовать таким же способом, как и остальные стримы.
const { Transform } = require('stream');

class myTransform extends Transform {
  _transform(chunk, encoding, callback) {}
}
- _transform — это приватный метод, который вызывается внутренними методами класса Transform для преобразования порции данных. Он принимает 3 параметра: chunk (часть данных), encoding (кодировка, если chunk это строка), callback (функция, которая вызывается после успешной или неудачной записи).
С помощью этого метода и будет происходить изменение порции данных. Внутри этого метода мы можем вызвать transform.push() ноль или несколько раз, который фиксирует изменения. Когда мы завершим преобразование данных, мы должны вызвать callback, который отправит все, что мы добавляли в transform.push(). Первый параметр этой callback функции — это ошибка. Также мы можем не использовать transform.push(), а отправить измененные данные вторым параметром в функцию callback (пример: callback(null, data)). Для того, чтобы понять как использовать этот вид стрима, давайте разберем метод stream.pipe.
- stream.pipe — этот метод используется для соединения Readable стрима с Writable стримом, а также для создания цепочек стримов. Это значит, что мы можем считывать часть данных и передавать в следующий стрим для обработки, а потом в следующий и т д.
Давайте напишем Transform стрим, который будет добавлять символ * в начало и конец каждой части данных.
class CounterReader extends Readable {
  constructor(opt) {
    super(opt);

    this._max = 1000;
    this._index = 0;
  }

  _read() {
    this._index += 1;

    if (this._index > this._max) {
      this.push(null);
    } else {
      const buf = Buffer.from(`${this._index}`, 'utf8');

      this.push(buf);
    }
  }
}

class CounterWriter extends Writable {
  _write(chunk, encoding, callback) {
    console.log(chunk.toString());

    callback();
  }
}

class CounterTransform extends Transform {
  _transform(chunk, encoding, callback) {
    try {
      const resultString = `*${chunk.toString('utf8')}*`;

      callback(null, resultString);
    } catch (err) {
      callback(err);
    }
  }
}

const counterReader = new CounterReader({ highWaterMark: 2 });
const counterWriter = new CounterWriter({ highWaterMark: 2 });
const counterTransform = new CounterTransform({ highWaterMark: 2 });

counterReader.pipe(counterTransform).pipe(counterWriter);
Stream instanceof EventEmitter
Все потоки являются экземплярами EventEmitter, то есть можно генерировать события StreamClass.emit('eventName', data), и обрабатывать их StreamClass.on('eventName', (data)=>{});
Метод pipe
Чтобы передать данные из одного потока в другой, самый простой способ вызвать над потоками метод pipe:
Readable.pipe(Writable);//например, по "схеме" DataBase -> File
Readable.pipe(Transform).pipe(Writable);//DataBase -> преобразовать в JSON формат -> сохранить JSON в File
Duplex.pipe(Transform).pipe(Duplex);//прочитать из DataBase -> обработать -> записать обратно в DataBase результат
Buffering
Потоки хранят данные в своем внутреннем буфере. Размер буфера можно указать через параметр highWaterMark, который можно задать в конструкторе класса.
Физический смысл значение highWaterMark зависит от другой опции — objectMode.
new StreamObject({objectMode: false, highWaterMark: кол_во_байт}); //по умолчанию 16384 (16kb)
new StreamObject({objectMode: true, highWaterMark: кол_во_объектов});//по умолчанию  16
В Readable потоке данные буферизируются, когда над ним вызвается метод push(data), и остаются в буфере до тех пор, пока их не прочитают, вызвав метод read(). Как только общий размер внутреннего буфера Readable потока достигнет порогового значения, указанного в highWaterMark, поток временно прекратит чтение данных.
Для Writable буферизация происходит во время вызова над ним метода write(data). Метод вернет true, пока размер буфера не достиг значения highWaterMark, и false, когда буфер переполнен. При использовании метода pipe(), как раз в этот момент он «останавливает» чтение данных, ожидает событие «drain», после чего передача данных возобновляется.
Buffer
Streams work on a concept called buffer.
A *buffer is a temporary memory that a stream takes to hold some data until it is consumed.
In a stream, the buffer size is decided by the highWatermark property on the stream instance which is a number denoting the size of the buffer in bytes.
A buffer memory in Node by default works on String and Buffer. We can also make the buffer memory work on JavaScript objects. To do so, we need to set the property objectMode on the stream object to true.
If we try to push some data into the stream, the data is pushed into the stream buffer. The pushed data sits in the buffer until the data is consumed.
If the buffer is full and we try to push data to a stream, the stream does not accept that data and returns with a false value for the push action.
Node.js provides Buffer class which provides instances to store raw data.
//create an uninitiated Buffer of 10 octets
let bufferOne = new Buffer(10);
//create a Buffer from a given array
let bufferTwo = new Buffer([10, 20, 30, 40, 50]);
//create a Buffer from a given string
let bufferThree = new Buffer('Simply Easy Learning');
Working on Buffer:
let buffer = Buffer.alloc(26);
for(let i=0; i<26; i++){
    buffer[i]=i+97;
}
console.log(buffer.toString('utf8'));// a, b, c.....z
Example
async function post(req, res, next) {
  try {
    const maxFileSize = 1024 * 1024 * 50; // 50 MB
    let contentBuffer = [];
    let totalBytesInBuffer = 0;
    let contentType = req.headers['content-type'] || 'application/octet';
    let fileName = req.headers['x-file-name'];

    if (fileName === '') {
      res.status(400).json({error: `The file name must be passed in the via x-file-name header`});
      return;
    }

    req.on('data', chunk => {
      contentBuffer.push(chunk);
      totalBytesInBuffer += chunk.length;

      // Look to see if the file size is too large.
      if (totalBytesInBuffer > maxFileSize) {
        req.pause();

        res.header('Connection', 'close');
        res.status(413).json({error: `The file size exceeded the limit of ${maxFileSize} bytes`});

        req.connection.destroy();
      }
    });

    // Could happen if the client cancels the upload.
    req.on('aborted', function() {
      // Nothing to do with buffering, garbage collection will clean everything up.
    });

    req.on('end', async function() {
      contentBuffer = Buffer.concat(contentBuffer, totalBytesInBuffer);

      try {
        const fileId = await files.create(fileName, contentType, contentBuffer);

        res.status(201).json({fileId: fileId});
      } catch (err) {
        console.error(err);

        res.header('Connection', 'close');
        res.status(500).json({error: 'Oops, something broke!'});

        req.connection.destroy();
      }
    });
  } catch (err) {
    next(err);
  }
}
Memory management
Understanding V8's Memory Handling
Definitions
- resident set size: is the portion of memory occupied by a process that is held in the RAM, this contains:
- the code itself
- the stack
- the heap
- stack: contains primitive types and references to objects
- heap: stores reference types, like objects, strings or closures
- shallow size of an object: the size of memory that is held by the object itself
- retained size of an object: the size of the memory that is freed up once the object is deleted along with its' dependent objects
How The Garbage Collector Works
Garbage collection is the process of reclaiming the memory occupied by objects that are no longer in use by the application. Usually, memory allocation is cheap while it's expensive to collect when the memory pool is exhausted.
An object is a candidate for garbage collection when it is unreachable from the root node, so not referenced by the root object or any other active objects. Root objects can be global objects, DOM elements or local variables.
The heap has two main segments, the New Space and the Old Space. The New Space is where new allocations are happening; it is fast to collect garbage here and has a size of ~1-8MBs. Objects living in the New Space are called Young Generation. The Old Space where the objects that survived the collector in the New Space are promoted into - they are called the Old Generation. Allocation in the Old Space is fast, however collection is expensive so it is infrequently performed .
Why is garbage collection expensive?
The V8 JavaScript engine employs a stop-the-world garbage collector mechanism. In practice, it means that the program stops execution while garbage collection is in progress.
Usually, ~20% of the Young Generation survives into the Old Generation. Collection in the Old Space will only commence once it is getting exhausted. To do so the V8 engine uses two different collection algorithms:
- Scavenge collection, which is fast and runs on the Young Generation,
- Mark-Sweep collection, which is slower and runs on the Old Generation.
Tools / Technics You Can Use to Find a Memory Leak in Node.js
With the heapdump module, you can create a heap snapshot for later inspection. Adding it to your project is as easy as:
npm install heapdump --save
Then in your entry point just add:
var heapdump = require('heapdump');

heapdump.writeSnapshot(function(err, filename) {
  console.log('dump written to', filename);
});
Once you have your snapshots, it's time to make sense of them. Make sure you capture multiple of them with some time difference so you can compare them.
const arr = [1, 2, 3, 4, 5, 6, 9, 7, 8, 9, 10];
arr.reverse();
const used = process.memoryUsage();
for (let key in used) {
  console.log(`${key} ${Math.round(used[key] / 1024 / 1024 * 100) / 100} MB`);
rss 25.63 MB
heapTotal 5.49 MB
heapUsed 3.6 MB
external 0.01 MB
Express
session management
By default Express requests are sequential and no request can be linked to each other. There is no way to know if this request comes from a client that already performed a request previously.
Users cannot be identified unless using some kind of mechanism that makes it possible.
That’s what sessions are.
When implemented, every user of your API or website will be assigned a unique session, and this allows you to store the user state.
Session handling in any web application is very important and is a must-have feature, without it, we won’t be able to track user and it’s activity.
npm install --save express express-session body-parser
const express = require('express');
const session = require('express-session');
const bodyParser = require('body-parser');
const redis = require('redis');
const redisStore = require('connect-redis')(session);
const client  = redis.createClient();
const router = express.Router();
const app = express();

app.use(session({
    secret: 'ssshhhhh',
    // create new redis store.
    store: new redisStore({ host: 'localhost', port: 6379, client: client, ttl : 260 }),
    saveUninitialized: false,
    resave: false
}));

app.use(bodyParser.json());
app.use(bodyParser.urlencoded({extended: true}));
app.use(express.static(__dirname + '/views'));

router.get('/',(req,res) => {
    let sess = req.session;
    if(sess.email) {
        return res.redirect('/admin');
    }
    res.sendFile('index.html');
});

router.post('/login',(req,res) => {
    req.session.email = req.body.email;
    res.end('done');
});

router.get('/admin',(req,res) => {
    if(req.session.email) {
        res.write(`<h1>Hello ${req.session.email} </h1><br>`);
        res.end('<a href='+'/logout'+'>Logout</a>');
    }
    else {
        res.write('<h1>Please login first.</h1>');
        res.end('<a href='+'/'+'>Login</a>');
    }
});

router.get('/logout',(req,res) => {
    req.session.destroy((err) => {
        if(err) {
            return console.log(err);
        }
        res.redirect('/');
    });

});

app.use('/', router);

app.listen(process.env.PORT || 3000,() => {
    console.log(`App Started on PORT ${process.env.PORT || 3000}`);
});
Here ‘secret‘ is used for cookie handling etc but we have to put some secret for managing Session in Express.
Where is the session data stored? It depends on how you set up the express-session module.
It can store session data in:
- memory, not meant for production
- a database like MySQL or Mongo
- a memory cache like Redis or Memcached
All solutions store the session id in a cookie, and keep the data server-side. The client will receive the session id in a cookie, and will send it along with every HTTP request.
We’ll reference that server-side to associate the session id with the data stored locally.
Memory is the default, it requires no special setup on your part, it’s the simplest thing but it’s meant only for development purposes.
The best choice is a memory cache like Redis, for which you need to setup its own infrastructure.
Example with Memcached:
const MemcachedStore = require('connect-memcached')(session);

app.use(cookieParser());
app.use(session({
      secret  : 'some-private-key',
      key     : 'test',
      proxy   : 'true',
      store   : new MemcachedStore({
        hosts: ['127.0.0.1:11211'], //Memcached server host url
        secret: '123, ABC' // Optionally use transparent encryption for memcache session data
    })
}));
Messaging
Message queues are software-engeneering components used for inter-process communication (IPC), or for inter-thread communication within the same process
what is message
Offloading work to a separate process is key to building scalable web applications and APIs. You need to be able to transfer compute intensive tasks from the request/response lifecycle. When building applications you can use one of two interaction patterns:
Request-Response (synchronous): An answer is returned with a response. For example, in e-commerce applications, a user is notified immediately if a submitted order has been processed or if there are any issues. Fire-and-forget (asynchronous): A request has been received and an alternative means to get the response is provided. For example, when users import a large amount of data that needs to be processed, they receive acknowledgement that the data has been received and instructed to check an import queue to view the status. Or, a message is sent upon import completion. In both synchronous and asynchronous operations, you can offload processing and free up resources so that the application can handle other requests. This is done using message queue. Message queues come in many shapes and sizes, and can organize the flow of messages in different ways. A very important advantage of using message queues in your project is feature growth, because what may start as a simple project can easily grow into a monster if not planned properly. We suggest considering RabbitMQ.
RabbitMQ
RabbitMQ Benefits
RabbitMQ is an open source message broker software that implements the Advanced Message Queuing Protocol (AMQP). A message broker is an architectural pattern for message validation, transformation and routing. It gives applications a common platform to send and receive messages and a safe place for messages to live until received. Some of the benefits we've seen from using RabbitMQ include:
- Connectability and scalability through messaging (i.e., applications can connect to each other as components of a larger application)
- Asynchronous messaging (decoupling applications by separating sending and receiving data)
- Robust messaging for applications
- Runs on all major operating systems
- Supports a huge number of developer platforms
- Open source and commercially supported
Main Concepts
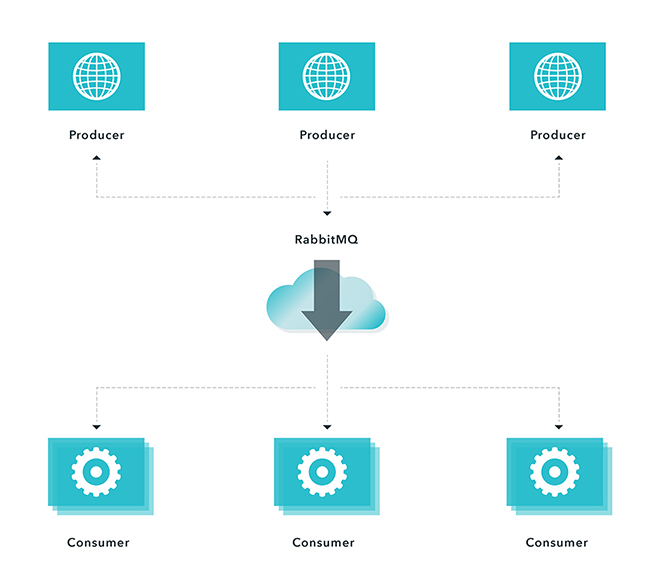
RabbitMQ is a very powerful concept when building applications that need to scale. It is a common pattern when building distributed systems to have a work queue that separates work producers from consumers (workers).
- Messages are sent by Producers
- Messages are delivered to Consumers
- Messages go through a Channel
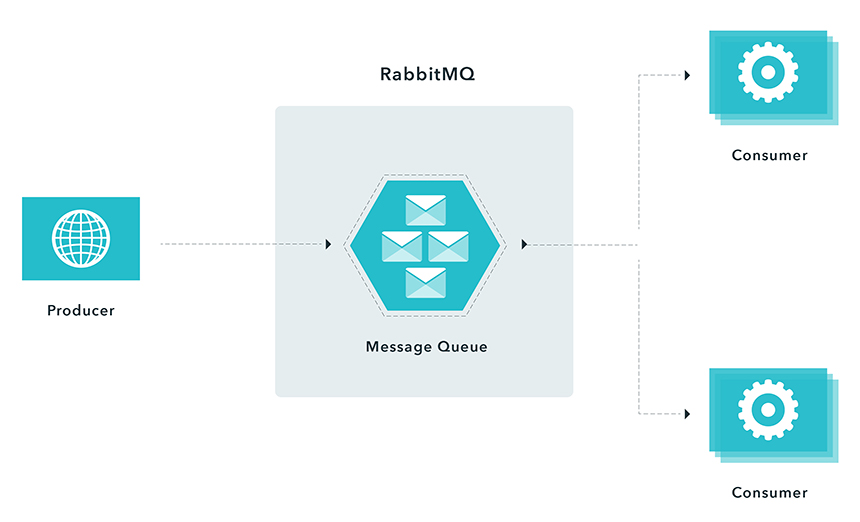
Using Rabbit MQ with a competing consumers messaging pattern
To illustrate, consider a user who needs to import a large amount of data. Processing this data is a CPU-intensive task. A naive implementation could be:
- User uploads data (request)
- Server processes the data
- Respond to the user with a result (reply)
If you try to process this data directly using a Node.js process, you will be blocking event loop. Any requests that come in during data processing will have to wait, which is not good. The system is unresponsive. A better approach would be:
- User uploads data (request)
- Server sends a message to a queue
- A response is sent to the user with a message that data has been received successfully and will be processed (reply).
The message that was sent to a queue contains all required information (user information, file location,etc.), and will be picked up and processed by an available consumer (worker). The user will be notified after the data has been processed. This approach (fire-and-forget) has several advantages:
- The server is able to handle other requests immediately
- Processing is delayed if there are no resources available at that moment
- Processing is retried if it fails the first time
In the above example we applied a competing consumer pattern. When there is a message in a queue, any of the consumers could potentially receive it. Simply speaking, consumers compete with each other to be the message receiver.
Using Rabbit MQ with a remote procedure call pattern
In instances when you have to respond synchronously (request/reply) within a reasonable amount of time, but need to do relatively expensive computations, you can use a remote procedure messaging pattern commonly known as Remote Procedure Call (RPC). This entails a producer sending a message and a server replying with a response message as demonstrated in the following figure.
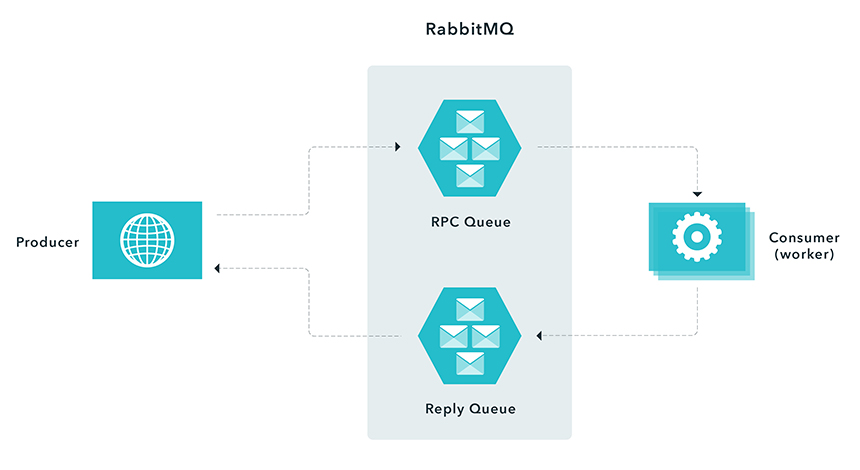
Using RabbitMQ - Procedure Call Pattern When a producer connects to a RPC queue, it creates an anonymous exclusive callback queue. It then sends a message with a replyTo property, so that the worker knows where to send a response. The worker is waiting for messages from the RPC queue. After the worker is done processing the message it sends a message back to the Reply Queue. The producer waits for a response by listening to the Reply Queue.
In this scenario, you need to ensure that you have enough workers to process incoming messages. However, you effectively move the load from the Node.js process to another server. When possible, avoid RPC, if you can use an asynchronous approach.
It is a common pattern in systems to process workloads separately. This eliminates tight coupling between producers and consumers, which enables application to be simpler and easier to scale. There are many advantages and benefits of using this approach.
- Decoupling - separate work producers and consumers
- Reliability - easy to implement retry logic
- Efficiency - distributing workload throughout the time
- Scalability - distributing work throughout nodes
- Making external systems easier to integrate
The same principles can be applied using other queues (ZeroMQ, Kafka, ActiveMQ, Amazon SQS, Azure ServiceBus and more). In followup posts, we will explore implementation details.
RabbitMQ Alternatives & Comparisons
Kafka: Kafka is a distributed, partitioned, replicated commit log service. It provides the functionality of a messaging system, but with a unique design.
ActiveMQ: Apache ActiveMQ is fast, supports many Cross Language Clients and Protocols, comes with easy to use Enterprise Integration Patterns and many advanced features while fully supporting JMS 1.1 and J2EE 1.4. Apache ActiveMQ is released under the Apache 2.0 License.
ZeroMQ: The 0MQ lightweight messaging kernel is a library which extends the standard socket interfaces with features traditionally provided by specialised messaging middleware products. 0MQ sockets provide an abstraction of asynchronous message queues, multiple messaging patterns, message filtering (subscriptions), seamless access to multiple transport protocols and more.
Amazon SNS: Amazon Simple Notification Service makes it simple and cost-effective to push to mobile devices such as iPhone, iPad, Android, Kindle Fire, and internet connected smart devices, as well as pushing to other distributed services. Besides pushing cloud notifications directly to mobile devices, SNS can also deliver notifications by SMS text message or email, to Simple Queue Service (SQS) queues, or to any HTTP endpoint.
Redis: Redis is an open source, BSD licensed, advanced key-value store. It is often referred to as a data structure server since keys can contain strings, hashes, lists, sets and sorted sets.
advantages and disadvantages (RabbitMQ)
Advantages:
- Messages guaranteed delivery.
- Discovery managed through brokers.
Disadvantages
- Much slower, high latency
- More to deploy & maintain (brokers/RabbitMQ need installing on machines, it's not just built into the modules)
libraries for messaging
- ZeroMQ
- Kafka
- ActiveMQ
- Amazon SQS
- Azure ServiceBus
Meteor.js
The Meteor docs defines meteor as a full-stack JavaScript platform for developing modern web and mobile applications. It’s major advantage is it’s realtime update. As changes are made to the web app, it automatically updates the template with the latest changes.
The Node.js framework makes development quite very simplified by providing a platform for the entire tier of the application to be in the same language; JavaScript. Making it function just as efficient in both the server and client side.
Meteor stands the capability of serving large projects like reaction commerce( known to be one of the largest and most popular e-commerce open source projects).
The most fascinating aspect of the Meteor framework is the very rich and organised documentation/large community it has, helping users learn fast by reaching out and getting their hands dirty with projects, very fast.
With the fact that meteor is leveraging on the Facebook GraphQL datastack to come up with meteor Apollo, as far back as 2016, only indicates that they have good plans and a visionary perception of what the future holds for data, how it is managed and how it flows. If there is any list of Node.js frameworks to watch out for, I would probably be arrested if I did not add Meteor to that list.
minimongo and synchronization process
Meteor uses a version of MongoDB (minimongo), to store all of the data from your models. It's capable of using any other NoSQL/document-oriented database, but MongoDB comes by default with the Meteor installation. This feature makes your programs much simpler and easier to write, and works really well for quick, lightweight data storage.
Using a publish/subscribe model, Meteor is constantly looking for changes to collections and to Session variables. When changes are made, a change event is broadcast (or published). Callback functions are listening (or subscribed) to the events being broadcast, and the code in a function is activated when the specific event it's subscribed to is published. Alternatively, the data model can be directly bound to portions of the HTML/Handlebars templates, so that when a change occurs, the HTML is re-rendered.
Published events
When a collection or a variable is modified, Meteor publishes the appropriate change event. If a document is added to a collection, an event is triggered. If a document already in a collection is modified and then saved back into the collection, an event is triggered. Finally, if a Session variable is changed, an event is triggered. Functions and templates are listening (subscribed) to the specific events, and will process the change in the data appropriately.

Meteor's MVVM is a clean, concise development pattern:
- Set up subscribers to model changes (model = collections, documents, and Session variables).
- Create logic to handle view events (view events = button click, text input, and so on).
- Change the model, when the logic calls for it (changes = published events).
- Remove autopublish (used only for tests):
meteor remove autopublish - Manually publish event
Meteor.publish("Categories", function() {
  return lists.find({},{fields:{Category:1}});
});
This tells the server to publish a "Categories" event. It will publish this whenever a change is made to the variables found inside the function. In this case, it's lists. find(). Whenever a change is made that would affect the results of lists.find(), Meteor will trigger/publish an event.
3. Inside the if (Meteor.isClient) function, at the very top, just inside the opening bracket, enter the following line of code:
Meteor.subscribe("Categories");
Hapijs
npm i @hapi/hapi @hapi/boom filepaths hapi-boom-decorators
Simple server;
const Hapi = require('@hapi/hapi');

const init = async () => {

    const server = Hapi.server({
        port: 3000,
        host: 'localhost'
    });

    // routes
    server.route({
        method: 'GET',
        path: '/',
        handler: (request, h) => {

            return 'Hello World!';
        }
    });

    await server.start();
    console.log('Server running on %s', server.info.uri);
};

process.on('unhandledRejection', (err) => {

    console.log(err);
    process.exit(1);
});

init();
main concept
While Express relies heavily on middleware for much of its functionality, hapi has more built into the core. Body parsing, cookie handling, input/output validation, and HTTP-friendly error objects are already built-in to the hapi framework. For additional functionality, hapi has a robust selection of plugins in its core ecosystem. hapi is also the only framework that doesn't rely on outside dependencies. Every dependency is managed by the core hapi team, which makes security and reliability some of hapi's greatest strengths.
Routes
Routes in hapi get called in a specific order, so you will never have an issue where two routes are conflicting with one another. Routes are called from most specific to least specific. For example, a route with a path /home will be called before /{any*}.
Express:
app.get('/hello', function (req, res) {
  res.send('Hello World!');
  });
Hapi:
server.route({
    method: 'GET',
    path:'/',
    handler: (request, h) => {

      return 'Hello World!';
    }
});
Methods
Hapi can use all the route methods that Express can, except HEAD. hapi also has the ability to use multiple methods on a single route object.
server.route({
    method: ['PUT', 'POST'],
    path: '/',
    handler: function (request, h) {

        return 'I did something!';
    }
});
To use all available methods, like in Express app.all(), use method: *.
Path
Like in Express, the path option in hapi must be a string, which can also contain parameters. Parameters in Express are preceded by :, such as: /users/:userId. In hapi, you would put the parameter in curly braces, like: path: /users/{userId}.
Parameters
You saw above how hapi handles simple parameters as compared to Express. Both hapi and Express handle optional parameters the same way. Just like Express, to make a parameter optional in hapi, just include a ? after the parameter: path: /hello/{user?}.
Accessing the parameters in hapi is very similar to Express. As you know, in Express, the parameters are populated in the req.params object. In hapi, the parameters are available via the request.params* object. Here is an example of both:
Express:
app.get('/hello/:name', function (req, res) {

    const name = req.params.name
    res.send('Hello ' + name);
});
Hapi:
server.route({
    method: 'GET',
    path: '/hello/{name}',
    handler: function (request, h) {

        const name = request.params.name;
        return 'Hello ' + name
    }
})
Query parameters are also similar in both frameworks. In Express, the are available via req.query and hapi they are available via request.query.
Handler
There are differences in the way Express and hapi structure their route handlers. Unlike Express, which has a handler with parameters of req and res, hapi has a handler with parameters of request and h. The second parameter, h is the response toolkit, which is an object with several methods used to respond to the request.
Here is an example of route with a handler that redirects to another route in Express and hapi:
Express:
app.get('/home', function (req, res) {

    res.redirect('/');
});
hapi:

server.route({
    method: 'GET',
    path: '/home',
    handler: function (request, h) {

        h.redirect('/');
    }
});
Both routes will redirect to the / route. Express uses the response method res.redirect whereas hapi uses h.redirect which is part of the response toolkit. There are Express response methods that hapi can accomplish by just using return. Some of these methods include res.send and res.json. Here is an example of how hapi will respond with JSON data:
server.route({
    method: 'GET',
    path: '/user',
    handler: function (request, h) {

        const user = {
            firstName: 'John',
            lastName: 'Doe',
            userName: 'JohnDoe',
            id: 123
        }

        return user;
    }
});
hapi has the functionality to respond with JSON data by default. They only thing you have to do is just return a valid JavaScript object and hapi will take care of the rest for you.
Middleware vs Plugins and Extensions
To extend its functionality, Express uses middleware. Middleware essentially is a sequence of functions using callbacks to execute the next function. The issue with this is as your application grows in size and complexity, the order at which middleware executes becomes more crucial and more difficult to maintain. Having a middleware execute before one it's dependant on will cause you application to fail. hapi fixes this issue with its robust plugin and extension system.
Plugins allow you to break your application logic into isolated pieces of business logic, and reusable utilities. Each plugin comes with its own dependencies which are explicitly specified in the plugins themselves. This means you don't have to install dependencies yourself to make your plugins work. You can either add an existing hapi plugin, or write your own.
Each request in hapi follows a predefined path, the request lifecycle. hapi has extension points that let you create custom functionality along the lifecycle. Extension points in hapi let you know the precise order at which you application will run. For more info, please see the hapi request lifecycle.
Extension Points
hapi has 7 extension points along the request lifecycle. In order, they are onRequest, onPreAuth, onCredentials, onPostAuth, onPreHandler, onPostHandler, and onPreResponse. To add a function to an extension point, you call server.ext().
server.ext('onRequest', function (request, h) {

    request.setUrl('/test');
    return h.continue
});
This function will run at onRequest, which is the first extension point. onRequest is run just after the server receives the request object, before the route lookup. What this function will do is reroute all requests to the /test route.
Creating a Plugin
As you know, you can write your own middleware in Express. The same is true with hapi plugins. A plugin is an object with with required name and register properties. The register property is a function with the signature of async function (server, option). Lets look at how to create a basic plugin:
Express:
const getDate = function (req, res, next) {

    req.getDate = new Date();
    next()
}
hapi:
const getDate = {
    name: 'getDate',
    version: '1.0.0',
    register: async function (server, options) {

        const currentDate = function() {

            const date = new Date();
            return date
        }

        server.decorate('toolkit', 'getDate', currentDate);
    }
}
The hapi plugin will save the current date in h.getDate(). We can then use this in any of our route handlers
Loading a Plugin
In Express, you load middleware by calling the app.use() method. In hapi, you call the server.register() method. Lets load the plugin we created in the previous section:
Express:
app.use(getDate);
hapi:
server.register({
    plugin: getDate
})
You can all addition options for you plugin by setting the options property on server.register().
body-parser
hapi has parsing abilities built into its core. Unlike Express, you do not need middleware to parse payload data. In fact, you may need to install up to four additional middlewares in Express depending on what kind of data you would like to parse. In hapi the payload data, whether its JSON or plain text, is readily available in the request.payload object. Here is a side by side comparison of parsing simple payload data:
Express:
var bodyParser = require('body-parser');

app.use(bodyParser.urlencoded({extend: true}));

app.post('/hello', function (req, res) {

  var name = req.body.name
  res.send('Hello ' + name);
  });
hapi:
server.route({
    method: 'POST',
    path: '/hello',
    handler: function (request, h) {

        const name = request.payload.name
        return `Hello ` + name;
    }
});
To parse a JSON object in express, you have to specify it:
app.use(bodyParser.json())
JSON parsing is built into hapi, so there are no further steps needed.
Passport -> bell
In Express, third party authentication is handled with Passport. In hapi, you use the bell module for third party authentication. bell has over 30 predefined configurations for OAuth providers including Twitter, Facebook, Google, GitHub, and more. It will also allow you to set up your own custom provider. bell was developed and is maintained by the core hapi team, so you know stability and reliability won't be an issue. Lets look how to authenticate using your Twitter credentials:
express-validator -> joi
To validate data in Express, you make use of the express-validator plugin. One of the biggest drawbacks to express-validator is that while you can validate a request, there is no clear way of validating a response. In hapi, you use the joi module, which can validate requests and responses with ease. Joi allows you to create your own validations with a simple and clean object syntax.
Error Handling -> boom
hapi uses the boom module to handle errors. By default, boom will return the errors in JSON format. Express on the other hand will return a text response by default, which is suboptimal with a JSON API. Lets look a 404 error response with the default settings by submitting a GET request to '/hello', which does not exists:
Express:
Cannot GET /hello
hapi:
{
    "statusCode": 404,
    "error": "Not Found",
    "message": "Not Found"
}
advantages and disadvantages
Advantages
- It provides a robust plugin system that allows you to add new features and fix bugs at a fast pace.
- It enables you to build scalable APIs.
- There is a deeper control over request handling.
- It is an excellent choice for building Representational State Transfer (REST) APIs because it provides you with routing, input, output validation, and caching.
- You can build an API that serves all kinds of clients that need mobile and single-page applications.
- Detailed API reference and good support for document generation.
- You can use hapi.js with any front-end framework, like React, Angular, and Vue.js to create a single-page application.
- Configuration-based approach to some sub-middlewares(pseudo-middlewares)
- Provides the availability of caching, authentication, and input validation.
- Has a plugin-based architecture for scaling.
- Provides really good enterprise plugins such as joi, yar, catbox, boom, tv, and travelogue.
Disadvantages
- Developers need to figure out the code structure on their own.
- “Locks” developers into using hapi-specific modules and plugins such as catbox, joi, boom, tv, good, travelogue, and yar; and which are not compatible with Express/Connect.
- Endpoints are created manually and must be tested manually.
- Refactoring is manual.
applicability
Hapi is a rich framework for building applications and services. It enables developers to focus on writing reusable application logic instead of spending time building infrastructure.
It is a configuration-driven pattern, traditionally modeled to control web server operations. A unique feature Hapi has is the ability to create a server on a specific IP, with features like the onPreHandler, we can do something with a request before it is completed by intercepting it and doing some pre-processing on the request.
Koajs
Koa was built by the same team behind Express, and aims to be a smaller, more expressive, and more robust foundation for web applications and APIs. By leveraging async functions, Koa allows you to ditch callbacks and significantly increase error-handling. Koa does not bundle any middleware within its core, and it provides an elegant suite of methods that make writing servers fast and enjoyable.
A Koa application is an object containing an array of middleware functions which are composed and executed in a stack-like manner upon request.
main concept
const Koa = require('koa')
const logger = require('koa-morgan')
const Router = require('koa-router')
const bodyParser = require('koa-body')()

const server = new Koa()
const router = new Router()

router.get('/', ctx => {
  ctx.body = 'I am root!'
})

router.get('/second_route', ctx => {
  ctx.body = 'I am second_route'
})

router.post('/something', ctx => {
  ctx.body = {
    something: 'something here'
  }
})

server
  .use(logger('tiny'))
  .use(router.routes())
  .listen(3001)
A Koa application is an object containing an array of middleware functions which are composed and executed in a stack-like manner upon request. Koa is similar to many other middleware systems that you may have encountered such as Ruby's Rack, Connect, and so on - however a key design decision was made to provide high level "sugar" at the otherwise low-level middleware layer. This improves interoperability, robustness, and makes writing middleware much more enjoyable.
This includes methods for common tasks like content-negotiation, cache freshness, proxy support, and redirection among others. Despite supplying a reasonably large number of helpful methods Koa maintains a small footprint, as no middleware are bundled.
advantages and disadvantages
Advantages
- Koa improves interoperability, robustness, and makes writing middleware much more enjoyable.
- Has a large number of helpful methods but maintains a small footprint, as no middleware are bundled.
- Koa is very lightweight, with just 550 lines of code.
- Has a very good user experience.
- Better error handling through try/catch.
- Generated-based control flow.
- No more callbacks, facilitating an upstream and downstream flow of control.
- Cleaner, more readable async code.
Disadvantages
- The open source community around Koa is relatively small.
- Not compatible with Express-style middleware.
- Koa uses generators which are not compatible with any other type of Node.js framework middleware.
applicability
With Koa.js you can build web apps with great performance. This is because you can stop using callbacks, deal with errors faster, and because Koa itself is a very lightweight framework. As well as that, it makes the code management process easier.
It’s important to take into account the best practices for having a better performance in Node.js like running things in parallel, use asynchronous APIs in your code, keeping code small and light, and using gzip compression.