Competent
Modules:
Control flow (Async tasks, Callbacks):
Package.json:
Reading and Writing Files:
HTTP create server:
Process:
Express:
Modules
importing own written modules
In Node, modules are referenced either by f le path or by name. A module that is referenced by a name will eventually map into a f le path unless the module is a core module. Node’s core modules expose some Node core functions to the programmer, and they are preloaded when a Node process starts. Other modules include third-party modules that you installed using NPM (Node Package Manager) or local modules that you or your colleagues have created. Each module of any type exposes a public API that the programmer can use after the module is imported into the current script. To use a module of any type, you have to use the require function like this:
const module = require('module_name');
EXPORTING A MODULE
The CommonJS module system is the only way you can share objects or functions among f les in Node. For a suff ciently complex application you should divide some of the classes, objects, or functions into reusable well-def ned modules.
function Circle(x, y, r) {

  function r_squared() {
    return Math.pow(r, 2);
  }

  function area() {
    return Math.PI * r_squared();
  }

  return {
    area: area
  };
}

module.exports = Circle;
You can also export more complex objects. module.exports is initialized with an empty object, which you can populate with the attributes you want to export. For instance, you can devise a module that exports a set of functions:
function printA() {
  console.log('A');
}

function printB() {
  console.log('B');
}

function printC() {
  console.log('C');
}

module.exports.printA = printA;
module.exports.printB = printB;
module.exports.pi = Math.PI;
Loading a Module
Caching Modules
Modules are cached the f rst time they are loaded, which means that every call to require('myModule') returns exactly the same module if the module name resolves to the exact same filename.
There are several ways to reference modules, depending on which kind of module it is — a core module, a third-party module installed via NPM, or a local module
Loading a Core Module
const http = require('http');Loading a File Module
const myModule = require('/home/pedro/my_modules/my_module');
const myModule1 = require('../my_modules/my_module');
const myModule2 = require('./lib/my_module_2');
Loading a Folder Module
const myModule = require('./myModuleDir');Loading from the node_modules Folder
const bodyParser = require('body-parser');
SUMMARY
Node sets aside JavaScript’s default global namespace and uses CommonJS modules instead. This enables you to better organize your code, thus avoiding security issues and bugs. You can use require() to load a core module, a third-party module, or your own module from a f le or a folder.
You can load non-core modules using relative or absolute f le paths. You can also load your modules by name if you place them inside the node_modules folder or install them using NPM.
You can create your own modules by authoring a JavaScript f le that exports the objects that represent the module API.
algorhytm for modules searching (node_modules in the different levels)
require(X) from module at path Y
1. If X is a core module,
   a. return the core module
   b. STOP
2. If X begins with '/'
   a. set Y to be the filesystem root
3. If X begins with './' or '/' or '../'
   a. LOAD_AS_FILE(Y + X)
   b. LOAD_AS_DIRECTORY(Y + X)
4. LOAD_NODE_MODULES(X, dirname(Y))
5. THROW "not found"

LOAD_AS_FILE(X)
1. If X is a file, load X as JavaScript text.  STOP
2. If X.js is a file, load X.js as JavaScript text.  STOP
3. If X.json is a file, parse X.json to a JavaScript Object.  STOP
4. If X.node is a file, load X.node as binary addon.  STOP

LOAD_INDEX(X)
1. If X/index.js is a file, load X/index.js as JavaScript text.  STOP
2. If X/index.json is a file, parse X/index.json to a JavaScript object. STOP
3. If X/index.node is a file, load X/index.node as binary addon.  STOP

LOAD_AS_DIRECTORY(X)
1. If X/package.json is a file,
   a. Parse X/package.json, and look for "main" field.
   b. If "main" is a falsy value, GOTO 2.
   c. let M = X + (json main field)
   d. LOAD_AS_FILE(M)
   e. LOAD_INDEX(M)
   f. LOAD_INDEX(X) DEPRECATED
   g. THROW "not found"
2. LOAD_INDEX(X)

LOAD_NODE_MODULES(X, START)
1. let DIRS = NODE_MODULES_PATHS(START)
2. for each DIR in DIRS:
   a. LOAD_AS_FILE(DIR/X)
   b. LOAD_AS_DIRECTORY(DIR/X)

NODE_MODULES_PATHS(START)
1. let PARTS = path split(START)
2. let I = count of PARTS - 1
3. let DIRS = [GLOBAL_FOLDERS]
4. while I >= 0,
   a. if PARTS[I] = "node_modules" CONTINUE
   b. DIR = path join(PARTS[0 .. I] + "node_modules")
   c. DIRS = DIRS + DIR
   d. let I = I - 1
5. return DIRS
Events
Most of Node’s objects — like HTTP requests, responses, and streams — implement the EventEmitter module so they can provide a way to emit and listen to events.
The EventEmitter is a module that facilitates communication between objects in Node. EventEmitter is at the core of Node asynchronous event-driven architecture. Many of Node’s built-in modules inherit from EventEmitter.
The concept is simple: emitter objects emit named events that cause previously registered listeners to be called. So, an emitter object basically has two main features:
- Emitting name events.
- Registering and unregistering listener functions.
To work with the EventEmitter, we just create a class that extends EventEmitter.
class MyEmitter extends EventEmitter {

}
Order of Listeners
If we register multiple listeners for the same event, the invocation of those listeners will be in order. The first listener that we register is the first listener that gets invoked.
If you need to define a new listener, but have that listener invoked first, you can use the prependListener method.
const events = require('events');
const eventEmitter = new events.EventEmitter();

const ringBell = function ringBell() {
  console.log('ring ring ring');
}

eventEmitter.on('doorOpen', ringBell);
eventEmitter.emit('doorOpen');
We could also have done this, for example:
eventEmitter.on('doorOpen', ringBell);
eventEmitter.on('doorOpen', doSomething);
eventEmitter.on('doorOpen', doSomethingElse);

eventEmitter.emit('doorOpen');
eventEmitter.removeListener('doorOpen', ringBell);
eventEmitter.removeAllListeners('doorOpen');
Control flow (Async tasks, Callbacks):
Async await
Just by adding a for loop and an if statement to our asynchronous code makes it much harder to read and understand. This kind of complexity can only be sustained for so long before it becomes too difficult to work with.
The new async/await syntax allows you to still use Promises, but it eliminates the need for providing a callback to the chained then() methods. The value that would have been sent to the then() callback is instead returned directly from the asynchronous function, just as if it were a synchronous blocking function.
const request = require('request-promise');

async function main() {
    var body = await request.get('https://api.github.com/repos/scottwrobinson/camo');
    console.log('Body:', body);
}

main();
The await indicates that you want to resolve the Promise and not return that actual Promise object as it would normally. When this line is executed, the request call will get put on the event loop's stack and execution will yield to other asynchronous code that is ready to be processed.
The async keyword is used when you're defining a function that contains asynchronous code. This is an indicator that a Promise is returned from the function and should therefore be treated as asynchronous.
This way you can take advantage of the speed of parallel execution and the simplicity of await.
async function main() {
    let reqs = repos.map(async function(r) {
        let options = { url: 'https://api.github.com/repos/' + r, headers: headers };
        let body = await request.get(options);
        let json = JSON.parse(body);

        if (json.has_issues) {
            let issuesOptions = { url: 'https://api.github.com/repos/' + r + '/issues', headers: headers };
            let ibody = await request.get(issuesOptions);
            let issuesJson = JSON.parse(ibody);

            if (issuesJson[0]) {
                issueTitles.push(issuesJson[0].title);
            }
        }
    });

    await Promise.all(reqs);
}

main();
There are more benefits than just being able to use traditional control-flow like loops and conditionals. This linear approach lets us get back to using the try...catch statement for handling errors. With Promises you had to use the .catch() method, which worked, but could cause confusion determining which Promises it caught exceptions for.
Package.json
npm scripts
NPM scripts are, well, scripts. We use scripts to automate repetitive tasks. For example, building your project, minifying Cascading Style Sheets (CSS) and JavaScript (JS) files. Scripts are also used in deleting temporary files and folders, etc,. There are many ways to pull this off — you could write bash/batch scripts, or use a task runner like Gulp or Grunt. However, a lot of people are moving over to NPM scripts for their simplicity and versatility. They also offer possibility of having fewer tools to learn, use, and keep track of.
The Scripts Object in package.json
{
    "name": "super-cool-package",
    "version": "1.0.0",
    "scripts": {},
    "dependencies": {},
    "devDependencies": {}
}
Notice the scripts object in the file. This is where our NPM scripts will go. NPM scripts are written as usual JSON key-value pairs where the key is the name of the script and the value contains the script you want to execute.
TIP
first important aspect of NPM scripts — they are simply terminal commands. They run in the shell of the OS on which they’re executed. So it might be bash for Linux and cmd.exe for Windows.
Custom Scripts
The script we just saw is one of the “special” NPM scripts. You can execute it by simply typing npm start. These are scripts with names that NPM recognizes and attaches special meaning to. For example, you can write a script called prepublish. NPM will execute the script before your package is packed and published, and also when you run npm install locally without any arguments.
"say-hello": "echo 'Hello World'"
Calling NPM Scripts Within Other NPM Scripts
Calling Shell and Node Scripts
hello.sh
#!/usr/bin/env bash
# filename: hello.sh
echo "What's your name?"
read name
echo "Hello there, $name!"
package.json
{
    "scripts": {
        "bash-hello": "bash hello.sh"
    }
}
Pre and Post Hooks
After you know about pre and post hooks for npm scripts, you will do the following, and pretest script will always be executed before test script being run. posttest will always be executed after test script being run.
"scripts": {
    "lint": "eslint",
    "test": "jest",
    "pretest": "npm run lint",
    "posttest": "npm run build",
    "build": "webpack"
}
Making Our Scripts Cross-Platform
There are three approaches that you may use:
- Use commands that run cross-platform: Many useful commands are common to Unix and Windows. If your scripts are simple, consider using those.
- Use node packages: You can use node packages like rimraf or cross-env instead of shell commands. And obviously, you can use these packages in JS files if your script is large and complex.
- Use ShellJS: ShellJS is an npm package that runs Unix commands via Node. So this gives you the power to run Unix commands on all platforms, including Windows.
Use cases
- Minification/Uglification of CSS/JavaScript
- Automating the build process
- Linting your code
- Compressing images
- Automatically injecting changes with BrowserSync
Real example
{
  "scripts": {
    "start": "./node_modules/.bin/react-scripts start",
    "build": "./node_modules/.bin/react-scripts build",
    "test": "./node_modules/.bin/react-scripts test --env=jsdom",
    "check:test_coverage": "npm run test -- --coverage",
    "generate:doc": "./node_modules/.bin/esdoc",
    "eject": "./node_modules/.bin/react-scripts eject",
    "lint:staged": "./node_modules/.bin/lint-staged"
  },
  "husky": {
    "hooks": {
      "pre-commit": "yarn lint:staged",
      "pre-push": "npm run check:test_coverage"
    }
  }
}
Manipulating file paths
File paths represent f les, and these paths come in relative or absolute formats. You can concatenate file paths, extract filename information, and even detect file existence. In Node you can manipulate file paths by using strings, but that can become difficult, for instance, when you want to join path components. For example, path components can be terminated with /, but they don’t have to be, and accounting for those cases can be cumbersome. Path separators also vary according to the OS.
Fortunately, Node has a module named path that enables you to normalize, join, and resolve paths, as well as find relative paths between absolute paths, extract components from paths, and determine the existence of paths. In general, the path module simply manipulates strings and does not interact with the filesystem to validate the strings
Normalizing Paths
path.normalize('/foo/bar//baz/asdf/quux/..'); // => '/foo/bar/baz/asdf'Joining Paths (+ it also normalizes the path)
path.join('/foo', 'bar', 'baz/asdf', 'quux', '..'); // => '/foo/bar/baz/asdf'Resolving Paths ( resolve a series of paths into a normalized absolute path)
path.resolve('/foo/bar', './baz'); // => /foo/bar/baz
path.resolve('/foo/bar', '/tmp/file/');// => /tmp/file
Finding the Relative Path Between Two Absolute Paths
path.relative('/data/orandea/test/aaa', '/data/orandea/impl/bbb'); // => ../../impl/bbbExtracting Components of a Path
path.dirname('/foo/bar/baz/asdf/quux.txt'); // => /foo/bar/baz/asdf

path.basename('/foo/bar/baz/asdf/quux.html') // => quux.html
path.basename('/foo/bar/baz/asdf/quux.html', '.html'); // => quux

path.extname('/a/b/index.html'); // => '.html'
path.extname('/a/b.c/index'); // => ''
path.parse() method returns an object whose properties represent significant elements of the path.
path.parse('/home/user/dir/file.txt');
/* Returns:
    {
        root: '/',
        dir: '/home/user/dir',
        base: 'file.txt',
       ext: '.txt',
       name: 'file'
    }
*/
path.isAbsolute(path) Determines whether the path is an absolute path. An absolute path will always resolve to the same location, regardless of the working directory.
Reading and Writing Files
fs.write vs fs.writeFile
fs.write(fd, buffer[, offset[, length[, position]]], callback)
Write buffer to the file specified by fd.
- fd
<integer> - buffer
<Buffer> | <TypedArray> | <DataView> - offset
<integer> - length
<integer> - position
<integer> - callback
<Function>- err
<Error> - bytesWritten
<integer>
- err
- buffer
<Buffer> | <TypedArray> | <DataView>
- offset determines the part of the buffer to be written, and length is an integer specifying the number of bytes to write.
- position refers to the offset from the beginning of the file where this data should be written. If typeof
position !== 'number', the data will be written at the current position. - callback will be given three arguments (err, bytesWritten, buffer) where bytesWritten specifies how many bytes were written from buffer.
If this method is invoked as its util.promisify()ed version, it returns a Promise for an Object with bytesWritten and buffer properties.
WARNING
It is unsafe to use fs.write() multiple times on the same file without waiting for the callback. For this scenario, fs.createWriteStream() is recommended.
fs.write(fd, string[, position[, encoding]], callback)
Write string to the file specified by fd. If string is not a string, then the value will be coerced to one.
- fd
<integer> - string
<string> - position
<integer> - encoding
<string>Default: 'utf8' - callback
<Function>- err
<Error> - written
<integer>
- err
- string
<string>
- position refers to the offset from the beginning of the file where this data should be written. If typeof position !== 'number' the data will be written at the current position.
- encoding is the expected string encoding.
- callback will receive the arguments (err, written, string) where written specifies how many bytes the passed string required to be written. Bytes written is not necessarily the same as string characters written.
WARNING
It is unsafe to use fs.write() multiple times on the same file without waiting for the callback. For this scenario, fs.createWriteStream() is recommended.
fs.writeFile(file, data[, options], callback)
- file
<string> | <Buffer> | <URL> | <integer> filename or file descriptor - data
<string> | <Buffer> | <TypedArray> | <DataView> - options
<Object> | <string>- encoding
<string> | <null>Default: 'utf8' - mode
<integer>Default: 0o666 - flag
<string>Default: 'w'.
- encoding
- callback
<Function>- err
<Error>
- err
When file is a filename, asynchronously writes data to the file, replacing the file if it already exists. data can be a string or a buffer. When file is a file descriptor, the behavior is similar to calling fs.write() directly (which is recommended). The encoding option is ignored if data is a buffer.
const data = new Uint8Array(Buffer.from('Hello Node.js'));
fs.writeFile('message.txt', data, (err) => {
  if (err) throw err;
  console.log('The file has been saved!');
});
If options is a string, then it specifies the encoding:
fs.writeFile('message.txt', 'Hello Node.js', 'utf8', callback);
WARNING
It is unsafe to use fs.writeFile() multiple times on the same file without waiting for the callback. For this scenario, fs.createWriteStream() is recommended.
fs.read vs fs.readFile
fs.readFile(path[, options], callback)
Asynchronously reads the entire contents of a file.
- path
<string> | <Buffer> | <URL> | <integer> filename or file descriptor - options
<Object> | <string> - encoding
<string> | <null>Default: null - flag
<string>Default: 'r'. - callback
<Function>- err
<Error> - data
<string> | <Buffer>
- err
fs.readFile('/etc/passwd', (err, data) => {
  if (err) throw err;
  console.log(data);
});
- The callback is passed two arguments (err, data), where data is the contents of the file.
- If no encoding is specified, then the raw buffer is returned.
- If options is a string, then it specifies the encoding:
fs.readFile('/etc/passwd', 'utf8', callback);
When the path is a directory, the behavior of fs.readFile() is platform-specific. On macOS, Linux, and Windows, an error will be returned. On FreeBSD, a representation of the directory's contents will be returned.
// macOS, Linux, and Windows
fs.readFile('<directory>', (err, data) => {
  // => [Error: EISDIR: illegal operation on a directory, read <directory>]
});

//  FreeBSD
fs.readFile('<directory>', (err, data) => {
  // => null, <data>
});
WARNING
The fs.readFile() function buffers the entire file. To minimize memory costs, when possible prefer streaming via fs.createReadStream().
fs.read(fd, buffer, offset, length, position, callback)
Read data from the file specified by fd.
- fd
<integer> - buffer
<Buffer> | <TypedArray> | <DataView> - offset
<integer> - length
<integer> - position
<integer> - callback
<Function>- err
<Error> - bytesRead
<integer> - buffer
<Buffer>
- err
- buffer is the buffer that the data will be written to.
- offset is the offset in the buffer to start writing at.
- length is an integer specifying the number of bytes to read.
- position is an argument specifying where to begin reading from in the file. If position is null, data will be read from the current file position, and the file position will be updated. If position is an integer, the file position will remain unchanged.
- callback is given the three arguments, (err, bytesRead, buffer).
TIP
If this method is invoked as its util.promisify()ed version, it returns a Promise for an Object with bytesRead and buffer properties.
HTTP create server
Class: http.IncomingMessage
An IncomingMessage object is created by http.Server or http.ClientRequest and passed as the first argument to the 'request' and 'response' event respectively. It may be used to access response status, headers and data.
- Event: 'aborted'
- Event: 'close'
- message.aborted
- message.complete
- message.destroy([error])
- message.headers
- message.httpVersion
- message.method
- message.rawHeaders
- message.rawTrailers
- message.setTimeout(msecs, callback)
- message.socket
- message.statusCode
- message.statusMessage
- message.trailers
- message.url
It implements the Readable Stream interface, as well as the following additional events, methods, and properties.
Event:
- aborted (Emitted when the request has been aborted)
- close (Indicates that the underlying connection was closed)
message
- .aborted will be true if the request has been aborted
- .complete will be true if a complete HTTP message has been received and successfully parsed
- .destroy([error]) calls destroy() on the socket that received the IncomingMessage. If error is provided, an 'error' event is emitted and error is passed as an argument to any listeners on the event.
- .headers
- The request/response headers object
- Key-value pairs of header names and values. Header names are lower-cased
// Prints something like: // { 'user-agent': 'curl/7.22.0', // host: '127.0.0.1:8000', // accept: '*/*' } console.log(request.headers); - .httpVersion In case of server request, the HTTP version sent by the client. In the case of client response, the HTTP version of the connected-to server. Probably either
'1.1'or'1.0'. - method The request method as a string. Read only. Examples: 'GET', 'DELETE'.
- .socket The net.Socket object associated with the connection. With HTTPS support, use request.socket.getPeerCertificate() to obtain the client's authentication details.
- .statusCode Only valid for response obtained from http.ClientRequest. The 3-digit HTTP response status code. E.G. 404.
- statusMessage Only valid for response obtained from http.ClientRequest. The HTTP response status message (reason phrase). E.G. OK or Internal Server Error.
- .url Request URL string. This contains only the URL that is present in the actual HTTP request
function IncomingMessage(socket) {
 Stream.Readable.call(this);
 this.socket = socket;
 this.connection = socket;
 this.httpVersion = null;
 this.complete = false;
 this.headers = {};
 this.trailers = {};
 this.readable = true;
 this._pendings = [];
 this._pendingIndex = 0;
 // request (server) only
 this.url = '';
 this.method = null;
 // response (client) only
 this.statusCode = null;
 this.client = this.socket;
 this._consuming = false;
 this._dumped = false;
}
util.inherits(IncomingMessage, Stream.Readable);
serverResponse class methods
This object is created internally by an HTTP server — not by the user. It is passed as the second parameter to the 'request' event.
- Event: 'close'
- Event: 'finish'
- response.addTrailers(headers)
- response.connection
- response.end([data][, encoding][, callback])
- response.finished
- response.getHeader(name)
- response.getHeaderNames()
- response.getHeaders()
- response.hasHeader(name)
- response.headersSent
- response.removeHeader(name)
- response.sendDate
- response.setHeader(name, value)
- response.setTimeout(msecs[, callback])
- response.socket
- response.statusCode
- response.statusMessage
- response.write(chunk[, encoding][, callback])
- response.writeContinue()
- response.writeHead(statusCode[, statusMessage][, headers])
- response.writeProcessing()
The response inherits from Stream, and additionally implements the following:
Event:
- 'close' Indicates that the underlying connection was terminated.
- 'finish' Emitted when the response has been sent. More specifically, this event is emitted when the last segment of the response headers and body have been handed off to the operating system for transmission over the network. It does not imply that the client has received anything yet.
response
.addTrailers(headers) This method adds HTTP trailing headers (a header but at the end of the message) to the response. Trailers will only be emitted if chunked encoding is used for the response; if it is not (e.g. if the request was HTTP/1.0), they will be silently discarded.
response.addTrailers({ 'Content-MD5': '7895bf4b8828b55ceaf47747b4bca667' });.end([data][, encoding][, callback])
- data
<string> | <Buffer> - encoding
<string> - callback
<Function>
This method signals to the server that all of the response headers and body have been sent; that server should consider this message complete. The method, response.end(), MUST be called on each response. If data is specified, it is similar in effect to calling response.write(data, encoding) followed by response.end(callback). If callback is specified, it will be called when the response stream is finished.
- data
.finished Boolean value that indicates whether the response has completed. Starts as false. After response.end() executes, the value will be true.
.getHeader(name) Reads out a header that's already been queued but not sent to the client. Note that the name is case insensitive.
const contentType = response.getHeader('content-type'); // contentType is 'text/html'.getHeaderNames() Returns an array containing the unique names of the current outgoing headers. All header names are lowercase.
const headerNames = response.getHeaderNames();
// headerNames === ['foo', 'set-cookie']
.getHeaders() Returns a shallow copy of the current outgoing headers. Since a shallow copy is used, array values may be mutated without additional calls to various header-related http module methods. The keys of the returned object are the header names and the values are the respective header values. All header names are lowercase.
const headers = response.getHeaders();
// headers === { foo: 'bar', 'set-cookie': ['foo=bar', 'bar=baz'] }
.hasHeader(name) Returns true if the header identified by name is currently set in the outgoing headers. Note that the header name matching is case-insensitive.
const hasContentType = response.hasHeader('content-type');.removeHeader(name) Removes a header that's queued for implicit sending.
response.removeHeader('Content-Encoding');.sendDate When true, the Date header will be automatically generated and sent in the response if it is not already present in the headers. Defaults to true. This should only be disabled for testing; HTTP requires the Date header in responses.
.setHeader(name, value) Sets a single header value for implicit headers. If this header already exists in the to-be-sent headers, its value will be replaced. Use an array of strings here to send multiple headers with the same name. Non-string values will be stored without modification.
response.setHeader('Content-Type', 'text/html');
response.setHeader('Set-Cookie', ['type=ninja', 'language=javascript']);
.statusCode When using implicit headers (not calling response.writeHead() explicitly), this property controls the status code that will be sent to the client when the headers get flushed.
response.statusCode = 404;After response header was sent to the client, this property indicates the status code which was sent out.
.statusMessage When using implicit headers (not calling response.writeHead() explicitly), this property controls the status message that will be sent to the client when the headers get flushed. If this is left as undefined then the standard message for the status code will be used.
response.statusMessage = 'Not found';After response header was sent to the client, this property indicates the status message which was sent out.
.write(chunk[, encoding][, callback]) This sends a chunk of the response body. This method may be called multiple times to provide successive parts of the body.
- chunk
<string> | <Buffer> - encoding
<string>Default: 'utf8' - callback
<Function>
- chunk
.writeHead(statusCode[, statusMessage][, headers]) Sends a response header to the request. The status code is a 3-digit HTTP status code, like 404. The last argument, headers, are the response headers. Optionally one can give a human-readable statusMessage as the second argument.
- statusCode
<number> - statusMessage
<string> - headers
<Object>
const body = 'hello world'; response .writeHead(200, { 'Content-Length': Buffer.byteLength(body), 'Content-Type': 'text/plain' }) .end(body);- statusCode
.writeProcessing() Sends a HTTP/1.1 102 Processing message to the client, indicating that the request body should be sent.
const http = require('http');
const server = http.createServer(function(req, res) {
  res.setHeader('Content-Type', 'text/html');
  res.writeHead(200, 'woot');

  res.write('<!doctype html>');
  res.write('<html>');
  res.write('<head><meta charset="utf-8"></head>');
  res.write('<body>');
  res.write('<h2>Hello World</h2>');
  res.write('</body></html>');

  res.end();
});

server.listen(8080);
handling URL Parameters
url Module — URL & URLSearchParams Objects The url module gives access to the URL and URLSearchParams objects:
- URL object contains properties to read different parts of a url — such as protocol, host, path, hash, search parameters (query parameters) etc
- URLSearchParams object contains methods to perform operations on the search parameters in the url — getting parameters, adding new parameters, editing existing parameters or deleting parameters
const url = require('url');

// new URL object
const current_url = new URL('http://usefulangle.com/post/87/javascript-preview-pdf?id=123&type=article');

// reads the query string in the url
const query_string = current_url.search;

// will output : ?id=123&type=article
console.log(query_string);

// creating a new URLSearchParams object from query string
// this will read individual parameters
const search_params = new URLSearchParams(query_string);
You can either create a new URLSearchParams object (like above) or use the searchParams property to get access to the URLSearchParams object:
const current_url = new URL('http://usefulangle.com/post/87/javascript-preview-pdf?id=123&type=article');

// same URLSearchParams object as above
const search_params = current_url.searchParams;
Once you get access to the URLSearchParams object, you can get the url parameters.
Getting Parameters by Name
const current_url = new URL('http://usefulangle.com/post/87/javascript-preview-pdf?id=123&type=article');
const search_params = current_url.searchParams;

// id = 123
const id = search_params.get('id');

// type = article
const type = search_params.get('type');

// this will be true
if(search_params.has('id')) {
    // this will be executed
}
Getting params from request url
// ...
if (request.method === 'GET' && request_url === '/form') {
    const current_url = new URL(request_url);
    const search_params = current_url.searchParams;

    // "page_no" parameter
    if(search_params.has('page_no')) {
        const page_no = search_params.get('page_no');
    }

    // "num_results" parameter
    if(search_params.has('num_results')) {
        const num_results = search_params.get('num_results');
    }

    // ...
}
Process
reading Command-Line Arguments
Node.js makes it easy to get the list of passed arguments, known as an argument vector. The argument vector is an array available from process.argv in your Node.js script.
The array contains everything that’s passed to the script, including the Node.js executable and the path/filename of the script. If you were to run the following command:
node example.js -a -b -c
Your argument vector would contain five items:
[
  '/usr/bin/node',
  '/some/path/to/example.js',
  '-a',
  '-b',
  '-c'
]
At the very least, a script that’s run without any arguments will still contain two items in the array, the node executable and the script file that’s being run.
Typically the argument vector is paired with an argument count (argc) that tells you how many arguments have been passed-in. Node.js lacks this particular variable but we can always grab the length of the argument vector array:
if (process.argv.length === 2) {
  console.error('Expected at least one argument!');
  process.exit(1);
}
Simple Argument Flags
The simplest way to implement arguments into your script would be to implement just a single flag that could be passed-in and modify the output of your script:
if (process.argv[2] && process.argv[2] === '-c') {
  console.log('After \'while, Crocodile!');
} else {
  console.log('See ya later, Alligator!');
}
This script checks if we have a third item in our argument vector (index 2 because the array index in JavaScript is zero-based) and if it’s present and is equal to -c it will alter the output:
node reptile-salutation.js # See ya later...
node reptile-salutation.js -c # After 'while...
We don’t have to limit ourselves to just modifying the conditional control structure, we can use the actual value that’s been passed to the script as well:
const name = (process.argv[2] || 'human');
console.log(`Alligators are the best! Don't you agree, ${name}?`);
Instead of a conditional based on the argument, this script takes the value that’s passed in (defaulting to “human” when the argument is missing) and injects it into our script’s output.
Arguments with Values
We’ve written a script that accepts an argument and one that accepts a raw value, what about in scenarios where we want to use a value in conjunction with an argument?
To make things a bit more complex, let’s also accept multiple arguments:
// Checks to see if the -c argument is present
const reptile = (
  process.argv.indexOf('-c') > -1 ? 'Crocodiles' : 'Alligators'
);

// Also checks for --name and if we have a value
const nameIndex = process.argv.indexOf('--name');
let nameValue;

if (nameIndex > -1) {
  // Grabs the value after --name
  nameValue = process.argv[nameIndex + 1];
}

const name = (nameValue || 'human');

console.log(`${reptile} are the best! Don't you agree, ${name}?`);
By using indexOf instead of relying on specific index values, we are able to look for the arguments anywhere in the argument vector, regardless of the order!
Commander library
# via yarn
$ yarn add commander
const commander = require('commander');

commander
  .version('1.0.0', '-v, --version')
  .usage('[OPTIONS]...')
  .option('-c, --crocodile', 'Use crocodile instead of alligator')
  .option('-n, --name <name>', 'Your name', 'human')
  .parse(process.argv);

const reptile = (commander.crocodile ? 'Crocodiles' : 'Alligators');

console.log(
  `${reptile} are the best! Don't you agree, ${commander.name}?`
);
commander does all of the hard work by processing process.argv and adding the arguments and any associated values as properties in our commander object.
Going this route comes with some added bonuses as well.
We can easily version our script and report the version number with -v or --version. We also get some friendly output that explains the script’s usage by passing the --help argument and if you happen to pass an argument that’s not defined or is missing a passed value, it will throw an error.
Spawning a Child Process
Node.js runs in a single thread. You can, however take advantage of multiple processes.
child_process module allows to create child processes in Node.js. Those processes can easily communicate with each other using a built-in messaging system.
There are four different ways to create a child process in Node: spawn(), fork(), exec(), and execFile().
Child processes have three standard IO streams available: stdin (writeable), stdout (readable) and stderr (readable). Streams also inherit from EventEmitter. On readable streams there is data event emitted when a commands run inside a child process outputs something.
TIP
spawn doesn't create a shell to execute the command while exec does create a shell. Thus, it's possible to specify the command to execute using the shell syntax. exec also buffers the command's entire output instead of using a stream.
fork is a variation of spawn where both the parent/caller and the child process can communicate with each other via send().
Thanks to fork, computation intensive tasks can be separated from the main event loop.
Node.js работает в однопоточном режиме, но для обработки параллелизма использует управляемую событиями парадигму. Это также облегчает создание дочерних процессов для параллельной обработки многоядерных систем на базе процессоров.
В дочерних процессах всегда есть три потока child.stdin , child.stdout и child.stderr, которые могут совместно использоваться потоками stdio родительского процесса. Существует модуль Node js child process, который поддерживает три основных способа создания дочернего процесса.
exec — метод child_process.exec запускает команду в оболочке/консоли и буферизует вывод.
spawn — child_process.spawn запускает новый процесс с помощью заданной команды.
fork — метод child_process.fork является особым случаем spawn() для создания дочерних процессов.
exec()
Метод child_process.exec запускает команду в оболочке и буферизирует вывод.
child_process.exec(command[, options], callback)
- command (String) — команда для запуска с аргументами, разделенными пробелом
- options (Object) — может содержать один или несколько из следующих параметров:
- cwd (String) — текущий рабочий каталог дочернего процесса
- env (Object) — ключи-значения для среды
- encoding (String) — (по умолчанию: ‘utf8′)
- shell (String) — оболочка, с которой выполняется команда (по умолчанию: ‘/ bin / sh’ в UNIX, ‘cmd.exe’ в Windows, оболочка должна понимать ключ -c в UNIX или /s/c в Windows. В Windows парсинг командной строки должен быть совместим с cmd.exe.)
- timeout (Number) — (По умолчанию: 0)
- maxBuffer (Number) — (по умолчанию: 200 * 1024)
- killSignal (String) — (по умолчанию: «SIGTERM»)
- uid (Number) — устанавливает идентификатор пользователя процесса.
- gid (Number) — устанавливает групповой идентификатор процесса.
- callback — функция принимает три аргумента error , stdout и stderr, которые вызываются с выходными данными при завершении процесса.
Метод exec() возвращает буфер с максимальным размером и ожидает завершения процесса, после чего пытается сразу вернуть все буферизованные данные.
Example
// support.js
console.log("Child Process " + process.argv[2] + " executed." );
const fs = require('fs');
const child_process = require('child_process');

for(let i = 0; i < 3; i++) {
   const workerProcess = child_process.exec(`node support.js ${i}`, function (error, stdout, stderr) {
      if (error) {
         console.log(error.stack);
         console.log('Error code: '+error.code);
         console.log('Signal received: '+error.signal);
      }
      console.log('stdout: ' + stdout);
      console.log('stderr: ' + stderr);
   });

   workerProcess.on('exit', function (code) {
      console.log('Child process exited with exit code '+code);
   });
}
$ node master.js

Child process exited with exit code 0
stdout: Child Process 1 executed.

stderr:
Child process exited with exit code 0
stdout: Child Process 0 executed.

stderr:
Child process exited with exit code 0
stdout: Child Process 2 executed.
spawn
TIP
Метод child_process.spawn запускает новый процесс с помощью заданной командой.
child_process.spawn(command[, args][, options])
- command (String) — запускаемая команда
- args (Array) — список аргументов строки
- options (Object) — может содержать один или несколько из следующих параметров:
- cwd (String) — текущий рабочий каталог дочернего процесса.
- env (Object) — пары ключ-значение среды.
- stdio (Array) — строка конфигурации stdio дочернего процесса.
- customFds (Array) — устаревшие дескрипторы файлов для дочерних элементов, которые будут использоваться для stdio.
- detached (Boolean) — дочерний процесс будет лидером группы процессов.
- uid (Number) — устанавливает идентификатор пользователя процесса.
- gid (Number) — устанавливает групповой идентификатор процесса.
Метод spawn() возвращает потоки (stdout & stderr), он должен использоваться, когда процесс возвращает большой объем данных. spawn() начинает принимать ответ, сразу после начала выполнения процесса.
Example
// support.js
console.log("Child Process " + process.argv[2] + " executed." );
// master.js
const fs = require('fs');
const child_process = require('child_process');

for(let i = 0; i<3; i++) {
   var workerProcess = child_process.spawn('node', ['support.js', i]);

   workerProcess.stdout.on('data', function (data) {
      console.log('stdout: ' + data);
   });

   workerProcess.stderr.on('data', function (data) {
      console.log('stderr: ' + data);
   });

   workerProcess.on('close', function (code) {
      console.log('child process exited with code ' + code);
   });
}
$ node master.js

stdout: Child Process 0 executed.

child process exited with code 0
stdout: Child Process 1 executed.

stdout: Child Process 2 executed.

child process exited with code 0
child process exited with code 0
fork()
Метод child_process.fork является особым случаем spawn() для создания процессов Node.
child_process.fork(modulePath[, args][, options])
- modulePath (String) — Модуль для запуска в дочернем элементе.
- args (Array) — Список аргументов строки
- options (Object) — Может содержать один или несколько из следующих параметров:
- cwd (String) — Текущий рабочий каталог дочернего процесса.
- env (Object) -Пары ключ-значение среды.
- execPath (String) — Исполняемый файл, используемый для создания дочернего процесса.
- execArgv (Array) — Список строковых аргументов, переданных исполняемому файлу (по умолчанию: process.execArgv).
- silent (Boolean) Если true, stdin, stdout и stderr для дочернего процесса будут перенаправлены в родительский процесс, иначе они будут унаследованы от родительского процесса, см. параметры «pipe» и «inherit» для stdio для spawn() (по умолчанию — false).
- uid (Number) — Устанавливает идентификатор пользователя процесса.
- gid (Number) — Устанавливает групповой идентификатор процесса.
В дополнение к тому, что он содержит все методы, что и стандартный экземпляр дочернего процесса, метод fork возвращает объект со встроенным каналом связи.
Example
// support.js
console.log("Child Process " + process.argv[2] + " executed." );
// master.js
const fs = require('fs');
const child_process = require('child_process');

for(var i=0; i<3; i++) {
   var worker_process = child_process.fork("support.js", [i]);

   worker_process.on('close', function (code) {
      console.log('child process exited with code ' + code);
   });
}
$ node master.js

Child Process 0 executed.
Child Process 1 executed.
Child Process 2 executed.
child process exited with code 0
child process exited with code 0
child process exited with code 0
socket.io basic operations
Socket.IO
Socket.IO is a library that enables real-time, bidirectional and event-based communication between the browser and the server. It consists of:
- a Node.js server
- a Javascript client library for the browser (which can be also run from Node.js) ::
Within each Namespace, you can define arbitrary channels, called Rooms, that sockets can join and leave. You can then broadcast to any given room, reaching every socket that has joined it.
This is a useful feature to send notifications to a group of users, or to a given user connected on several devices for example.
Those features come with a simple and convenient API, which looks like the following:
io.on('connection', function(socket){
  socket.emit('request', /* */); // emit an event to the socket
  io.emit('broadcast', /* */); // emit an event to all connected sockets
  socket.on('reply', function(){ /* */ }); // listen to the event
});
WARNING
Socket.IO is NOT a WebSocket implementation. Although Socket.IO indeed uses WebSocket as a transport when possible, it adds some metadata to each packet: the packet type, the namespace and the ack id when a message acknowledgement is needed. That is why a WebSocket client will not be able to successfully connect to a Socket.IO server, and a Socket.IO client will not be able to connect to a WebSocket server either
Installing
- Server
npm install --save socket.io
Javascript Client
A standalone build of the client is exposed by default by the server at /socket.io/socket.io.js. It can also be served from a CDN, like cdnjs. To use it from Node.js, or with a bundler like webpack or browserify, you can also install the package from npm:
npm install --save socket.io-client
Server (app.js)
```js
const app = require('express')();
const server = require('http').Server(app);
const io = require('socket.io')(server);

server.listen(80);
// WARNING: app.listen(80) will NOT work here!

app.get('/', function (req, res) {
    res.sendFile(__dirname + '/index.html');
});

io.on('connection', function (socket) {
    socket.emit('news', { hello: 'world' });
    socket.on('my other event', function (data) {
        console.log(data);
    });
});
```
Client (index.html)
```html
<script src="/socket.io/socket.io.js"></script>
<script>
    const socket = io.connect('http://localhost');
    socket.on('news', function (data) {
        console.log(data);
        socket.emit('my other event', { my: 'data' });
    });
</script>
```
Sending and receiving events (Server)
Socket.IO allows you to emit and receive custom events. Besides connect, message and disconnect, you can emit custom events:
// note, io(<port>) will create a http server for you
const io = require('socket.io')(80);

io.on('connection', function (socket) {
  io.emit('this', { will: 'be received by everyone'});

  socket.on('private message', function (from, msg) {
    console.log('I received a private message by ', from, ' saying ', msg);
  });

  socket.on('disconnect', function () {
    io.emit('user disconnected');
  });
});
Restricting yourself to a namespace
If you have control over all the messages and events emitted for a particular application, using the default / namespace works. If you want to leverage 3rd-party code, or produce code to share with others, socket.io provides a way of namespacing a socket.
This has the benefit of multiplexing a single connection. Instead of socket.io using two WebSocket connections, it’ll use one.
Server
const io = require('socket.io')(80);
const chat = io
    .of('/chat')
    .on('connection', function (socket) {
        socket.emit('a message', {
            that: 'only',
            '/chat': 'will get'
        });

        chat.emit('a message', {
            everyone: 'in',
            '/chat': 'will get'
        });
    });

const news = io
    .of('/news')
    .on('connection', function (socket) {
        socket.emit('item', { news: 'item' });
    });
Client
<script>
const chat = io.connect('http://localhost/chat');
const news = io.connect('http://localhost/news');

chat.on('connect', function () {
    chat.emit('hi!');
});

news.on('news', function () {
    news.emit('woot');
});
</script>
Sending and getting data (acknowledgements)
Sometimes, you might want to get a callback when the client confirmed the message reception.
To do this, simply pass a function as the last parameter of .send or .emit. What’s more, when you use .emit, the acknowledgement is done by you, which means you can also pass data along:
Server (app.js)
const io = require('socket.io')(80);

io.on('connection', function (socket) {
    socket.on('ferret', function (name, fn) {
        fn('woot');
    });
});
Client (index.html)
<script>
    const socket = io(); // TIP: io() with no args does auto-discovery
    socket.on('connect', function () { // TIP: you can avoid listening on `connect` and listen on events directly too!
        socket.emit('ferret', 'tobi', function (data) {
        console.log(data); // data will be 'woot'
        });
    });
</script>
Broadcasting messages
To broadcast, simply add a broadcast flag to emit and send method calls. Broadcasting means sending a message to everyone else except for the socket that starts it.
To broadcast, simply add a broadcast flag to emit and send method calls. Broadcasting means sending a message to everyone else except for the socket that starts it.
Server
const io = require('socket.io')(80);

io.on('connection', function (socket) {
    socket.broadcast.emit('user connected');
});
Using it just as a cross-browser WebSocket
If you just want the WebSocket semantics, you can do that too. Simply leverage send and listen on the message event:
Server (app.js)
const io = require('socket.io')(80);

io.on('connection', function (socket) {
socket.on('message', function () { });
socket.on('disconnect', function () { });
});
Client (index.html)
<script>
const socket = io('http://localhost/');

socket.on('connect', function () {
    socket.send('hi');

    socket.on('message', function (msg) {
        // my msg
    });
});
</script>
Namespaces
Socket.IO allows you to “namespace” your sockets, which essentially means assigning different endpoints or paths.
This is a useful feature to minimize the number of resources (TCP connections) and at the same time separate concerns within your application by introducing separation between communication channels.
Default namespace
We call the default namespace / and it’s the one Socket.IO clients connect to by default, and the one the server listens to by default.
This namespace is identified by io.sockets or simply io:
// the following two will emit to all the sockets connected to `/`
io.sockets.emit('hi', 'everyone');
io.emit('hi', 'everyone'); // short form
Each namespace emits a connection event that receives each Socket instance as a parameter
io.on('connection', function(socket){
  socket.on('disconnect', function(){ });
});
Custom namespaces
To set up a custom namespace, you can call the of function on the server-side:
const nsp = io.of('/my-namespace');
nsp.on('connection', function(socket){
  console.log('someone connected');
});
nsp.emit('hi', 'everyone!');
On the client side, you tell Socket.IO client to connect to that namespace:
const socket = io('/my-namespace');
Important note
The namespace is an implementation detail of the Socket.IO protocol, and is not related to the actual URL of the underlying transport, which defaults to /socket.io/….
Rooms
Within each namespace, you can also define arbitrary channels that sockets can join and leave.
Joining and leaving
You can call join to subscribe the socket to a given channel:
io.on('connection', function(socket){
  socket.join('some room');
});
And then simply use to or in (they are the same) when broadcasting or emitting:
io.to('some room').emit('some event');
To leave a channel you call leave in the same fashion as join.
Default room
Each Socket in Socket.IO is identified by a random, unguessable, unique identifier Socket#id. For your convenience, each socket automatically joins a room identified by this id.
This makes it easy to broadcast messages to other sockets:
io.on('connection', function(socket){
  socket.on('say to someone', function(id, msg){
    socket.broadcast.to(id).emit('my message', msg);
  });
});
Disconnection
Upon disconnection, sockets leave all the channels they were part of automatically, and no special teardown is needed on your part.
Sending messages from the outside-world
In some cases, you might want to emit events to sockets in Socket.IO namespaces / rooms from outside the context of your Socket.IO processes.
There’s several ways to tackle this problem, like implementing your own channel to send messages into the process.
To facilitate this use case, we created two modules:
socket.io-redis
socket.io-emitter
By implementing the Redis Adapter:
const io = require('socket.io')(3000);
const redis = require('socket.io-redis');
io.adapter(redis({ host: 'localhost', port: 6379 }));
you can then emit messages from any other process to any channel
const io = require('socket.io-emitter')({ host: '127.0.0.1', port: 6379 });
setInterval(function(){
  io.emit('time', new Date);
}, 5000);
Emit cheatsheet
io.on('connect', onConnect);

function onConnect(socket){

  // sending to the client
  socket.emit('hello', 'can you hear me?', 1, 2, 'abc');

  // sending to all clients except sender
  socket.broadcast.emit('broadcast', 'hello friends!');

  // sending to all clients in 'game' room except sender
  socket.to('game').emit('nice game', "let's play a game");

  // sending to all clients in 'game1' and/or in 'game2' room, except sender
  socket.to('game1').to('game2').emit('nice game', "let's play a game (too)");

  // sending to all clients in 'game' room, including sender
  io.in('game').emit('big-announcement', 'the game will start soon');

  // sending to all clients in namespace 'myNamespace', including sender
  io.of('myNamespace').emit('bigger-announcement', 'the tournament will start soon');

  // sending to a specific room in a specific namespace, including sender
  io.of('myNamespace').to('room').emit('event', 'message');

  // sending to individual socketid (private message)
  io.to(`${socketId}`).emit('hey', 'I just met you');

  // WARNING: `socket.to(socket.id).emit()` will NOT work, as it will send to everyone in the room
  // named `socket.id` but the sender. Please use the classic `socket.emit()` instead.

  // sending with acknowledgement
  socket.emit('question', 'do you think so?', function (answer) {});

  // sending without compression
  socket.compress(false).emit('uncompressed', "that's rough");

  // sending a message that might be dropped if the client is not ready to receive messages
  socket.volatile.emit('maybe', 'do you really need it?');

  // specifying whether the data to send has binary data
  socket.binary(false).emit('what', 'I have no binaries!');

  // sending to all clients on this node (when using multiple nodes)
  io.local.emit('hi', 'my lovely babies');

  // sending to all connected clients
  io.emit('an event sent to all connected clients');

};
Express
authenticating with Passport
Passport
Passport is authentication middleware for Node.js. As it’s extremely flexible and modular, Passport can be unobtrusively dropped into any Express-based web application. A comprehensive set of strategies supports authentication using a username and password, Facebook, Twitter, and more.
const express = require('express');
const cons = require('consolidate');
const bodyParser = require('body-parser');
const cookieParser = require('cookie-parser');
const session = require('express-session');

const passport = require('passport');
const FacebookStrategy = require('passport-facebook').Strategy;
const LocalStrategy = require('passport-local').Strategy;
const ensureLoggedIn = require('connect-ensure-login').ensureLoggedIn;
const app = express();

app.engine('html', cons.handlebars);

// set .html as the default extension
app.set('view engine', 'html');
app.set('views', __dirname + '/views');

app.use(express.static('public'));
app.use(cookieParser());
app.use(bodyParser());
app.use(session({ secret: 'keyboard cat' }));
app.use(passport.initialize());
app.use(passport.session());

passport.serializeUser(function(user, done) {
  done(null, user);
});

passport.deserializeUser(function(user, done) {
  done(null, user);
});

// name your strategy
passport.use('local', new LocalStrategy(
  function(username, password, done) {
    console.log('username, password', username, password);
    if (username !== 'admin') {
      return done(null, false, { message: 'Incorrect username.' });
    }
    if (password !== 'passwd') {
      return done(null, false, { message: 'Incorrect password.' });
    }
    console.log('LocalStrategy OK');
    return done(null, {
      username: 'admin'
    });
  }
));

passport.use('facebook', new FacebookStrategy({
    clientID: 'some-fb-client-id',
    clientSecret: 'some-secret',
    callbackURL: "http://localhost:3001/auth/facebook/callback"
  },
  function(accessToken, refreshToken, profile, done) {
    console.log('>>>fbProfile::', profile);
    // in real life: create or update user...
    return done(null, {username: profile.id});
  }
));

app.get('/auth/facebook/callback',
  passport.authenticate('facebook', {
    successReturnToOrRedirect: '/',
    failureRedirect: '/login'
  }));

// naming your strategy allows to have only one /login uri
app.post('/login', passport.authenticate(['local', 'facebook'], {
  successReturnToOrRedirect: '/',
  failureRedirect: '/login'
}));

app.get('/',
  (req, res) => {
    console.log('>>USER', req.user);
    res.status(200).send(req.user);
  });

app.get('/login', (req, res) => {
  res.status(200).render('login', { user: req.user });
});
console.log(ensureLoggedIn);
app.get('/secure-1',
  ensureLoggedIn('/login'),
  (req, res) => {
    res.send('secure 1!')
});
app.get('/secure-2',
  ensureLoggedIn('/login'),
  (req, res) => {
    res.send('secure 2!')
});

app.get('/logout', function(req, res){
  req.logout();
  res.redirect('/');
});

app.listen(3001, () => console.log('yep.. listening on http://localhost:3001'));
LocalStrategy example
// config passport
const mongoose = require('mongoose');
const passport = require('passport');
const LocalStrategy = require('passport-local');

const Users = mongoose.model('Users');

passport.use(new LocalStrategy({
  usernameField: 'user[email]',
  passwordField: 'user[password]',
}, (email, password, done) => {
  Users.findOne({ email })
    .then((user) => {
      if(!user || !user.validatePassword(password)) {
        return done(null, false, { errors: { 'email or password': 'is invalid' } });
      }

      return done(null, user);
    }).catch(done);
}));
app.use(passport.initalize());
app.use(passport.session());
to protect a certain route, we would define the route as this:
router.method('/path', passport.authenticate('jwt', { session: false }), (req,res) => { /*...*/ });
to protect a group of routes as imported in our server or index.js like this:
app.use('/path', passport.authenticate('jwt', {session:false}),require('path/to/route/file'));
for Example:
app.post('/login', passport.authenticate('local', { successRedirect: '/',
                                                    failureRedirect: '/login' }));
OAuth 2
OAuth 2 представляет собой фреймворк для авторизации, позволяющий приложениям осуществлять ограниченный доступ к пользовательским аккаунтам на HTTP сервисах, например, на Facebook, GitHub и DigitalOcean. Он работает по принципу делегирования аутентификации пользователя сервису, на котором находится аккаунт пользователя, позволяя стороннему приложению получать доступ к аккаунту пользователя. OAuth 2 работает в вебе, на десктопных и мобильных приложениях.
Debugging modules and applications
- Logging with console The easiest way to log information to the command line when you are debugging your code is to use the console module that is native to Node.js.
/**
* Logging information to your console.
*/
console.time('timer');
console.log('hey %s', 'there');
console.info('info');
console.warn('warn');
console.error('error');
console.dir(console);
console.trace(console.error('traced'));
console.assert(true !== false, 'true equals false');
console.timeEnd('timer');
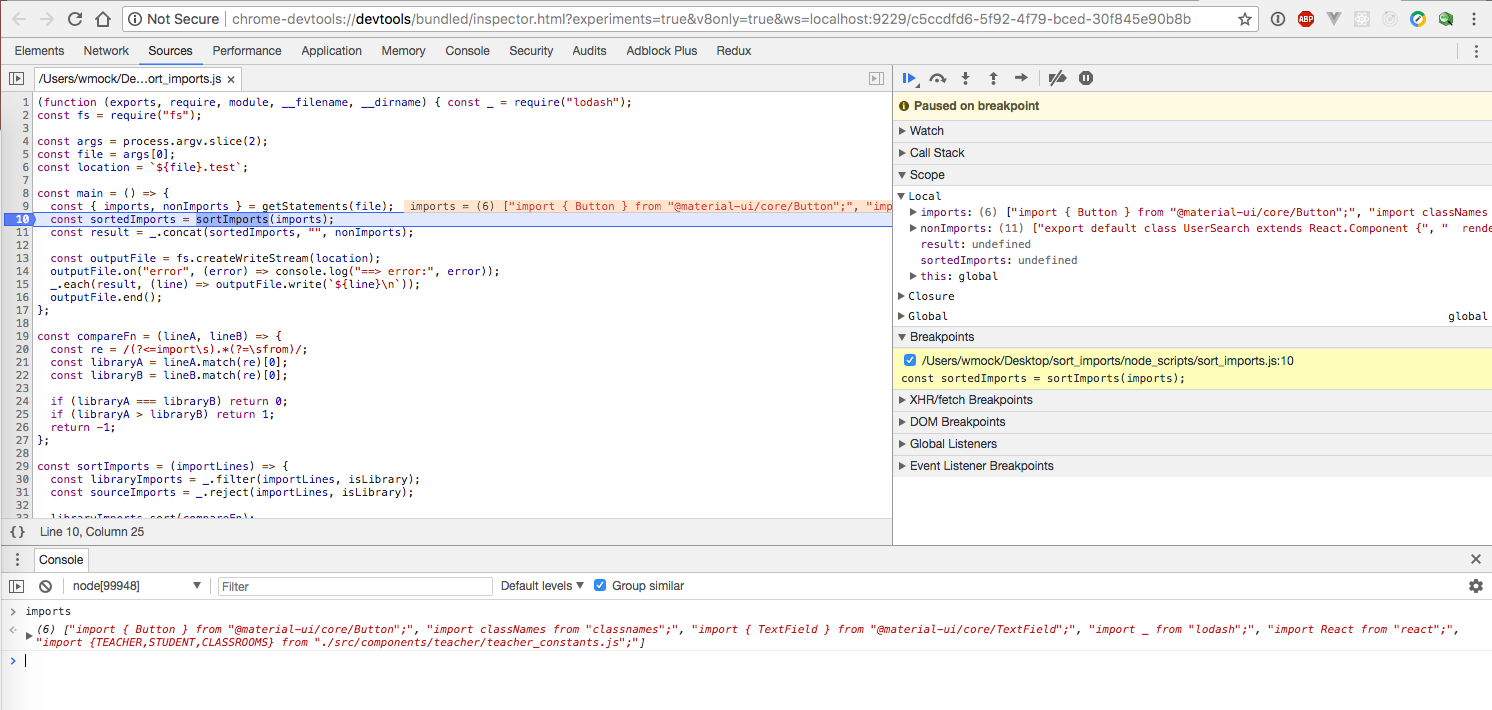
- Using a Graphical Debugging Tool One of the most basic yet most consistent cross-platform debugging tools for Node.js applications is an npm package called node-inspector. This package is used to bind the debugger that comes with a Blink-based browser, such as Google Chrome or the latest versions of Opera. You will then gain access to the native debugging tools for these browsers but it will allow you to navigate the code and debug your Node.js application in an IDE-like setting. To get started with node-inspector, install it globally via npm. This gains you access to the node-inspector command that will allow you to start the debugger listening from any directory on your machine
npm install -g node-inspector
run node inspector
$ node-inspector
Node Inspector v0.3.1
info - socket.io started
Visit http://127.0.0.1:8080/debug?port=5858 to start debugging.
run application
$ node --debug 12-2-1.js
debugger listening on port 5858
Once the inspector is running, you can begin a new instance of your Node.js application

- Debugging Your Application in a Production Environment You have a Node.js application running on a production server that is behaving in a manner that prompts you to step into the code and see what is happening. You need to be able to attach a debugger to the production process in order to debug your application.
Connecting to a Node.js process that is currently running is built into the Node.js debugging functionality. This will attach the V8 debugger to your application in the same way that starting your application with the debug flag will.
$ node debug -p 6284
connecting... ok
debug>
- with Google Chrome Developer tools
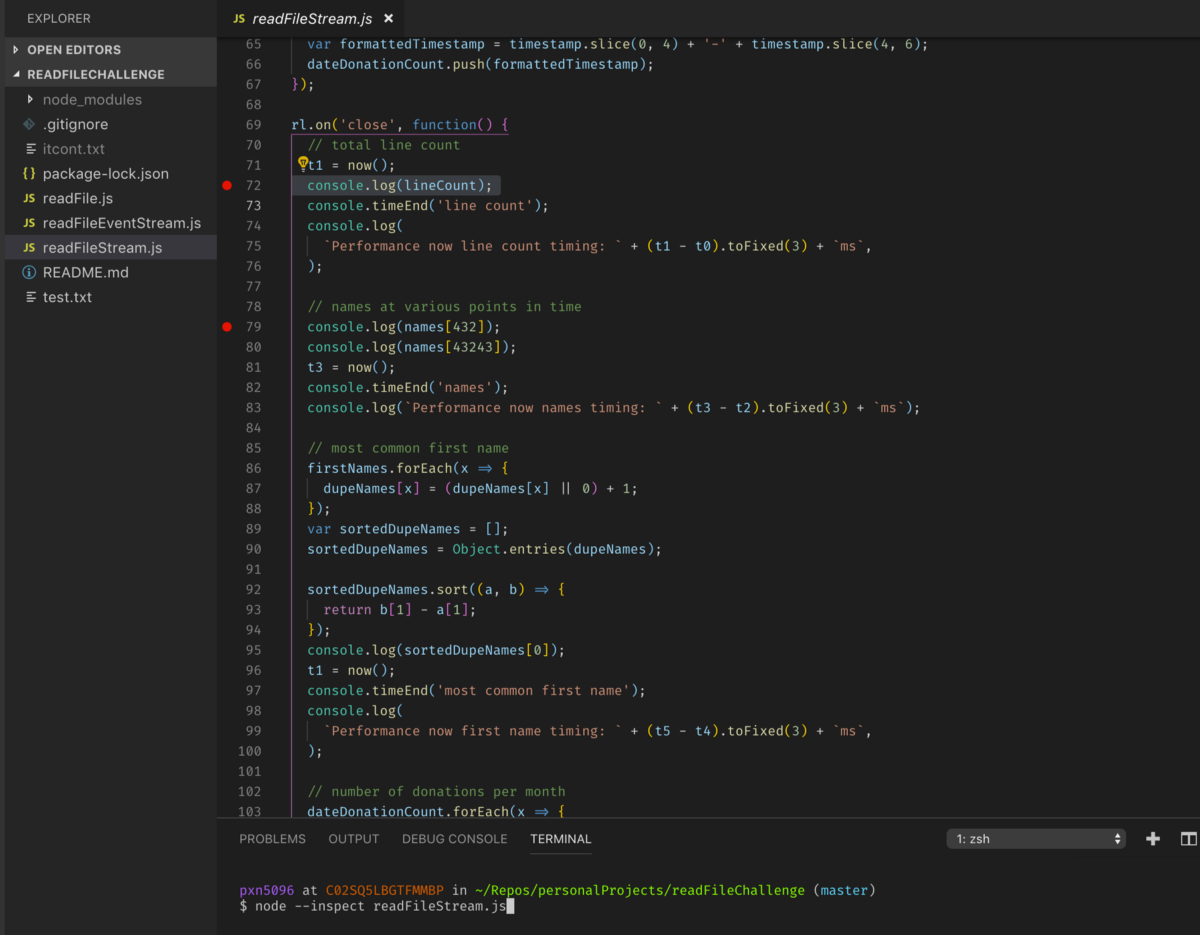
node --inspect-brk [your node application file]
node --inspect <your_file>.js
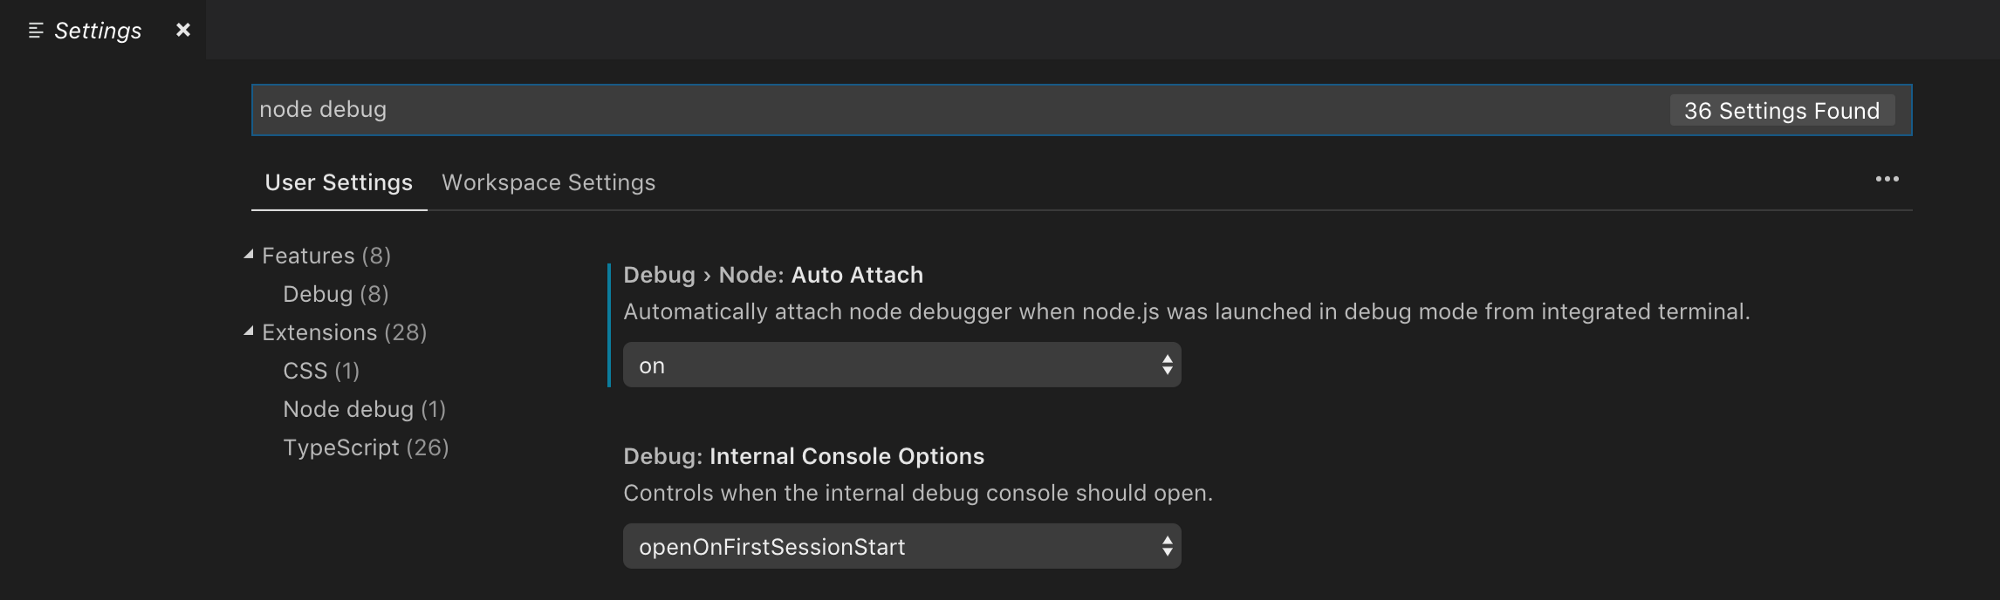
- with VSCode
Open up Preferences > Settings and in the search box type in “node debug”. Under the Extensions tab there should be one extension titled “Node debug”. From here, click the first box: Debug > Node: Auto Attach and set the drop down to “on”. You’re almost ready to go now. Yes, it really is that easy.
Now, go to your Node.js project file, and set some breakpoints by clicking on the left hand side of the file wherever you’d like to see your code stop, and in the terminal type node --inspect <FILE NAME>. Now watch the magic happen…
If you need more advanced settings for VS Code, it comes with a configuration file, .vscode/launch.json which describes how the debugger should be launched. The default launch.json looks something like this:
{
    "version": "0.2.0",
    "configurations": [
        {
            "type": "node",
            "request": "launch",
            "name": "Launch Program",
            "program": "${workspaceRoot}/index.js"
        },
        {
            "type": "node",
            "request": "attach",
            "name": "Attach to Port",
            "address": "localhost",
            "port": 5858
        }
    ]
}
Understanding the boomerang effect or callback hell
The “boomerang effect” happens when a group of callbacks is executed in chain — when one I/O operation completes, the next operation starts. The name “boomerang” derives from the shape of your code when there are many nested callback functions. The increasing left indentation and the return of that indentation makes a boomerang-like shape.
const fs = require('fs');

function append_some_a_to_b(callback) {
    fs.open(__dirname + '/a.txt', 'r', function(err, aFd) {
        if (err) {
            return callback(err);
        }

        const buffer = new Buffer(10);
        fs.read(aFd, buffer, 0, buffer.length, 0, function(err) {
            if (err) {
                return callback(err);
            }

            fs.close(aFd, function(err) {
                if (err) {
                    return callback(err);
                }

                fs.open(__dirname + '/b.txt', 'a', function(err, bFd) {
                    if (err) {
                        return callback(err);
                    }

                    fs.fstat(bFd, function(err, bStats) {
                        if (err) {
                            return callback(err);
                        }

                        fs.write(bFd, buffer, 0, buffer.length, bStats.size,
                            function(err) {
                                if (err) {
                                    return callback(err);
                                }
                                fs.close(bFd, callback);
                            });
                    });
                });
            });
        });
    });
}
TIP
AVOIDING THE BOOMERANG EFFECT BY DECLARING FUNCTIONS
Meteor.js
Meteor
Meteor is a full-stack JavaScript platform for developing modern web and mobile applications. Meteor includes a key set of technologies for building connected-client reactive applications, a build tool, and a curated set of packages from the Node.js and general JavaScript community.
curl https://install.meteor.com/ | sh
- Meteor allows you to develop in one language, JavaScript, in all environments: application server, web browser, and mobile device.
- Meteor uses data on the wire, meaning the server sends data, not HTML, and the client renders it.
- Meteor embraces the ecosystem, bringing the best parts of the extremely active JavaScript community to you in a careful and considered way.
- Meteor provides full stack reactivity, allowing your UI to seamlessly reflect the true state of the world with minimal development effort.
meteor create myapp
cd myapp
meteor npm install
meteor
# Meteor server running on: http://localhost:3000/
- фулстек фреймворк
- берет на себя трансфер данных (работа с API)
- Babel 7, Cordova 7.1, Mongo 3.4, streaming server rendering
- свой шаблонизатор
Метеора есть менеджер пакетов, который называется Atmosphere. Он позволяет сообществу создавать пакеты, которые глубоко интегрированы в платформу Meteor, они расширяют API, доступные для вас как для разработчика.