Competent
URI Handling Function Properties
Using underscoreJS/lodash:
- native js vs provided by library methods
- approach pros and cons
Same origin policy
Dynamic UI routing
Data visualisation (highcharts.js, d3.js):
- using basic graphs(lines, column and bar charts, pie, areas, 3d charts)
- graph types
URI Handling Function Properties
Using underscoreJS/lodash:
- native js vs provided by library methods
- approach pros and cons
Same origin policy:
JSONP
JSONP is a method for sending JSON data without worrying about cross-domain issues.
JSONP does not use the XMLHttpRequest object.
JSONP uses the <script> tag instead.
TIP
JSONP stands for JSON with Padding.
Requesting a file from another domain can cause problems, due to cross-domain policy. Requesting an external script from another domain does not have this problem.
proxy
Often during frontend-only development there is a backend server accessible without setting the CORS headers. The common solution would be to fire up the backend on my computer too and it makes the API to be on the same host as the code I’m working. The bad solution would be to set the CORS headers in production even they are not needed, effectively opening an attack vector. The solution I came up with is a simple proxy that serves static files from the file system and proxies some paths to the remote API server. Since Same Origin Policy only affects browsers, making the call from the server-side possible, and it effectively brings everything to the same domain.
The proxy script
Dependencies
For this proxy, I’ll be using Node.js, as it provides very easy dependency management with a simple file. These dependencies are Express and Request. The other important part in package.json is the main property that sets the main script.
{
  "name": "a_simple_proxy_to_circumvent_the_sop",
  "description": "Proxy+Express",
  "author": "gsashee@gmail.com",
  "dependencies": {
    "express": "4.13.x",
    "request": "2.58.x"
  },
  "main":"server.js"
}
Then with a simple npm install, both dependencies are downloaded and ready to roll.
The script
The script is very simple. It fires up an Express server that serves the static files from the fs, and adds a route that forwards to the predefined API URL. The complete source is as follows:
var express = require('express');
var request = require('request');

// Parameters
// You can use a shorthand for multiple API endpoints: /api|/other_api
var paths='/api';
var apiServerHost = 'http://echo.httpkit.com';

var app = express();
app.use(paths, function(req, res) {
  var url = apiServerHost + req.baseUrl + req.url;
  console.log('piped: '+req.baseUrl + req.url);
  req.pipe(request(url)).pipe(res);
});

app.use(express.static('.'));

app.listen(process.env.PORT || 8080);
For the paths multiple values can be added, delimited with a pipe (|).
Start it with a simple npm start and it will be listening on http://localhost:8080 . Also you don’t need to restart it when you make changes to the files, making front-end development easier.
For an added benefit, it supports Heroku, so just create a new app there and push your code, and it makes an instant preview server.
Conclusion
This proxy script proved to be very useful in some situations. It is in my ever accumulating development tools collection. I hope you find it useful and saves some coding next time.
Custom headers
Cross-Origin Resource Sharing (CORS) — механизм, использующий дополнительные HTTP-заголовки, чтобы дать возможность агенту пользователя получать разрешения на доступ к выбранным ресурсам с сервера на источнике (домене), отличном от того, что сайт использует в данный момент. Говорят, что агент пользователя делает запрос с другого источника (cross-origin HTTP request), если источник текущего документа отличается от запрашиваемого ресурса доменом, протоколом или портом.
Пример cross-origin запроса: HTML страница, обслуживаемая сервером с http://domain-a.com, запрашивает <img> src по адресу http://domain-b.com/image.jpg. Сегодня многие страницы загружают ресурсы вроде CSS-стилей, изображений и скриптов с разных доменов, соответствующих разным сетям доставки контента (Content delivery networks, CDNs).
В целях безопасности браузеры ограничивают cross-origin запросы, инициируемые скриптами. Например, XMLHttpRequest и Fetch API следуют политике одного источника (same-origin policy). Это значит, что web-приложения, использующие такие API, могут запрашивать HTTP-ресурсы только с того домена, с которого были загружены, пока не будут использованы CORS-заголовки.
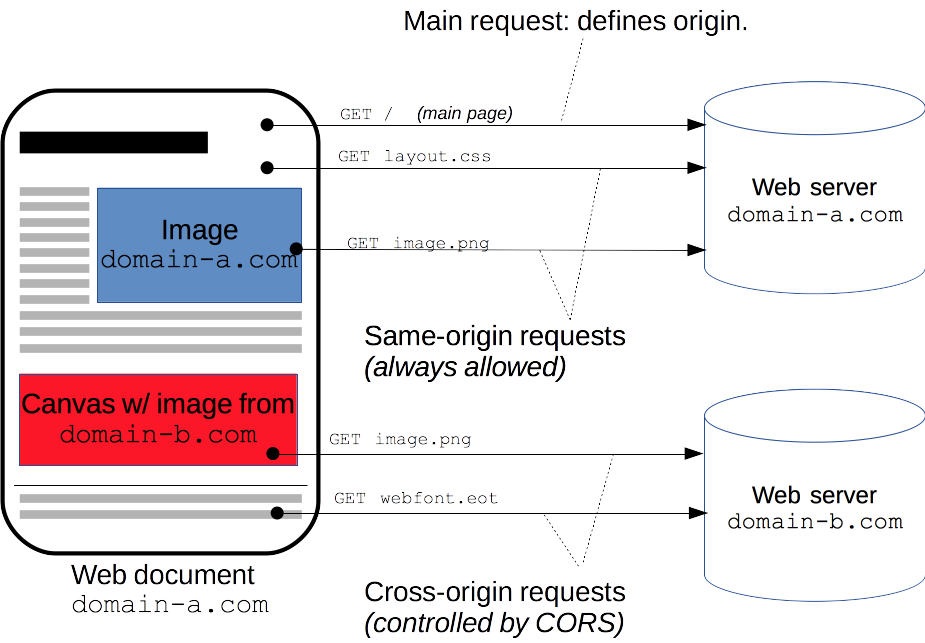
Механизм CORS поддерживает кросс-доменные запросы и передачу данных между браузером и web-серверами по защищенному соединению. Современные браузеры используют CORS в API-контейнерах, таких как XMLHttpRequest или Fetch, чтобы снизить риски, присущие запросам с других источников.
HTTP Request Headers
When a domain is requesting to interact with a resource on another domain, request headers are added from the first domain in order to use the cross-origin resource sharing feature. These are the HTTP request headers that may be associated with the requesting domain.
- Origin
- Access-Control-Request-Method
- Access-Control-Request-Headers
HTTP Response Headers
The domain who’s resources are being requested can respond to the first domain with the following HTTP response headers based on what configuration options are set.
- Access-Control-Allow-Origin
- Access-Control-Allow-Credentials
- Access-Control-Expose-Headers
- Access-Control-Max-Age
- Access-Control-Allow-Methods
- Access-Control-Allow-Headers
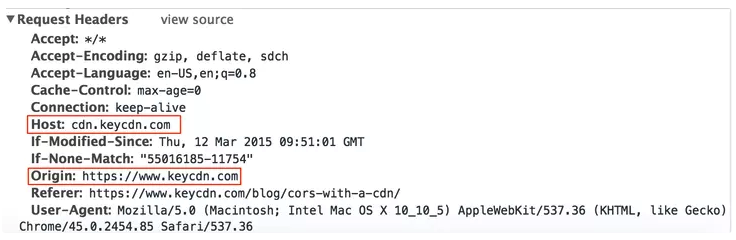
A “Real-World” Example of How CORS Works
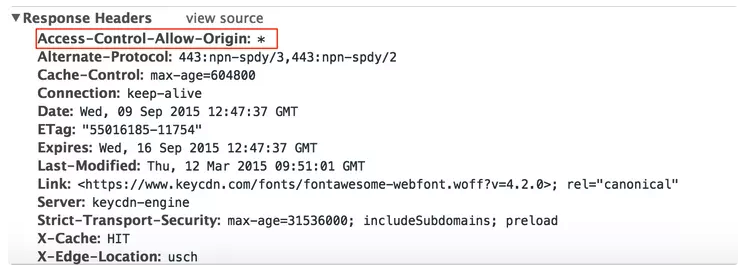
CORS works by having the origin domain send HTTP request headers to the host domain that is hosting the resource. The example below shows that https://www.keycdn.com is the Origin domain that is requesting a resource from the Host: cdn.keycdn.com
Once cdn.keycdn.com receives the request, it responds by either allowing or denying the origin domain access to the requested resources based on the CORS settings configured. In the example below, it shows that the host responded with the response header of Access-Control-Allow-Origin: * . The * means all domains are allowed to access this resource.
Dynamic UI routing
Dependency injection (CommonJS vs AMD)
Модуль - переиспользуемая часть кода, содержит в себе детали реализации и предоставляет открытое API
- абстрагировать код
- инкапсулировать код
- переиспользовать код
- управлять зависимостями
ES5 попытки
IIFE
(function() {
  return {

  }
})();
Revealing Module (выявление модуля)
const service = function() {
  // some inner code

  // public API
  return {

  }
}();

const Module = function() {}
const v1 = new Module();
AMD
- AMD (асинхронное определение модуля)
- используется в браузерах и применят для определения функцию
define
define('Module1', ['depend1', 'depend2'], function (depend1, depend2) {
  // some code

  // Public API
  return {

  }
})
CommonJS
применяется в Node.js и использует для определения зависимостей и модулей
requireиmodule.exportsconst dep1 = require('./dep1'); const dep2 = require('./dep2'); module.exports = function() { // some code }
UMD
- UMD (универсальное определение модуля)
- может быть использован как в браузере, так и в node.js
(function (root, factory) {
  if (typeof define === 'function' && define.amd) {
  // AMD. Подключение анонимного модуля
  define(['b'], factory);
} else if (typeof module === 'object' && module.exports) {
  // Node. Не работает с CommonJS напрямую,
  // только CommonJS-образными средами, которые поддерживают
  // module.exports, как Node.
  module.exports = factory(require('b'));
} else {
  // Глобальные переменные браузера (root это window)
  root.returnExports = factory(root.b);
}
}(this, function (b) {
//как-нибудь использовать b.
// Просто возвращаем значение для определения модуля.
// Этот пример возвращает объект, но модуль
// может вернуть и функцию как экспортируемое значение.
return {};
}));
ES6
- использует токен
exportдля экспорта публичного API модуля
export function sum(a, b) {
  return a + b;
}

export default class Person {

}
import { sum } from './lib1';
import { sayHello as say } from './lib2';
import * as API from './lib3';

sum(2, 5); // 7
Загрузчики модулей
RequireJS- для AMD модулейSystemJS- AMD, CommonJS, UMD
Data visualisation (highcharts.js, d3.js):
- using basic graphs(lines, column and bar charts, pie, areas, 3d charts)
- graph types
WebWorkers
TIP
WebWorker - технология, позволяющая веб-приложениям выполнять фоновые задачи в отдельных потоках
Доступно
- Объект navigator
- Объект location (только для чтения)
- XMLHttpRequest
- setTimeout()/clearTimeout() а также setInterval()/clearInterval()
- Импорт внешних скриптов с использованием importScripts()
- Создание других веб-Workerов
Не доступны
- DOM (он не является потокобезопасным)
- Объект window
- Объект document
- Объект parent
Web Worker позволяет нам делать такие вещи, как запуск длинных сценариев для обработки вычислительно-интенсивных задач, но без блокировки пользовательского интерфейса. На самом деле все это происходит параллельно. Web Workers действительно многопоточны.
Web Workersсоздаются посредством основного процесса и могут общаться только с ним.Shared Workersдоступ к ним может быть достигнут всеми процессами, работающими на одном и том же происхождении (разные вкладки браузера, iframe или другие общие Workers).Service Workers— это управляемые событиями Workers, зарегистрированные в отношении источника и пути. Он может управлять веб-страницей / сайтом, с которым он связан, перехватывать и изменять запросы на навигацию и ресурсы, а также очень грамотно кэшировать ресурсы, чтобы дать контроль над поведением приложения в определенных ситуациях (например, когда не доступна сеть).
Проверка поддержки
window.addEventListener('load', function() {
  if (typeof Worker !== 'undefined') {
    // WebWorker поддерживается
  }
})
Пример
const worker = new Worker('task.js');

// message будет возникать, если поток присылает данные
worker.addEventListener('message', function(e) {
  console.log(e.data);
});

// отправка данных потоку
worker.postMessage('hello world');

// обработка ошибок
worker.addEventListener('error', function(err){}, false);
// task.js
addEventListener('message', function(e) {
  // вагон сложных вычислений c e.data
  postMessage({a: 1}); // отправка данных в основной поток
})
Завершить
// в главном потоке
worker.terminate();

// внутри файла task.js
close();
Импорт скриптов
// task.js
importScripts('foo.js');
Shared
доступен нескольким разным скриптам — даже если они находятся в разных окнах, фреймах или даже worker-ах
TIP
необходимо взаимодействовать через объект port — явно открыв порт, с помощью которого скрипты могут взаимодействовать с worker-ом
const myWorker = new SharedWorker("worker.js");
myWorker.port.start();  // в родительском потоке

// ---------
port.start();  // в потоке worker-а, где переменная port является ссылкой на порт
Broadcast Channel
более обобщённый API для связи. Он позволяет передавать широковещательные сообщения ко всем контекстам, использующим одно и то же происхождение. Все вкладки браузера, iframe или Worker, обслуживаемые одним и тем же источником, могут отправлять и получать сообщения
const bc = new BroadcastChannel('test_channel');

bc.postMessage('This is a test message.');

bc.onmessage = function (e) {
  console.log(e.data);
}

bc.close()
Angular
@angular/platform-webworker
import { WorkerAppModule } from '@angular/platform-webworker';
Service workers
это сценарий, который запускается браузером в фоновом режиме. Он никак не связан с веб-страницей или DOM и предоставляет функции “из коробки”, такие как обработка сетевых запросов, push-уведомления и фоновая синхронизация. Service workers обеспечивают возможность работы offline.
TIP
Service Workers are at the core of Progressive Web Apps because they allow caching of resources and push notifications, two of the main distinguishing features that up to now set native apps apart.
A Service Worker runs on a separate thread. This means you can’t access many objects available in the main JavaScript thread, including access to the DOM and several APIs like XHR, or Cookies. On the plus side, any Service Worker operation can’t ever block the UI thread, because it’s completely separate.
WARNING
Keep in mind that service workers need to be served over HTTPS, otherwise, the browser won't register them.
The Main Features of Service Workers
The end goal of Progressive Web Apps (PWAs) is to be excellent on mobile, and one thing that the web always failed at on mobile is handling the offline state.
Service workers can intercept network requests, add them to the browser cache, using the Cache API, and they can serve cached resources if they detect that the browser is offline and the network is unavailable.
Another big feature is enabling push notifications, through the use of the Push API and the Notifications API, two separate web platform APIs that developers can use in service workers.
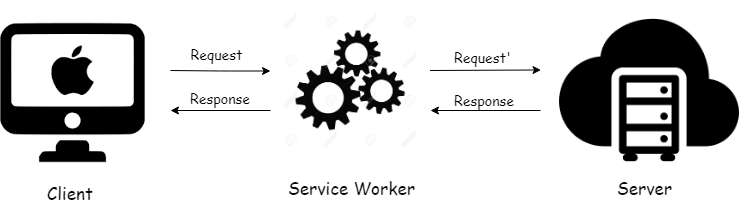
Service worker — посредник между клиентом и сервером, пропускающий через себя все запросы к серверу. С его помощью можно перехватывать все запросы “на лету”.
Service workers подобны Javascript workers. Они не связаны с DOM или веб-страницами. Они работают на другом потоке и получают доступ к DOM с помощью API postMessage. При разработке прогрессивных веб-приложений (PWA) стоит обратить внимание на service workers и стратегии кэширования.
TIP
Service workers не относятся к web workers. Web workers -это сценарии, выполняющие нагрузочные вычисления на другом потоке без блокировки основного цикла событий и замедлений в работе UI.
Регистрация service worker
Для начала нужно зарегистрировать service worker в файле javascript.
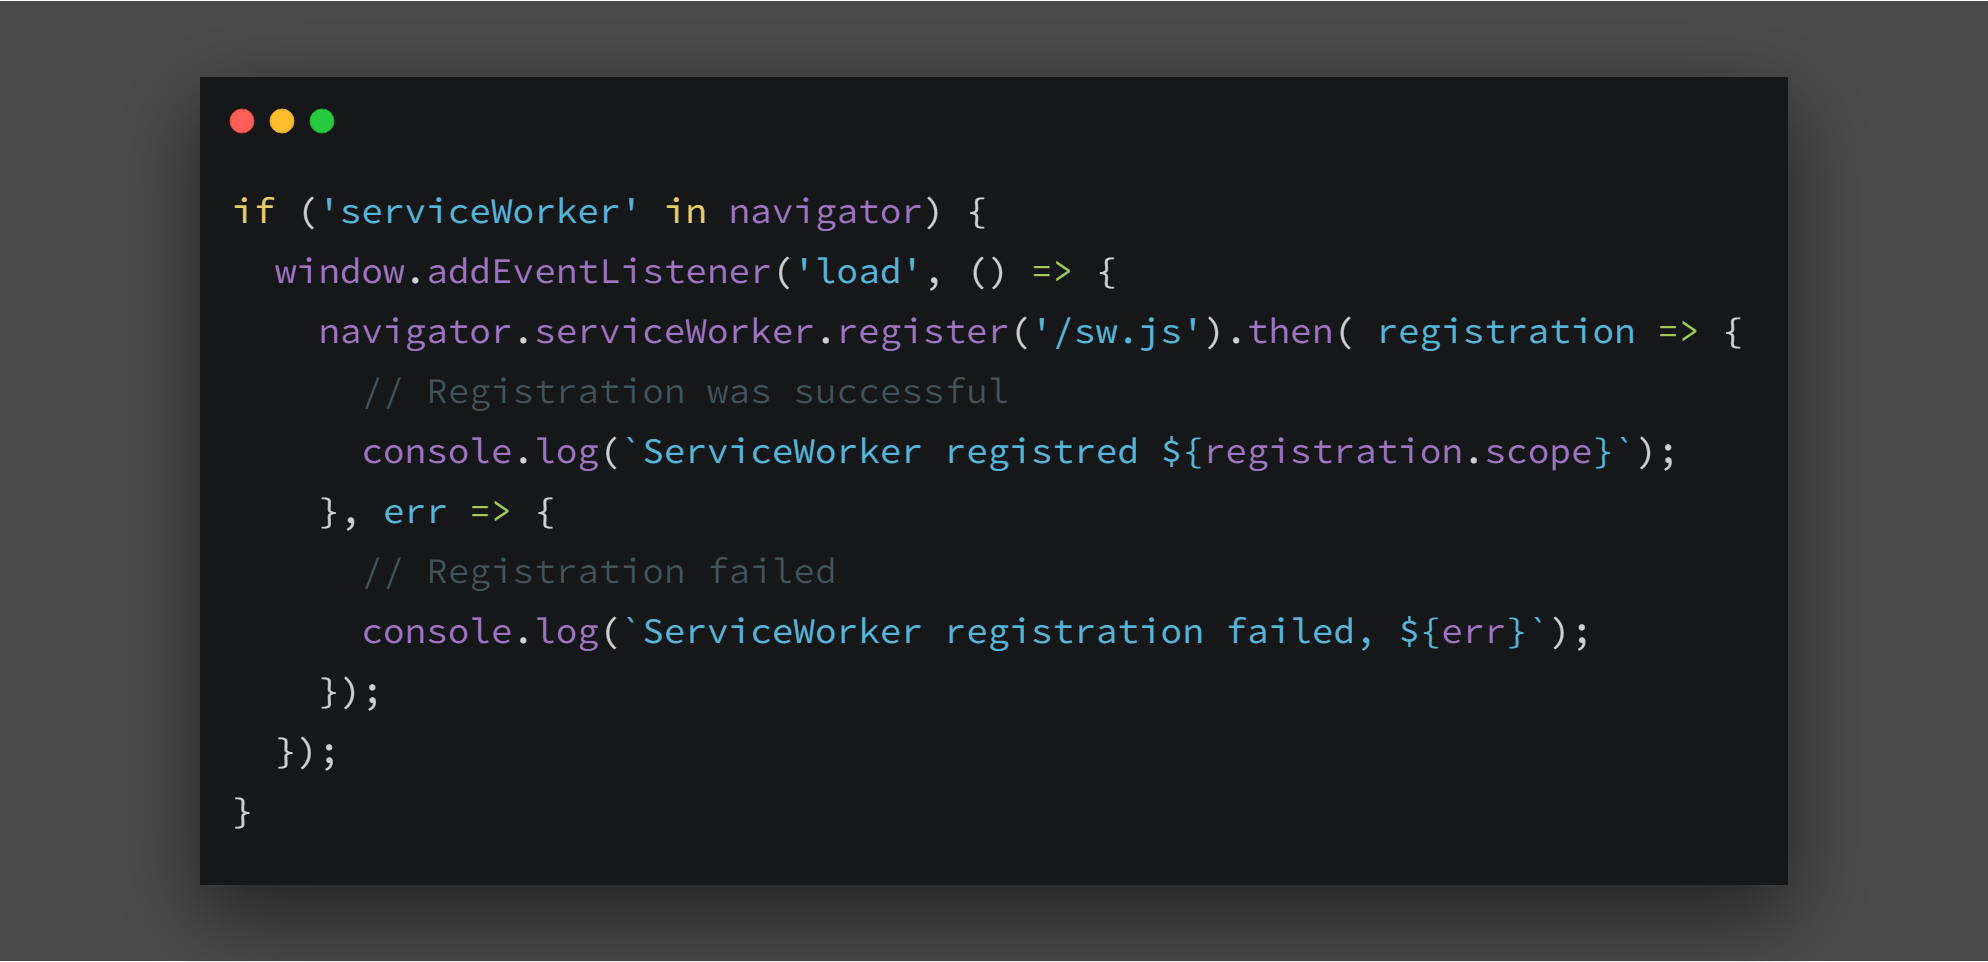
Жизненный цикл Service Worker
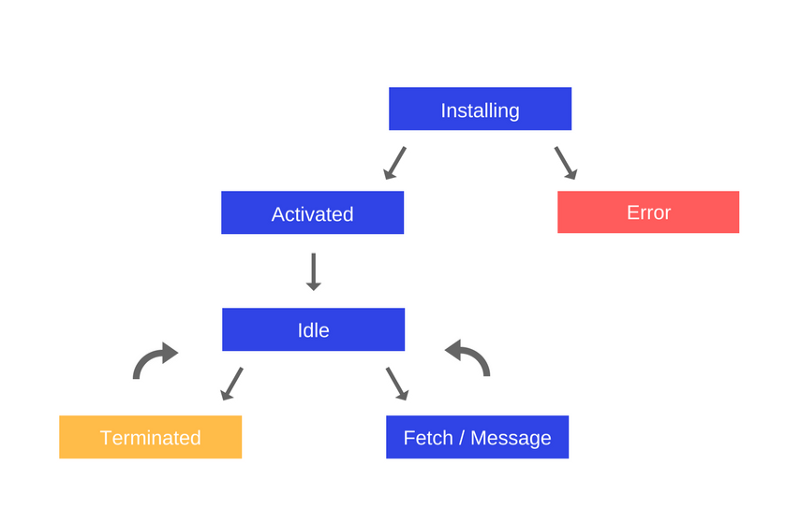
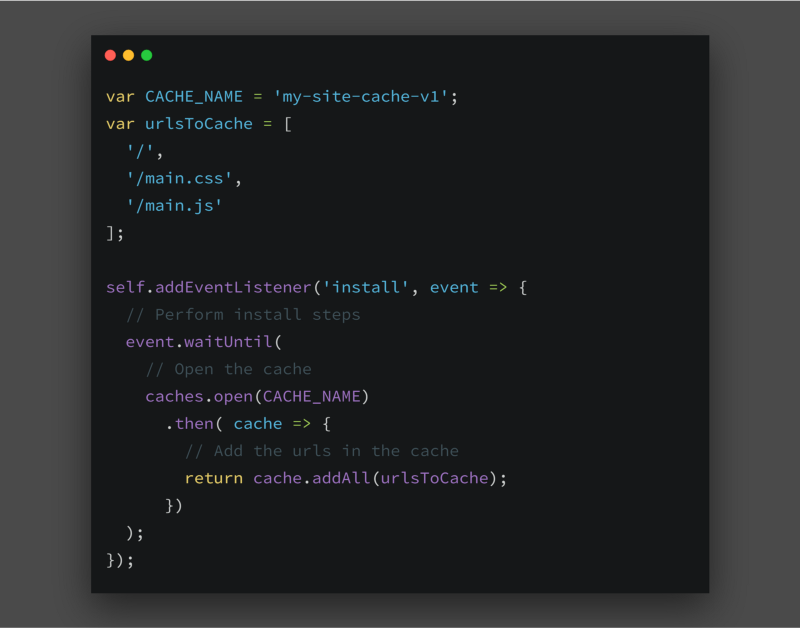
Install После регистрации service worker запускается событие install. Его можно прослушать в файле sw.js. Прежде чем перейти к коду, рассмотрим действия в событии install:
- Устанавливаем кэш в это событие.
- Добавляем все статические активы в кэш.
Метод event.waitUntil() использует промис для определения длительности и результата установки. Если какой-либо файл отсутствует в кэше, то service worker не устанавливается. Поэтому убедитесь, что в кэше отсутствует длинный список URL-адресов, поскольку если даже один url не кэшируется, то установка service worker будет приостановлена.
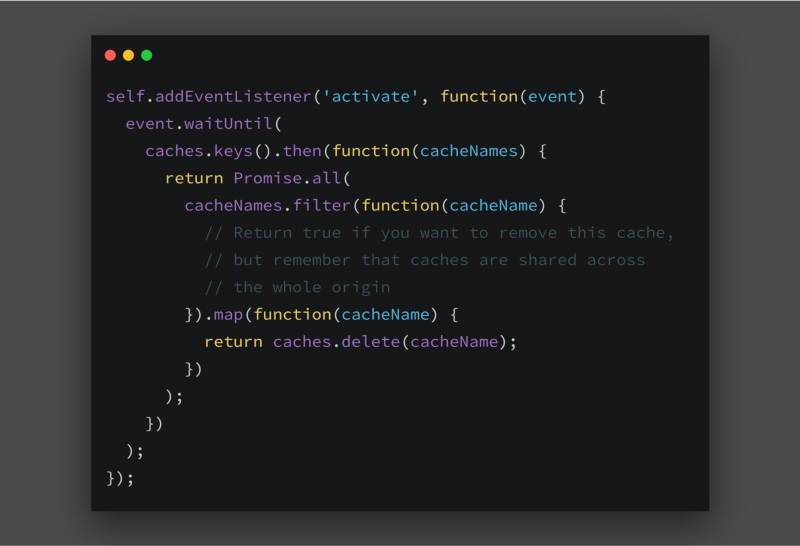
Activate После установки нового Service Worker появится событие activate. В этом событии можно удалить старый кэш. Нижеприведенный фрагмент кода взят из руководства по service worker.
Idle После активации, service worker переходит на стадию idle, не выполняя никаких действий, до запуска следующего события.
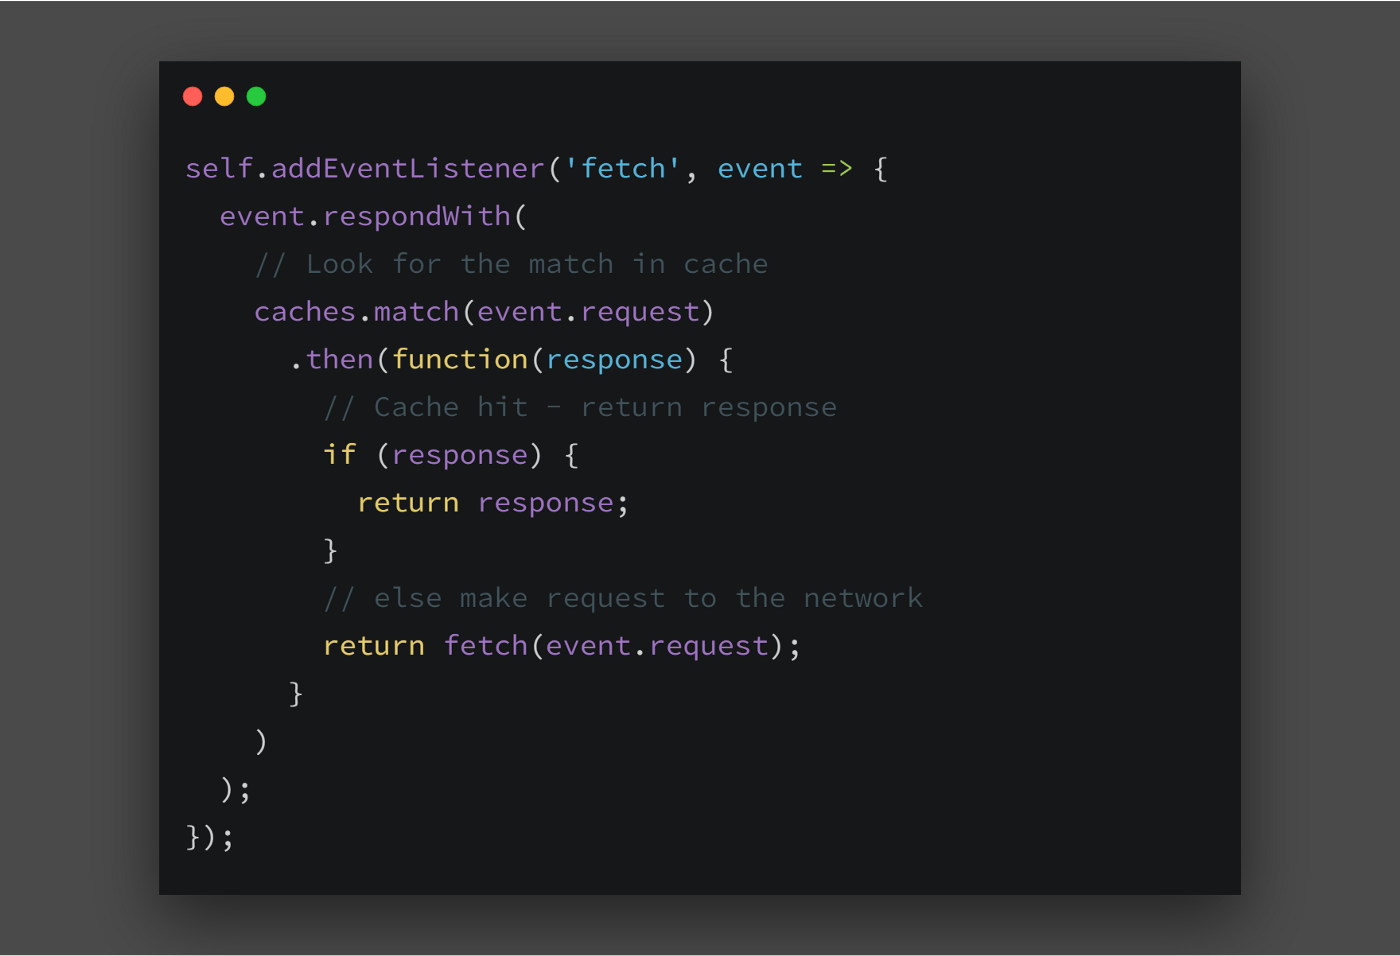
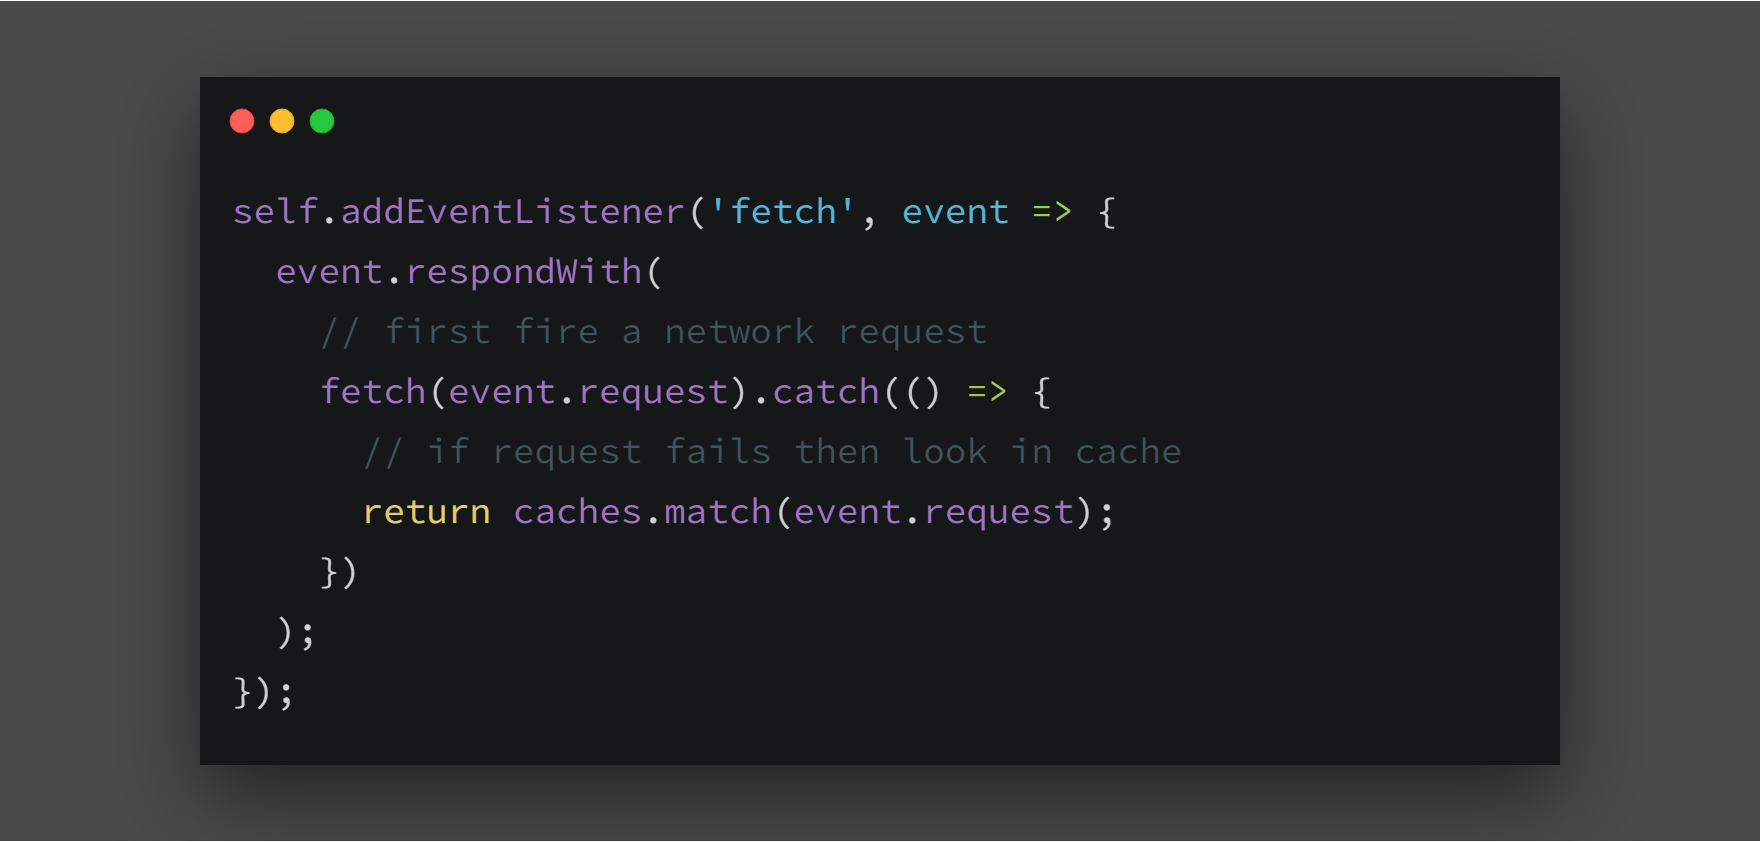
Fetch При каждом запросе fetch запускается событие fetch. Попробуем реализовать стратегии кэширования в этом событии. Как было сказано ранее, service worker работает в качестве посредника, пропуская через себя все запросы. С этого момента можно выбрать куда отправить запрос: в сеть или в кэш. В приведенном ниже примере, service worker перехватывает запрос, который отправляется в кэш. Если кэш не возвращает допустимый ответ, то запрос отправляется в сеть.
Стратегии кэширования
Мы рассмотрели одну из стратегий кэширования в событии fetch под названием “cache falling back to network”. Запомните: все стратегии кэширования реализуются в событии fetch. Рассмотрим некоторые из них:
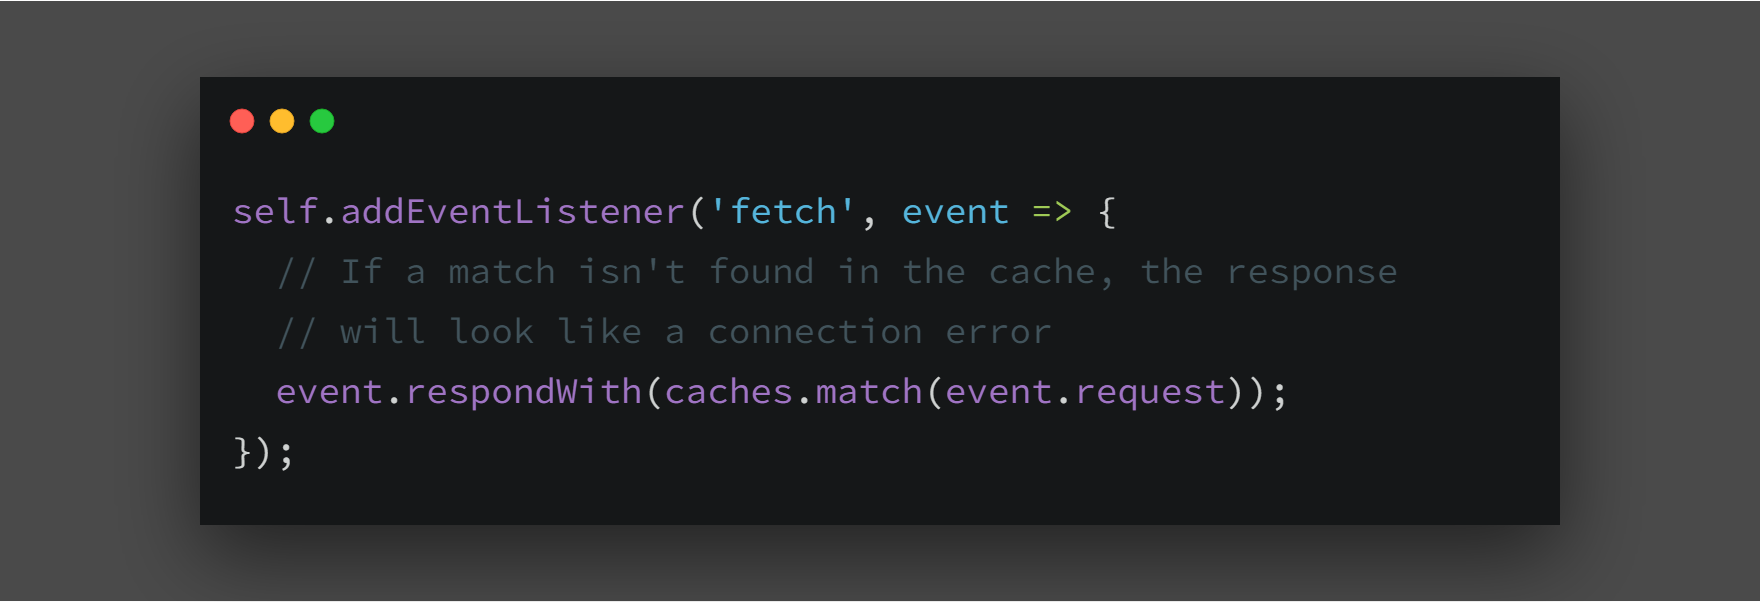
Cache only Одна из самых простых стратегий. Как можно догадаться из названия, все запросы отправляются в кэш. Случаи использования - для получения доступа к статическим активам
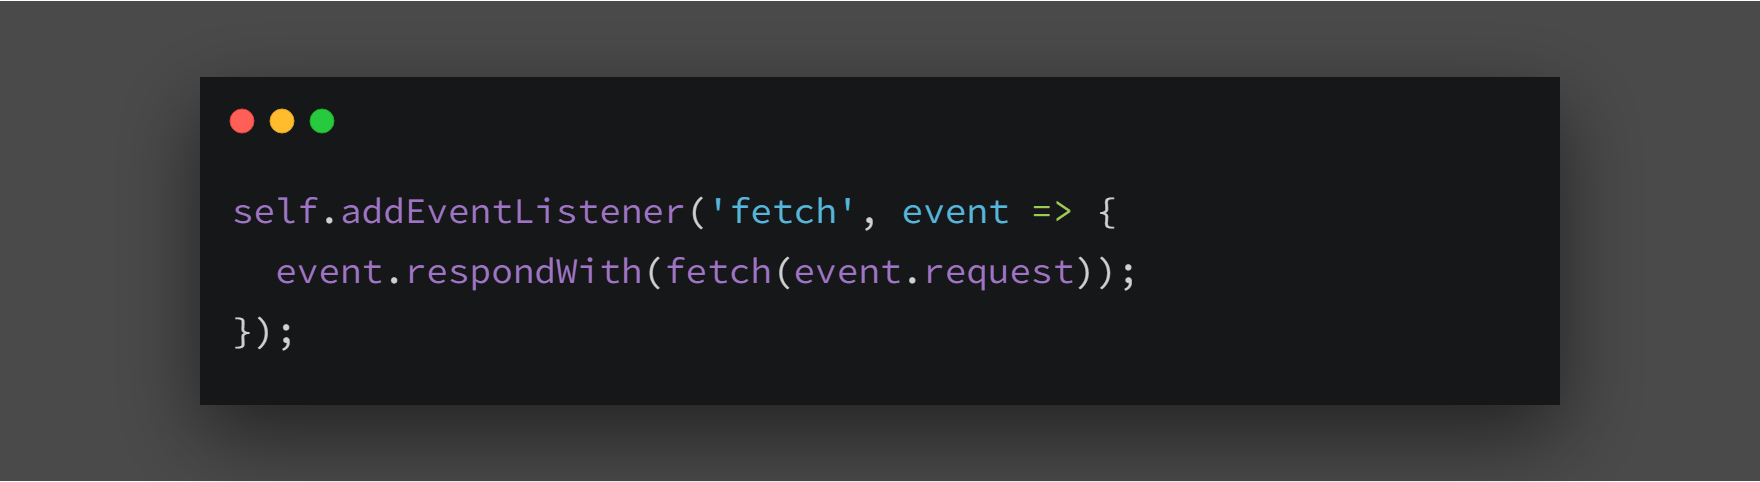
Network only Клиент делает запрос, service worker перехватывает его и направляет в сеть. Легче легкого!! Случаи использования - при отсутствии аналогов offline, например с analytics pings и запросами non-GET.
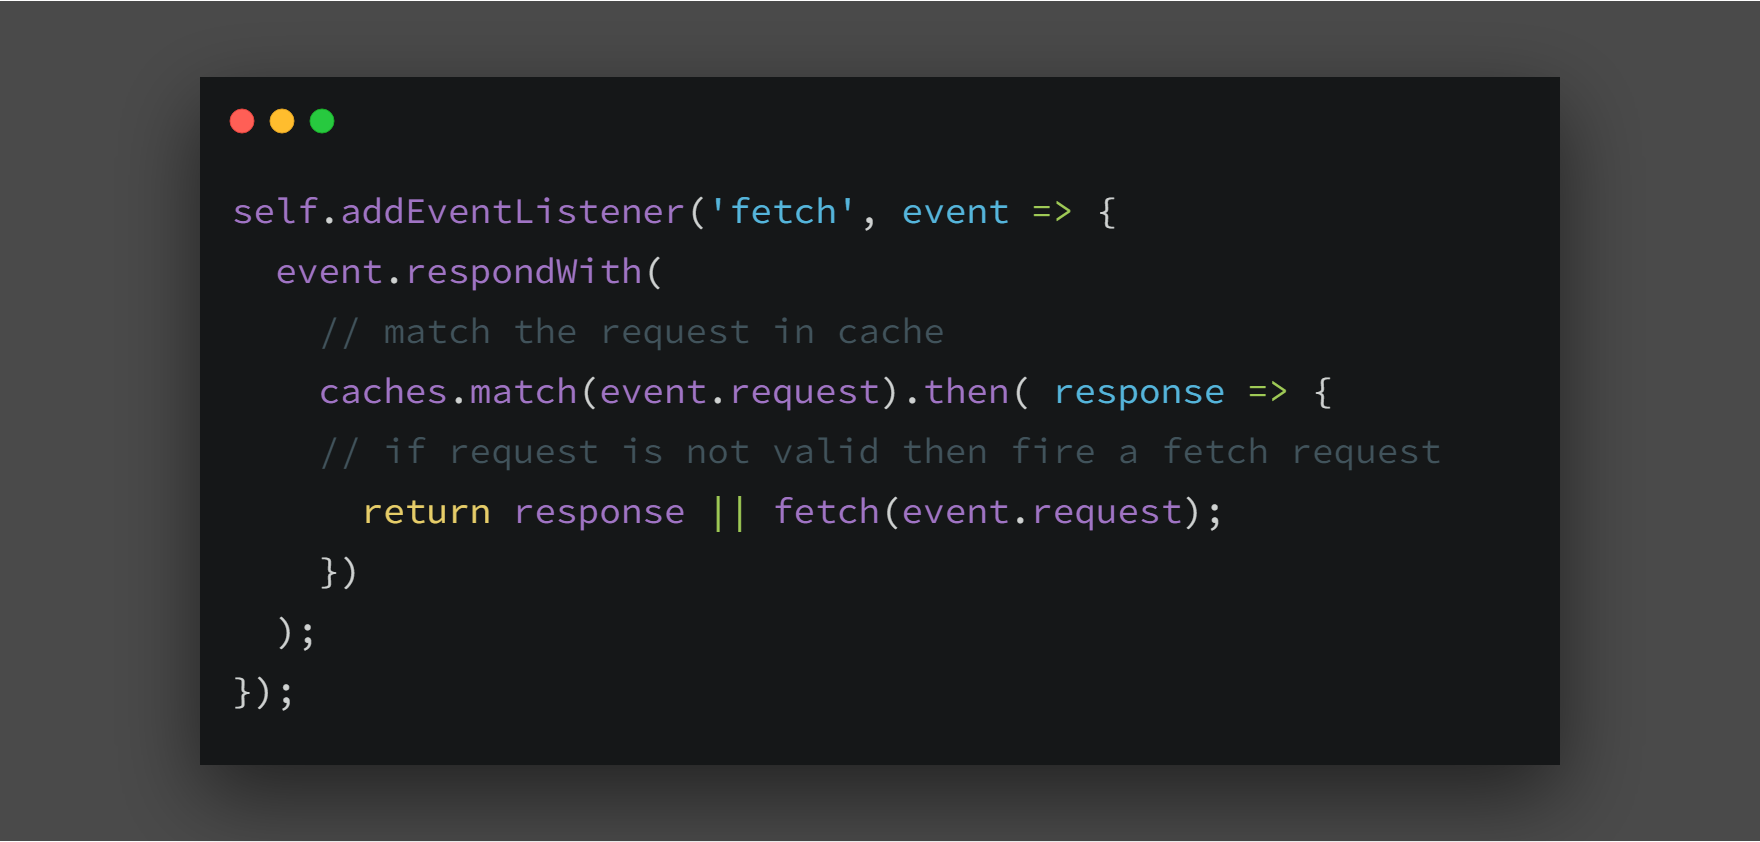
Cache falling back to network Эту стратегию мы рассматривали выше, в событии fetch. Service worker делает запрос в кэш, и при отсутствии ответа запрос отправляется в сеть. Случаи использования - при разработке offline first приложения
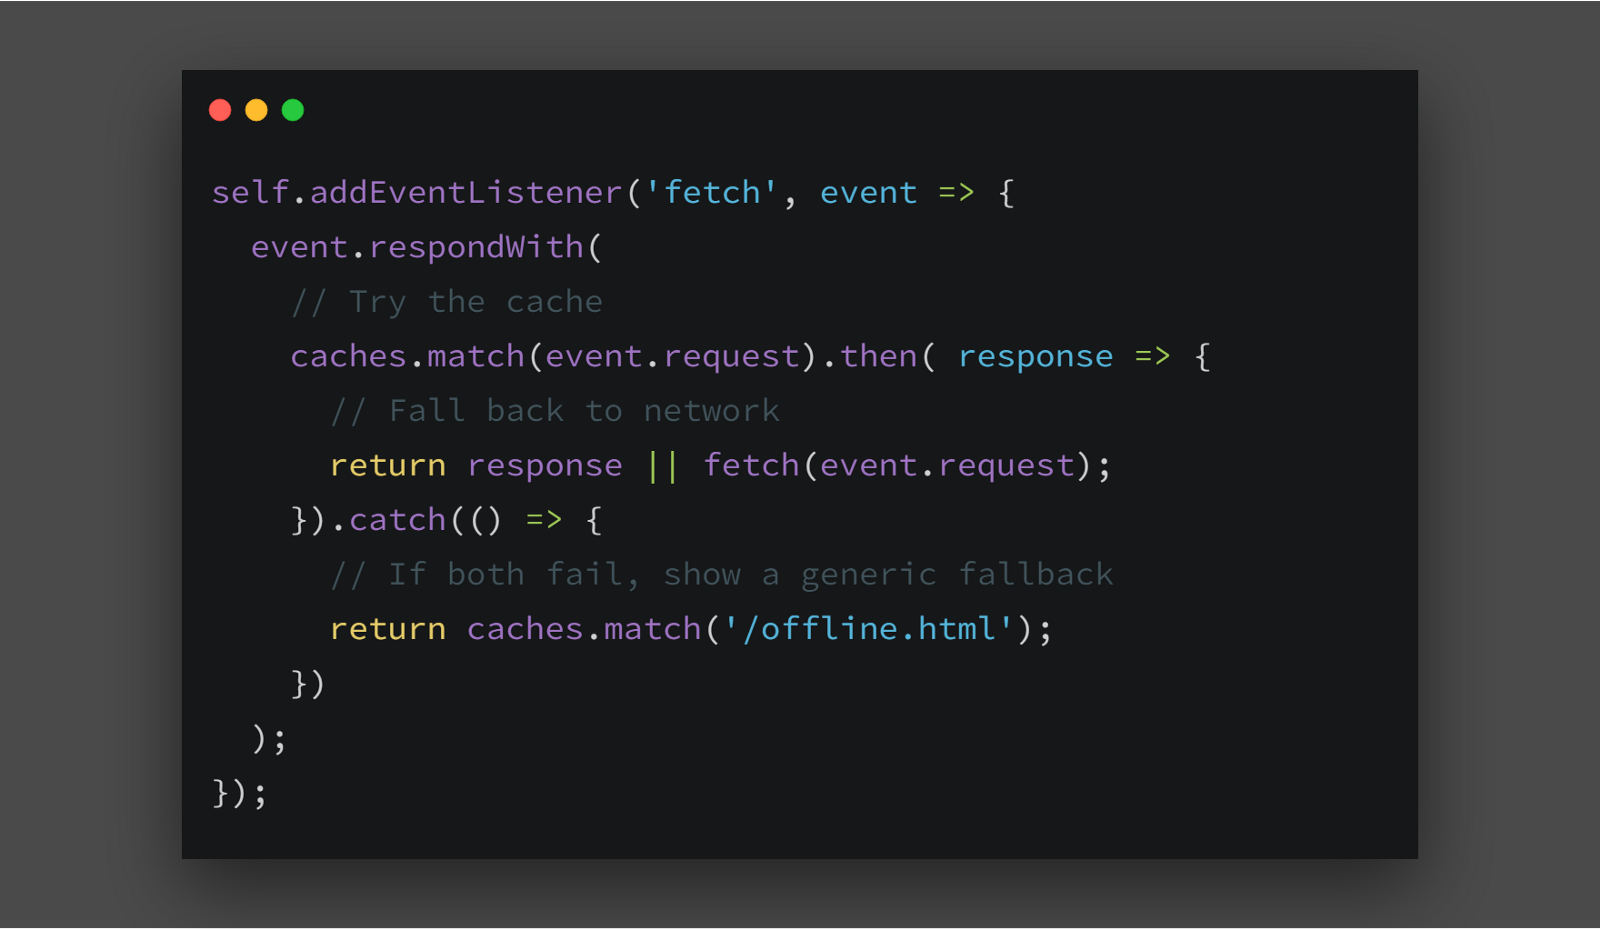
Network falling back to cache Сначала service worker делает запрос к сети, и в случае успешного ответа он отправляется в кэш.
Случаи использования - При разработке часто меняющихся страниц, например: страницы для записей или таблицы участников игры. Идеально подойдет для случая, когда в приоритете последние добавленные данные.
Generic fallback (Резерв) Когда оба запроса дают сбой как к кэшу, так и к сети, отображается общий резерв вместо черного экрана или ошибки.
HTML5: Geolocation
The HTML Geolocation API is used to get the geographical position of a user.
Since this can compromise privacy, the position is not available unless the user approves it.
Note: Geolocation is most accurate for devices with GPS, like smartphone.
Using HTML Geolocation The getCurrentPosition() method is used to return the user's position.
The example below returns the latitude and longitude of the user's position:
<script>
var x = document.getElementById("demo");
function getLocation() {
  if (navigator.geolocation) {
    navigator.geolocation.getCurrentPosition(showPosition);
  } else {
    x.innerHTML = "Geolocation is not supported by this browser.";
  }
}

function showPosition(position) {
  x.innerHTML = "Latitude: " + position.coords.latitude +
  "<br>Longitude: " + position.coords.longitude;
}
</script>
- Check if Geolocation is supported
- If supported, run the getCurrentPosition() method. If not, display a message to the user
- If the getCurrentPosition() method is successful, it returns a coordinates object to the function specified in the parameter (showPosition)
- The showPosition() function outputs the Latitude and Longitude
Handling Errors and Rejections
The second parameter of the getCurrentPosition() method is used to handle errors. It specifies a function to run if it fails to get the user's location:
Example
function showError(error) {
  switch(error.code) {
    case error.PERMISSION_DENIED:
      x.innerHTML = "User denied the request for Geolocation."
      break;
    case error.POSITION_UNAVAILABLE:
      x.innerHTML = "Location information is unavailable."
      break;
    case error.TIMEOUT:
      x.innerHTML = "The request to get user location timed out."
      break;
    case error.UNKNOWN_ERROR:
      x.innerHTML = "An unknown error occurred."
      break;
  }
}
Displaying the Result in a Map
To display the result in a map, you need access to a map service, like Google Maps.
In the example below, the returned latitude and longitude is used to show the location in a Google Map (using a static image):
Example
function showPosition(position) {
  var latlon = position.coords.latitude + "," + position.coords.longitude;

  var img_url = "https://maps.googleapis.com/maps/api/staticmap?center=
  "+latlon+"&zoom=14&size=400x300&sensor=false&key=YOUR_:KEY";

  document.getElementById("mapholder").innerHTML = "<img src='"+img_url+"'>";
}
Location-specific Information
This page has demonstrated how to show a user's position on a map.
Geolocation is also very useful for location-specific information, like:
- Up-to-date local information
- Showing Points-of-interest near the user
- Turn-by-turn navigation (GPS)
- The getCurrentPosition() Method - Return Data
The getCurrentPosition() method returns an object on success. The latitude, longitude and accuracy properties are always returned. The other properties are returned if available:
| Property | Returns |
|---|---|
| coords.latitude | The latitude as a decimal number (always returned) |
| coords.longitude | The longitude as a decimal number (always returned) |
| coords.accuracy | The accuracy of position (always returned) |
| coords.altitude | The altitude in meters above the mean sea level (returned if available) |
| coords.altitudeAccuracy | The altitude accuracy of position (returned if available) |
| coords.heading | The heading as degrees clockwise from North (returned if available) |
| coords.speed | The speed in meters per second (returned if available) |
| timestamp | The date/time of the response (returned if available) |
Geolocation Object - Other interesting Methods
The Geolocation object also has other interesting methods:
- watchPosition() - Returns the current position of the user and continues to return updated position as the user moves (like the GPS in a car).
- clearWatch() - Stops the watchPosition() method.
The example below shows the watchPosition() method. You need an accurate GPS device to test this (like smartphone):
<script>
var x = document.getElementById("demo");
function getLocation() {
  if (navigator.geolocation) {
    navigator.geolocation.watchPosition(showPosition);
  } else {
    x.innerHTML = "Geolocation is not supported by this browser.";
  }
}
function showPosition(position) {
  x.innerHTML = "Latitude: " + position.coords.latitude +
  "<br>Longitude: " + position.coords.longitude;
}
</script>
Working with History object
The HTML5 History API gives developers the ability to modify a website's URL without a full page refresh. This is particularly useful for loading portions of a page with JavaScript, such that the content is significantly different and warrants a new URL.
Here's an example. Let's say a person navigates from the homepage of a site to the Help page. We're loading the content of that Help page with Ajax. That user then heads off to the Products page which we again load and swap out content with Ajax. Then they want to share the URL. With the History API, we could have been changing the URL of the page right along with the user as they navigate, so the URL they see (and thus share or save) is relevant and correct.
To check out the features of this API it's as simple as heading into the Developer Tools and typing history into the console. If the API is supported in your browser of choice then we'll find a host of methods attached to this object:
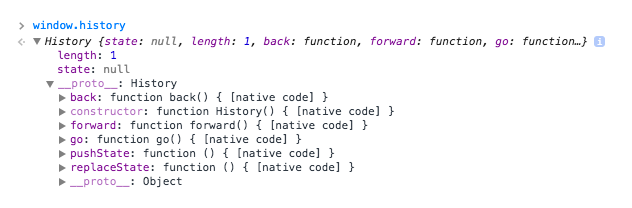
.length - returns the amount of visited pages in given tab and session;
.state - returns a current object of a history state (which can be rewritten);
.back - goes one step back history, if possible;
.forward - goes one step forward, if possible;
.go(step): a method, which allows to move within history depending on a passed argument (step)
history.replaceState(null, null, 'hello');
The replaceState method above switches out the URL in the address bar with '/hello' despite no assets being requested and the window remaining on the same page. Yet there is a problem here. Upon hitting the back button we'll find that we don't return to the URL of this article but instead we'll go back to whatever page we were on before. This is because replaceState does not manipulate the browser's history, it simply replaces the current URL in the address bar.
To fix this we'll need to use the pushState method instead:
// history.pushState([data], [title], [url]);
history.pushState(null, null, 'hello');
History Object Properties
| Property | Description |
|---|---|
| length | Returns the number of URLs in the history list |
History Object Methods
| Method | Description |
|---|---|
| back() | Loads the previous URL in the history list |
| forward() | Loads the next URL in the history list |
| go() | Loads a specific URL from the history list |
LocalStorage, SessionStorage and SQLite
LocalStorage- сохраняет данные, даже если переоткрыть браузер
window.localStorage
SessionStorage- доступно на протяжении сессии (пока браузер открыт, даже при перезагрузке страницы)
window.localStorage
localStorage.setItem('lastname', 'Smith');
localStorage.getItem('lastname');
localStorage.removeItem('lastname');
localStorage.clear(); // чистит все хранилище для данного домена
и ключ, и значение всегда сохраняются как строки
при изменении происодит событие
window.addEventListener('storage', function(e) {}
- Error handler
try {
localStorage.setItem('name', 'somevalue');
} catch (e) {
if (e == QUOTA_EXCEEDED_ERR) {
    alert('Storage limit exceeded');
}
}