Competent
Cloud computing patterns
CDN
Troubleshooting production code
Private and public IP address
Making Front end built artifact as separated part of application
AWS/Azure/google apps engine/digital ocean/rack space
Cloud computing patterns
Cloud Application Architectures
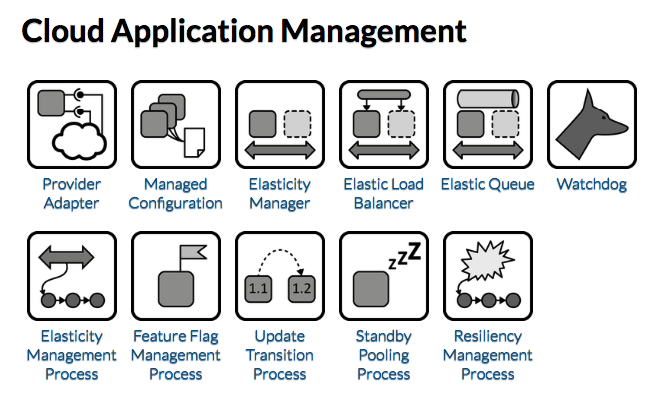
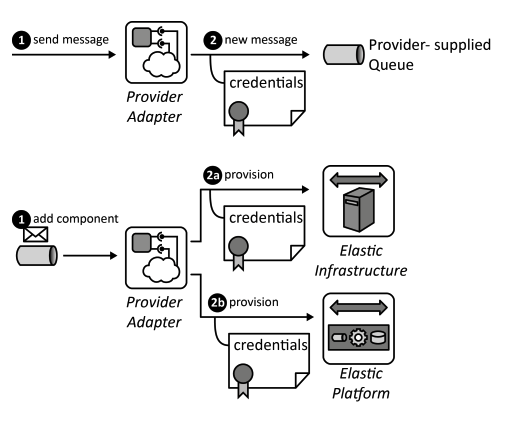
Provider Adapter
TIP
Provider interfaces are encapsulated and mapped to unified interfaces used in applications to separate concerns of interactions with the provider from application functionality.
How can the dependencies of an application component on a provider-specific interface be managed?
Context Cloud providers offer many interfaces that can be used in application components of a Distributed Application. If a component directly interacts with these interfaces, its implementation becomes strongly interleaved with the specific functions offered and the protocols used.
Solution The Provider Adapter encapsulates all provider-specific implementations required for authentication, data formatting etc. in an abstract interface. The Provider Adapter , thus, ensures separation of concerns between application components accessing provider functionality and application components providing application functionality. It may also offer synchronous provider-interfaces to be accessed asynchronously via messages and vice versa.
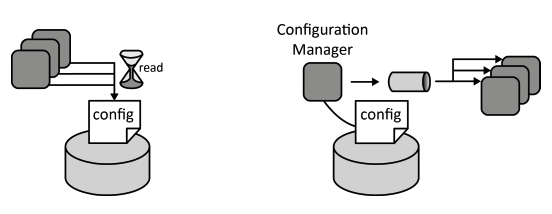
Managed Configuration
TIP
Scaled-out application components should use a centrally stored configuration to provide a unified behavior that can be adjusted simultaneously.
How can the configuration of scaled out application component instances be controlled in a coordinated fashion?
Context Application components of a Distributed Application often have configuration parameters. Storing configuration information together with the application component implementation can be unpractical as it results in more overhead in case of configuration changes. Each running instance of the application component must be updated separately. Component images stored in Elastic Infrastructures or Elastic Platforms also have to be updated upon configuration change.
Solution Configurations are stored in a central Storage Offering, commonly, a Relational Database, Key-Value Storage, or Blob Storage from where it is accessed by all running component instances either by accessing the storage periodically or by sending messages to the components.
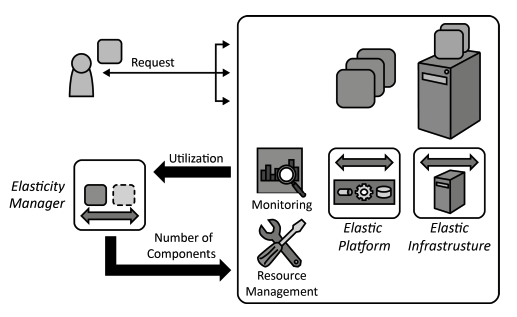
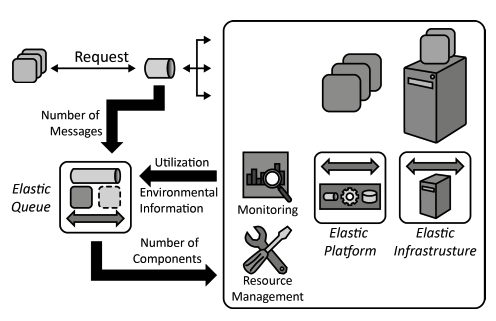
Elasticity Manager
TIP
The utilization of IT resources on which an elastically scaled-out application is hosted, for example, virtual servers is used to determine the number of required application component instances.
How can the number of required application component instances be determined based on the utilization of hosting IT resources?
Context Application components of a Distributed Application hosted on an Elastic Infrastructure or Elastic Platform shall be scaled-out. The instances of applications components, thus, shall be provisioned and decommissioned automatically based on the current workload experienced by the application.
Solution The utilization of cloud resources on which application component instances are deployed is monitored. This could be, for example, the CPU load of a virtual server. This information is used to determine the number of required instances.
Elastic Queue
TIP
The number of asynchronous accesses via messaging to an elastically scaled-out application is used to adjust the number of required application component instances.
How can the number of required application component instances be adjusted based on monitored asynchronous accesses?
Context A Distributed Application is comprised of multiple application components that are accessed asynchronously and deployed to an Elastic Infrastructure or an Elastic Platform. The required provisioning and decommissioning operations to scale this application should be performed in an automated fashion.
Solution Queues that are used to distribute asynchronous requests among multiple application components instances are monitored. Based on the number of enqueued messages the Elastic Queue adjusts the number of application component instances handling these requests.
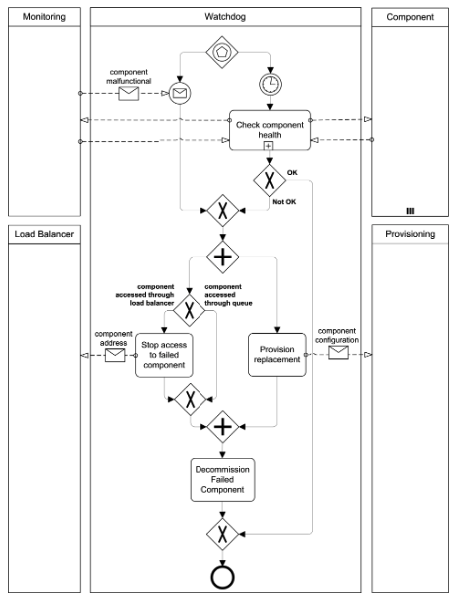
Watchdog
TIP
Applications cope with failures automatically by monitoring and replacing application component instances if the provider-assured availability is insufficient.
How can applications automatically detect failing application components and handle their replacement?
Context If a Distributed Application is comprised of many application components it is dependent on the availability of all component instances. To enable high availability under such conditions, applications have to rely on redundant application component instances and the failure of these instances has to be detected and coped with automatically.
Solution Individual application components rely on external state information by implementing the Stateless Component pattern. Components are scaled out and multiple instances of them are deployed to redundant resources. The component instances are monitored by a separate Watchdog component and replaced in case of failures.

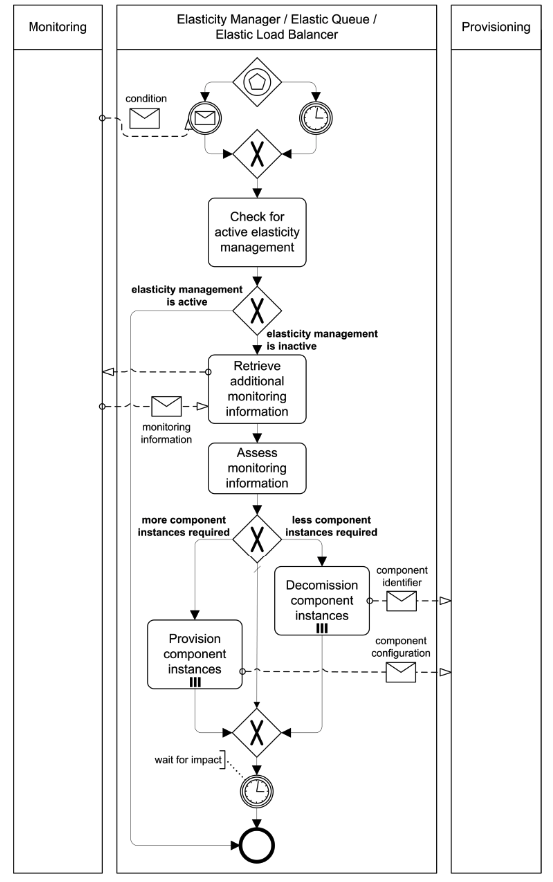
Elasticity Management Process
TIP
Application component instances are added automatically to an application to cope with increasing workload. If the workload decreases application component instances are removed respectively.
How can the number of resources to which application components are scaled-out be adjusted efficiently to the currently experienced workload and anticipated future workload?
Context A Distributed Application uses Elasticity Managers, Elastic Queues, or Elastic Load Balancers to ensure an elastic scaling of application components. To handle this task adequately, the current resource demand has to be obtained automatically from the application and has to be reflected in provisioning and decommissioning of cloud resources.
Solution An Elasticity Management Process analyzes the utilization of application component instances in intervals, when a system manager requests it, or if certain conditions are observed by the monitoring component. Based on this information, the current workload of the application is computed and reflected by adjusting used resources.
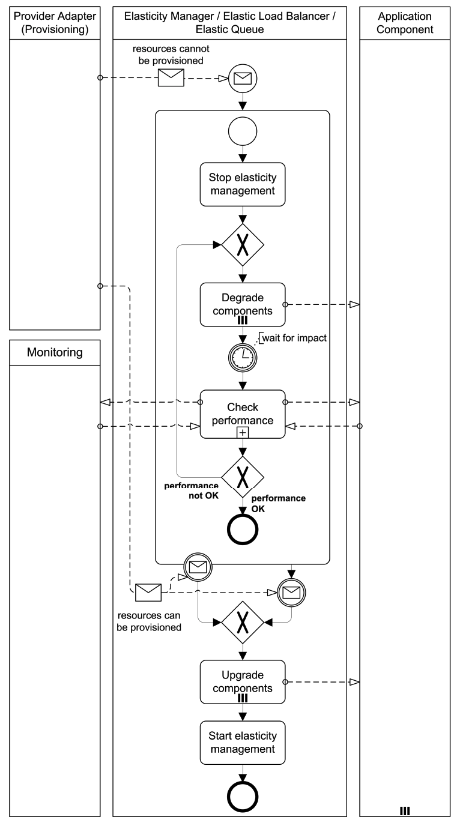
Feature Flag Management Process
TIP
If the cloud cannot provide required resources in time, the features provided by application components are degraded gracefully to replace or disable unimportant ones in order to keep vital features operational.
How can the performance of an application degrade gracefully, if the experienced workload increases but additional cloud resources are unavailable or take too long to provision?
Context While the elasticity of clouds generally allows a tight alignment of resource numbers to the experienced workload, the time it takes to provision new resources remains as a limiting factor. If the workload increases too drastically, it may take too long to provision new resources. Furthermore, cloud providers often do not guarantee concrete provisioning times.
Solution Less important application functionality provided by application component instances is disabled or replaced with a less demanding implementation, if the cloud provider cannot fulfill current workload demands. When resources can eventually be provisioned again, the application components return to normal operation.
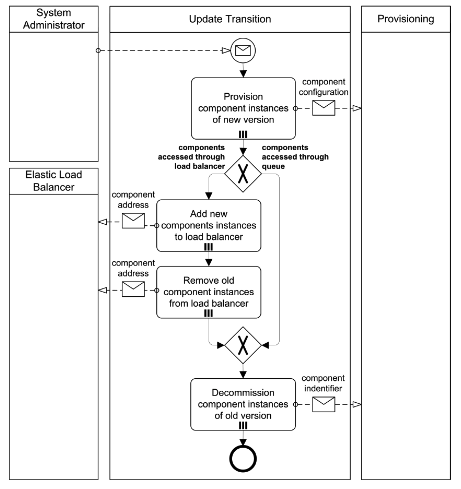
Update Transition Process
TIP
When a new application component version, middleware versions etc. become available, running application components are updated seamlessly.
How can application components of a Distributed Application be updated seamlessly?
Context During the runtime of a Distributed Application, new versions of used middleware, operating systems, or application components may become available. A seamless switch from the old to the new version of application components shall be enabled.
Solution The new component version is created. Additional application component instances of the new version are provisioned. These components are executed simultaneously with the application components of the old version. If necessary, load balancing is then switched to the component instances of the new version. If the application components access a queue, this step is unnecessary. Finally, the old application component instances are decommissioned.
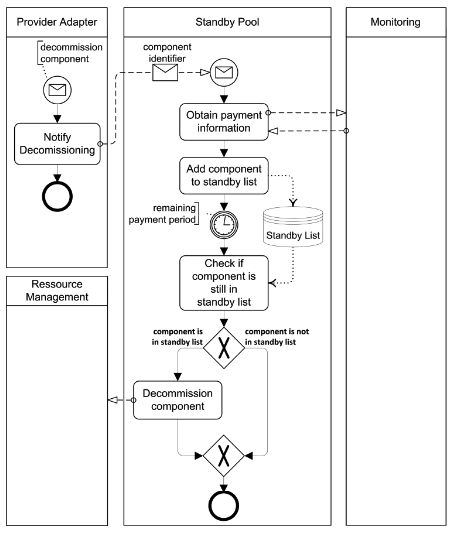
Standby Pooling Process
TIP
Application component instances should be kept on standby to increase provisioning speed and utilize billing time-slots efficiently.
How can defined provisioning times for application component instances be ensured while utilizing pay-per-use resources in an optimal fashion?
Context Even though application component instances may be provisioned and decommissioned dynamically, it usually requires some time to actually provision and decommission them. If a cloud application, however, experiences drastic and quick workload changes, these provisioning times may limit its capability to obtain the required resources quickly enough. Decommissioning of component instances immediately when no longer needed may also be ineffective, if cloud resources are charged for fixed time-slots.
Solution Instead of decommissioning application component instances instantly when they are unused, they are assigned to a standby list They are decommissioned only when the time-slot they have been paid for has been utilized and they are still not needed. The standby list may always contain a certain number of component instances to ensure timely provisioning.
Resiliency Management Process
TIP
Application components are checked for failures and replaced automatically without human intervention.
How can the overall availability of an application be ensured automatically even if individual application component instances fail?
Context A Watchdog allows to monitor application components and react to failures. To handle this task, the component functionality must be verified and failing components must be replaced with newly provisioned components in a coordinated fashion.
Solution This process is triggered by the monitoring functionality or by the Watchdog if it detects a component failure. Additionally, the Resiliency Management Process periodically verifies application component health. If a failure is detected, the faulty application component instance is decommissioned and replaced by a newly provisioned instance.
CDN
configuring own cdn (use separated resource - CloudFront_AWS/cloudflare/google_cloud_cdn for example)
Amazon CloudFront is a web service that speeds up distribution of your static and dynamic web content, such as .html, .css, .js, and image files, to your users. CloudFront delivers your content through a worldwide network of data centers called edge locations. When a user requests content that you're serving with CloudFront, the user is routed to the edge location that provides the lowest latency (time delay), so that content is delivered with the best possible performance.
- If the content is already in the edge location with the lowest latency, CloudFront delivers it immediately.
- If the content is not in that edge location, CloudFront retrieves it from an origin that you've defined—such as an Amazon S3 bucket, a MediaPackage channel, or an HTTP server (for example, a web server) that you have identified as the source for the definitive version of your content.
As an example, suppose that you're serving an image from a traditional web server, not from CloudFront. For example, you might serve an image, sunsetphoto.png, using the URL http://example.com/sunsetphoto.png.
Your users can easily navigate to this URL and see the image. But they probably don't know that their request was routed from one network to another—through the complex collection of interconnected networks that comprise the internet—until the image was found.
CloudFront speeds up the distribution of your content by routing each user request through the AWS backbone network to the edge location that can best serve your content. Typically, this is a CloudFront edge server that provides the fastest delivery to the viewer. Using the AWS network dramatically reduces the number of networks that your users' requests must pass through, which improves performance. Users get lower latency—the time it takes to load the first byte of the file—and higher data transfer rates.
You also get increased reliability and availability because copies of your files (also known as objects) are now held (or cached) in multiple edge locations around the world.
How You Set Up CloudFront to Deliver Content
You create a CloudFront distribution to tell CloudFront where you want content to be delivered from, and the details about how to track and manage content delivery. Then CloudFront uses computers—edge servers—that are close to your viewers to deliver that content quickly when someone wants to see it or use it.
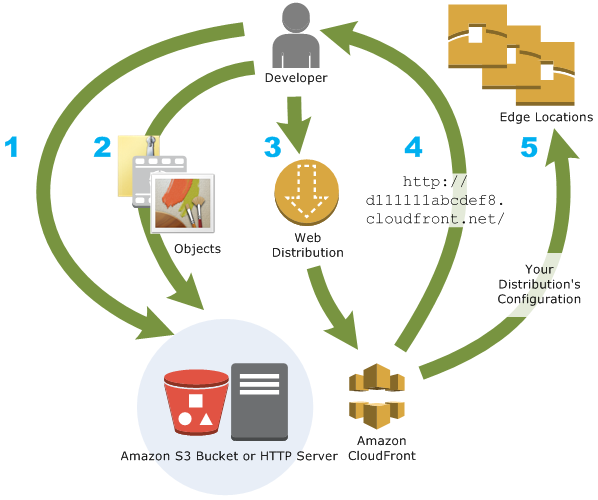
How You Configure CloudFront to Deliver Your Content
- You specify origin servers, like an Amazon S3 bucket or your own HTTP server, from which CloudFront gets your files which will then be distributed from CloudFront edge locations all over the world.
An origin server stores the original, definitive version of your objects. If you're serving content over HTTP, your origin server is either an Amazon S3 bucket or an HTTP server, such as a web server. Your HTTP server can run on an Amazon Elastic Compute Cloud (Amazon EC2) instance or on a server that you manage; these servers are also known as custom origins.
If you use the Adobe Media Server RTMP protocol to distribute media files on demand, your origin server is always an Amazon S3 bucket.
- You upload your files to your origin servers. Your files, also known as objects, typically include web pages, images, and media files, but can be anything that can be served over HTTP or a supported version of Adobe RTMP, the protocol used by Adobe Flash Media Server.
If you're using an Amazon S3 bucket as an origin server, you can make the objects in your bucket publicly readable, so that anyone who knows the CloudFront URLs for your objects can access them. You also have the option of keeping objects private and controlling who accesses them.
You create a CloudFront distribution, which tells CloudFront which origin servers to get your files from when users request the files through your web site or application. At the same time, you specify details such as whether you want CloudFront to log all requests and whether you want the distribution to be enabled as soon as it's created.
CloudFront assigns a domain name to your new distribution that you can see in the CloudFront console, or that is returned in the response to a programmatic request, for example, an API request.
CloudFront sends your distribution's configuration (but not your content) to all of its edge locations — collections of servers in geographically dispersed data centers where CloudFront caches copies of your objects.
As you develop your website or application, you use the domain name that CloudFront provides for your URLs. For example, if CloudFront returns d111111abcdef8.cloudfront.net as the domain name for your distribution, the URL for logo.jpg in your Amazon S3 bucket (or in the root directory on an HTTP server) will be http://d111111abcdef8.cloudfront.net/logo.jpg.
Or you can configure your CloudFront distribution so you can use your own domain name. In that case, the URL might be http://www.example.com/logo.jpg.
Optionally, you can configure your origin server to add headers to the files, to indicate how long you want the files to stay in the cache in CloudFront edge locations. By default, each object stays in an edge location for 24 hours before it expires. The minimum expiration time is 0 seconds; there isn't a maximum expiration time limit.
Troubleshooting production code
ssh/rds connection to server
The SSH protocol (also referred to as Secure Shell) is a method for secure remote login from one computer to another. It provides several alternative options for strong authentication, and it protects the communications security and integrity with strong encryption. It is a secure alternative to the non-protected login protocols (such as telnet, rlogin) and insecure file transfer methods (such as FTP).
The protocol is used in corporate networks for:
- providing secure access for users and automated processes
- interactive and automated file transfers
- issuing remote commands
- managing network infrastructure and other mission-critical system components.
The protocol works in the client-server model, which means that the connection is established by the SSH client connecting to the SSH server. The SSH client drives the connection setup process and uses public key cryptography to verify the identity of the SSH server. After the setup phase the SSH protocol uses strong symmetric encryption and hashing algorithms to ensure the privacy and integrity of the data that is exchanged between the client and server.
The figure below presents a simplified setup flow of a secure shell connection.
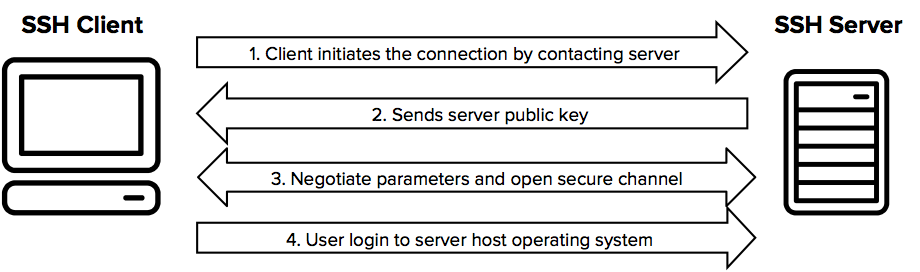
The SSH command consists of 3 distinct parts:
ssh {user}@{host}
The SSH key command instructs your system that you want to open an encrypted Secure Shell Connection. {user} represents the account you want to access. For example, you may want to access the root user, which is basically synonymous for system administrator with complete rights to modify anything on the system. {host} refers to the computer you want to access. This can be an IP Address (e.g. 244.235.23.19) or a domain name (e.g. www.xyzdomain.com).
When you hit enter, you will be prompted to enter the password for the requested account. When you type it in, nothing will appear on the screen, but your password is, in fact being transmitted. Once you’re done typing, hit enter once again. If your password is correct, you will be greeted with a remote terminal window.
Kubernetes
- Create the Pod:
kubectl apply -f https://k8s.io/examples/application/shell-demo.yaml
- Verify that the Container is running:
kubectl get pod shell-demo
- Get a shell to the running Container:
kubectl exec -it shell-demo -- /bin/bash
text editor/nano/vim/midnight commander for editing/reviewing code on server
Vim and Nano are completely different terminal text editors.
Nano is simple, easy to use and master while Vim is powerful and tough to master.
To differentiate, it will be better to list some features of them. Since we don't use terminal editors for normal edits or coding, I'm listing some of the most interesting features that help for the way we use them today.
Nano:
- Easy to use and master.
- Nano has most of the shortcuts listed at the bottom of the window, making it extremely simple to use.
- Search function
- Search and replace
- "Goto line" command
- Automatic indentation
Vim:
- Tough to get started with and master. The editing and command modes will confuse beginners.
- Session recovery
- Split screen
- Tab expansion
- Completion commands
- Syntax coloring
Nano
Nano is the built-in basic text editor for many popular distros. It’s usually already contained in the distro, doesn’t take any learning or getting used to, and all its commands and prompts are displayed at the bottom.
Nano
Самое важное:
Alt+U (Esc U)— Undo, отмена последнего действия.Alt+E (Esc E)— Redo, повтор отменённого действия.F1 (Ctlr+G)— Показать справкуF2— Выход с сохранением файлаCtrl+X— Вернуться к редактированию из справки, и прочих диалоговых окон, выход из программы.
Копирование и вставка текста:
Alt-A (Ctrl-6)— установить\снять маркер начала выделения текста (либо просто стрелки с shift)Alt+6 (Esc 6)— копировать выделение текст в буфер обмена. Комбинация alt+6 у меня занята и не заработала.Ctrl+K (или F9)— вырезать выделенный фрагмент в буфер обмена, при отсутствии выделения удалить строку.Ctrl+U (или F10)— вставить фрагмент из буфера обменаCtrl+Shift+V— вставить из GUI буфера обменаIns— Вставка текста из другого файла, либо вывода команды.
Поиск и замена:
Ctrl+W— ПоискAlt+W— Повторный поискCtrl+\— Замена. Помнит последний поиск как изменяемое по умолчанию.
Навигация:
Alt+\ (Ctrl+Home)— В начало файлаAlt+/ (Ctrl+End)— В конец файлаCtrl+Y (PgUp)— На страницу вверхCtrl+V (PgDn)— На страницу внизAlt+S— Переключение между плавной прокруткой страниц и фиксированной
Docker
How do I SSH into a running container
There is a docker exec command that can be used to connect to a container that is already running.
- Use ````docker ps``` to get the name of the existing container
- Use the command
docker exec -it <container name> /bin/bashto get a bash shell in the container - Generically, use
docker exec -it <container name> <command>to execute whatever command you specify in the container.
Private and public IP address
Internet Protocol (IP) addresses are usually of two types: Public and Private.
What are Public IP Addresses?
A public IP address is assigned to every computer that connects to the Internet where each IP is unique. Hence there cannot exist two computers with the same public IP address all over the Internet. This addressing scheme makes it possible for the computers to “find each other” online and exchange information. User has no control over the IP address (public) that is assigned to the computer. The public IP address is assigned to the computer by the Internet Service Provider as soon as the computer is connected to the Internet gateway.
A public IP address can be either static or dynamic. A static public IP address does not change and is used primarily for hosting webpages or services on the Internet. And another one a dynamic public IP address is chosen from a pool of available addresses and changes each time one connects to the Internet. Most Internet users will only have a dynamic IP assigned to their computer which goes off when the computer is disconnected from the Internet. Thus when it is re-connected it gets a new IP.
You can check your public IP address by visiting www.whatismyip.com
What is private address?
An IP address is considered private if the IP number falls within one of the IP address ranges reserved for private networks such as a Local Area Network (LAN). The Internet Assigned Numbers Authority (IANA) has reserved the following three blocks of the IP address space for private networks (local networks):
- 10.0.0.0 – 10.255.255.255 (Total Addresses: 16,777,216)
- 172.16.0.0 – 172.31.255.255 (Total Addresses: 1,048,576)
- 192.168.0.0 – 192.168.255.255 (Total Addresses: 65,536)
Private IP addresses are used for numbering the computers in a private network including home, school and business LANs in airports and hotels which makes it possible for the computers in the network to communicate with each other. Say for example, if a network A consists of 30 computers each of them can be given an IP starting from 192.168.0.1 to 192.168.0.30. Unlike the public IP, the administrator of the private network is free to assign an IP address of his own choice
Devices with private IP addresses cannot connect directly to the Internet. Likewise, computers outside the local network cannot connect directly to a device with a private IP. It is possible to interconnect two private networks with the help of a router or a similar device that supports Network Address Translation.
If the private network is connected to the Internet (through an Internet connection via ISP) then each computer will have a private IP as well as a public IP. Private IP is used for communication within the network where as the public IP is used for communication over the Internet. Most Internet users with a DSL/ADSL connection will have both a private as well as a public IP.
You can view your private IP in windows commend prompt by typing ipconfig IPV4 Address is your private IP which in most cases will be command in the command prompt. The number that you see against “192.168.1.1 or 192.168.1.2. Unlike the public IP, private IP addresses are always static in nature.
- get private IP: Mac -
ifconfig, Windows -ipconfig - get public IP: ip4.me
Making Front end built artifact as separated part of application
Given a version number MAJOR.MINOR.PATCH, increment the:
- MAJOR version when you make incompatible API changes,
- MINOR version when you add functionality in a backwards-compatible manner, and
- *PATCH version when you make backwards-compatible bug fixes.
Additional labels for pre-release and build metadata are available as extensions to the MAJOR.MINOR.PATCH format.
This is not a new or revolutionary idea. In fact, you probably do something close to this already. The problem is that “close” isn’t good enough. Without compliance to some sort of formal specification, version numbers are essentially useless for dependency management. By giving a name and clear definition to the above ideas, it becomes easy to communicate your intentions to the users of your software. Once these intentions are clear, flexible (but not too flexible) dependency specifications can finally be made.
To keep the JavaScript ecosystem healthy, reliable, and secure, every time you make significant updates to an npm package you own, we recommend publishing a new version of the package with an updated version number in the package.json file that follows the semantic versioning spec. Following the semantic versioning spec helps other developers who depend on your code understand the extent of changes in a given version, and adjust their own code if necessary.
Note
If you introduce a change that breaks a package dependency, we strongly recommend incrementing the version major number; see below for details.
Incrementing semantic versions in published packages
To help developers who rely on your code, we recommend starting your package version at 1.0.0 and incrementing as follows:
| Code status | Stage | Rule | Example version |
|---|---|---|---|
| First release | New product | Start with 1.0.0 | 1.0.0 |
| Backward compatible bug fixes | Patch release | Increment the third digit | 1.0.1 |
| Backward compatible new features | Minor release | Increment the middle digit and reset last digit to zero | 1.1.0 |
| Changes that break backward compatibility | Major release | Increment the first digit and reset middle and last digits to zero | 2.0.0 |
Using semantic versioning to specify update types your package can accept
You can specify which update types your package can accept from dependencies in your package’s package.json file.
For example, to specify acceptable version ranges up to 1.0.4, use the following syntax:
- Patch releases: 1.0 or 1.0.x or ~1.0.4
- Minor releases: 1 or 1.x or ^1.0.4
- Major releases: * or x
{
    "dependencies": {
        "my_dep": "^1.0.0",
        "another_dep": "~2.2.0"
    }
}
AWS/Azure/google apps engine/digital ocean/rack space:
- storage provider (what is storage in context of specified cloud provider, storage offerings, types, advantages and disadvantages)
- Availability zones, edge locations
Amazon Simple Storage Service (Amazon S3) – это сервис хранения объектов, предлагающий лучшие в отрасли показатели производительности, масштабируемости, доступности и безопасности данных. Это означает, что нашими клиентами могут быть компании любых размеров и из любых областей деятельности. Они могут использовать наш сервис для хранения и защиты любых объемов данных в различных ситуациях, например для обеспечения работы сайтов, мобильных приложений, для резервного копирования и восстановления, архивации, корпоративных приложений, устройств IoT и анализа больших данных. Amazon S3 предлагает простые в использовании инструменты администрирования, которые позволяют организовать данные и точно настроить ограничения доступа в соответствии потребностями вашего бизнеса или законодательными требованиями. Amazon S3 обеспечивает надежность 99,999999999 % (здесь 11 девяток) и хранит данные миллионов приложений в интересах компаний со всего света.
Amazon S3 предлагает различные инструменты, которые позволяют организовать и контролировать для поддержки определенных сценариев использования, сокращения расходов, обеспечения безопасности и соблюдения законодательных требований. Данные хранятся как объекты в ресурсах, которые называют корзинами, при этом размер одного объекта может составлять до 5 ТБ. Хранилище S3 позволяет добавлять теги метаданных в объекты, перемещать и сохранять данные в классах хранилища S3, настраивать и применять элементы управления доступом к данных, защищать данные от несанкционированного использования, применять аналитику больших данных и отслеживать данные на уровне объекта и корзины.
Управление хранилищем и его мониторинг
Плоская неиерархическая структура Amazon S3 и различные возможности управления помогают клиентам любого уровня и из любых отраслей организовать данные выгодным для бизнеса и сотрудников образом. Все объекты хранятся в корзинах S3, и их можно организовать с помощью общих имен, которые называют префиксами. Кроме того, в каждый объект можно добавить до 10 пар «ключ-значение», которые называют тегами объектов S3. Эти пары можно создавать, обновлять и удалять в любое время в течение жизненного цикла объекта. Для отслеживания объектов и связанных с ними тегов, корзин и префиксов, можно использовать отчет S3 Inventory, в котором указываются объекты, хранимые в корзине S3 или имеющие определенный префикс, а также соответствующие метаданные и статус шифрования. Сервис S3 Inventory можно настроить для ежедневного или еженедельного создания отчетов.
Управление хранилищем
С помощью имен корзин, префиксов, тегов объектов S3 и сервиса S3 Inventory можно классифицировать данные, создавать отчеты и настраивать другие возможности S3. Сервис S3 Batch Operations упрощает эти задачи, независимо от количества объектов, и позволяет управлять данными в Amazon S3 в любом масштабе. Используя S3 Batch Operations, можно копировать объекты между корзинами, заменять наборы тегов объектов, изменять элементы управления доступом и восстанавливать архивные объекты из Amazon S3 Glacier с помощью одного запроса к API S3 или нескольких щелчков мыши в Консоли управления Amazon S3. С помощью S3 Batch Operations также можно применять функции AWS Lambda к объектам для выполнения настраиваемой бизнес-логики, например для обработки данных или перекодировки изображений. Для начала работы создайте список целевых объектов, используя отчет S3 Inventory, или укажите собственный список, а затем выберите требуемую операцию в меню. После выполнения запроса S3 Batch Operation вы получите оповещение и отчет по всем изменениям. Узнайте больше о S3 Batch Operations, посмотрев обучающие видео.
Amazon S3 также поддерживает возможности для контроля версий данных, предотвращения случайного удаления и репликации данных в другие регионы AWS. С помощью S3 Versioning можно легко сохранять, извлекать и восстанавливать объекты, хранимые в Amazon S3, что позволяет восстанавливать систему после непреднамеренных действий пользователей и сбоев приложений. Для предотвращения случайного удаления включите удалении с использованием многофакторной аутентификации (MFA) для корзины S3. Если попытаться удалить объект из корзины с включенным удалением с использованием MFA, потребуются два этапа аутентификации: данные для доступа к аккаунту AWS и последовательность из действительного серийного номера, пробела и шестизначного кода с экрана принятого устройства аутентификации, такого как аппаратный ключ или ключ безопасности U2F. Возможность межрегиональной репликации (CRR) в S3 упрощает репликацию объектов (и связанных метаданных и тегов объектов) в другие регионы AWS для снижения задержек, аварийного восстановления, обеспечения соответствия требованиям и ряда других примеров использования. Межрегиональная репликация в S3 связана с исходной корзиной S3 и реплицирует объекты в целевую корзину в другом регионе AWS.
Вы также можете применить политики «однократная запись, многократное чтение» (WORM) с помощью S3 Object Lock. Возможность управления S3 блокирует удаление версий объектов в течение периода хранения, установленного клиентом. Эта возможность позволяет применять политики хранения в качестве дополнительного уровня защиты данных либо для выполнения нормативных требований. Рабочие нагрузки можно переносить из существующих систем WORM в Amazon S3, а S3 Object Lock можно настроить на уровне объектов или корзин для предотвращения удаления версий объектов до заданной даты, которую вы можете определить самостоятельно или в соответствии с нормативными требованиями. Объекты с блокировкой S3 Object Lock сохраняют защиту WORM даже после перемещения в другие классы хранилища с политикой жизненного цикла S3. Для отслеживания объектов с блокировкой S3 Object Lock можно использовать отчет S3 Inventory, содержащий сведения о статусе WORM объектов. S3 Object Lock можно настроить в одном из двух режимов. При использовании в режиме Governance аккаунты AWS с определенными разрешениями IAM могут снимать защиту S3 Object Lock с объектов. Если вам требуется большая надежность по неизменности для выполнения законодательных требований, можно использовать режим Compliance. В режиме Compliance защиту не может снять ни один пользователь, в том числе аккаунт root.
Мониторинг хранилища
В дополнение к этим возможностям управления, можно использовать функции S3 и другие сервисы AWS для мониторинга и контроля использования ресурсов S3. К корзинам S3 можно применять теги, распределяя расходы в рамках нескольких подразделений бизнеса (таких как центры затрат, имена приложения или владельцы), и затем использовать отчеты о распределении расходов AWS для просмотра сведений об использовании и расходах, сгруппированные по тегам корзины. Можно также использовать Amazon CloudWatch для отслеживания работоспособности ресурсов AWS и настройки предупреждений об оплате, которые отправляются, если предполагаемые расходы достигают предела, заданного пользователем. Другой сервис мониторинга AWS, AWS CloudTrail, отслеживает действия на уровне объекта и корзины, а также предоставляет соответствующие отчеты. Оповещения о событиях S3 можно настроить для инициации рабочих процессов, предупреждений и вызова AWS Lambda при внесении определенных изменений в ресурсы S3. Оповещения о событиях S3 можно использовать для автоматической перекодировки мультимедийных файлов после завершения загрузки в Amazon S3, обработки файлов данных по мере их поступления или синхронизация объектов с другими хранилищами данных. Подробнее о возможностях управления хранилищем S3 и его мониторинге »
Классы хранилищ
Amazon S3 позволяет хранить данные в хранилищах S3 различного класса: S3 Standard, S3 Intelligent‑Tiering, S3 Standard‑Infrequent Access (S3 Standard‑IA), S3 One Zone‑Infrequent Access (S3 One Zone‑IA), Amazon S3 Glacier (S3 Glacier) и Amazon S3 Glacier Deep Archive (S3 Glacier Deep Archive).
Каждый класс хранилища S3 поддерживает определенный уровень доступа к данным по соответствующей цене. Это значит, что критические важные производственные данные можно хранить в S3 Standard для частого доступа, нечасто используемые данные – в S3 Standard-IA или S3 One Zone-IA для сокращения расходов и архивировать данные с минимальными расходами в архивных классах хранилища – S3 Glacier и S3 Glacier Deep Archive. Можно использовать анализ классов хранилищ S3 для мониторинга схем доступа к объектам, чтобы выявить данные, которые следует перенести в менее затратные классы хранилища. Затем эти сведения можно использовать для настройки политики жизненного цикла S3, которая регулирует перенос данных. Политики жизненного цикла S3 также можно применять для принудительного истечения срока действия объектов после окончания их жизненного цикла. Данные с меняющимися или неизвестными моделями доступа можно хранить в системе S3 Intelligent-Tiering, которая автоматически перемещает данные на основании меняющихся моделей доступа между уровнем частого доступа и более экономичным уровнем нечастого доступа для сокращения расходов.
Управление доступом и безопасность
Управление доступом
Для защиты данных в Amazon S3 по умолчанию пользователям предоставляется только доступ к ресурсам S3, которые создали они. Доступ другим пользователям можно предоставить с помощью одного или нескольких из следующих возможностей управления доступом: AWS Identity and Access Management (IAM) для создания пользователей и управления правами доступа, списки управления доступом (ACL) для предоставления доступа к отдельным объектам авторизованным пользователям, политики корзины для настройки разрешений для всех объектов в одной корзине S3 и аутентификация строки запроса для предоставления временного доступа другим пользователям с помощью краткосрочных URL-адресов. Amazon S3 также поддерживает журналы аудита, которые содержат запросы к ресурсам S3 для обеспечения полной визуализации действий пользователей и данных, которые они запрашивают.
Безопасность
Amazon S3 предоставляет гибкие возможности обеспечения безопасности для предотвращения доступа неавторизованных пользователей к данным. Конечные точки VPC используются для подключения к ресурсам S3 из Amazon Virtual Private Cloud (Amazon VPC). Amazon S3 поддерживает шифрование на стороне сервера (с тремя ключевыми вариантами управления) и на стороне клиента для передачи данных. Используйте S3 Inventory для проверки статуса шифрования объектов S3 (подробнее о S3 Inventory см. в разделе об управлении хранилищем).
S3 Block Public Access – это новый набор механизмов контроля безопасности, который позволяет запретить публичный доступ к корзинам и объектам S3. Достаточно нескольких нажатий клавиш в Консоли управления Amazon S3, чтобы применить параметры S3 Block Public Access ко всем корзинам аккаунта AWS или только к некоторым корзинам S3. После того как параметры применены к аккаунту AWS, любые существующие или новые корзины и объекты, связанные с этим аккаунтом, будут наследовать параметры, запрещающие публичный доступ. Параметры Amazon S3 Block Public Access переопределяют другие разрешения S3. Благодаря этому администратору аккаунта легко обеспечить применение политики «Запрет публичного доступа» независимо от способа добавления объекта или создания корзины или существующих разрешений доступа. Механизмы контроля S3 Block Public Access поддерживают аудит, что предоставляет дополнительный уровень контроля, и используют проверки разрешений корзины AWS Trusted Advisor, журналы AWS CloudTrail и предупреждения Amazon CloudWatch. Необходимо включить Block Public Access для всех учетных записей и корзин, которые не должны быть общедоступными.
Клиенты также могут использовать сервис Amazon Macie для автоматического обнаружения и защиты конфиденциальных данных, хранимых в Amazon S3. Сервис применяет машинное обучение для распознавания конфиденциальных данных, таких как персональная информация (PII) или интеллектуальная собственность, и предоставляет информационные панели и предупреждения, которые обеспечивают наглядное представление того, как осуществляется доступ этим данным и как они перемещаются. Amazon Macie также непрерывно отслеживает модели доступа к данным для выявления отклонений от нормы и генерирует подробные предупреждения, если обнаруживает риск несанкционированного доступа или неумышленной утечки данных. Подробнее см. в разделах об управлении доступом и безопасности в S3 и защите данных в Amazon S3 »
Запросы к данным без извлечения
Amazon S3 предоставляет встроенную возможность и дополнительные сервисы, которые запрашивают данные без необходимости в копировании и загрузке на отдельную аналитическую платформу или в хранилище данных. Это значит, что аналитику больших данных можно проводить непосредственно на данных в Amazon S3. S3 Select – это возможность S3, предназначенная для повышения производительности запросов на 400 % и сокращения расходов на запросы на 80 %. Она позволяет извлекать подмножество данных объекта (с помощью простых выражений SQL) вместо всего объекта, размер которого может составлять до 5 ТБ.
Amazon S3 также совместим с аналитическими сервисами AWS Amazon Athena и Amazon Redshift Spectrum. Amazon Athena запрашивает данные из Amazon S3 без извлечения и загрузки в отдельный сервис или платформу. Он использует стандартные выражения SQL для анализа данных, предоставления результатов за считаные секунды, а также часто применяется для специализированного обнаружения данных. Amazon Redshift Spectrum также выполняет SQL-запросы напрямую к данным в Amazon S3 и больше подходит для сложных запросов и крупных наборов данных (размером до нескольких экзабайт). Так как Amazon Athena и Amazon Redshift используют общие форматы и каталог данных, их можно использовать для одинаковых наборов данных в Amazon S3. Подробнее см. в разделах Создание решений для хранения больших данных и S3 Select »
Передача больших объемов данных
В AWS доступен набор сервисов по миграции данных, который упрощает, ускоряет и защищает перенос данных в облако AWS. Сервис S3 Transfer Acceleration предназначен для увеличения скорости передачи данных в корзины S3 до максимальных значений при передаче данных на большие расстояния. Для передачи очень больших объемов данных рекомендуется использовать сервисы AWS Snowball, AWS Snowball Edge и AWS Snowmobile, позволяющие передавать петабайты и экзабайты данных в облако AWS по стоимости в пять раз ниже тарифов высокоскоростного Интернета. Эти сервисы AWS Snow используют защищенные физические устройства для передачи данных по дорогам и устраняет проблемы миграции, связанные с высокими затратами на использование сети, продолжительной передачей данных и вопросами безопасности.
Клиенты, которым требуется сохранить локальные приложения и реализовать архитектуру облачного хранилища, могут использовать AWS Storage Gateway (гибридный облачный сервис хранилища) для удобного подключения локальных сред к Amazon S3. Перенос данных между локальным хранилищем и AWS (в том числе Amazon S3) можно автоматизировать с помощью инструмента AWS DataSync, который позволяет перемещать данные в 10 раз быстрее, чем инструменты с открытым исходным кодом. Если требуется напрямую перемещать файлы в Amazon S3 и обратно с помощью протокола SFTP, следует использовать AWS Transfer for SFTP – полностью управляемый сервис, обеспечивающий безопасный обмен файлами с третьими лицами.
Вместе со сторонними поставщиками из сети AWS Partner Network (APN) клиенты также могут развертывать гибридные архитектуры хранилищ, интегрировать Amazon S3 в существующие приложения и рабочие процессы и переносить данные из облака AWS и в него.
AWS S3 is a simple storage service offered by Amazon AWS that give you the ability to use it as a webservice. Imagine a Dropbox or Google Drive that allows you to upload or download files programmatically with an API.
- S3 Bucket: is a storage unit from the S3 service from Amazon. You can store different type of files (data) and have metadata that describes the actual data or file.
- Access Key ID: Is the identification for a certain access key that allows an application or user to access a set of preconfigured AWS Resource (like a S3 Bucket for example).
- Secret Access key: Is the secret part of the Access Key ID. Think of it as a password for a specific Access Key ID (they must be used always in pairs)
Step 1: Get your key pairs
The easy way to obtain a key pair is to create them for your default account for AWS Console.
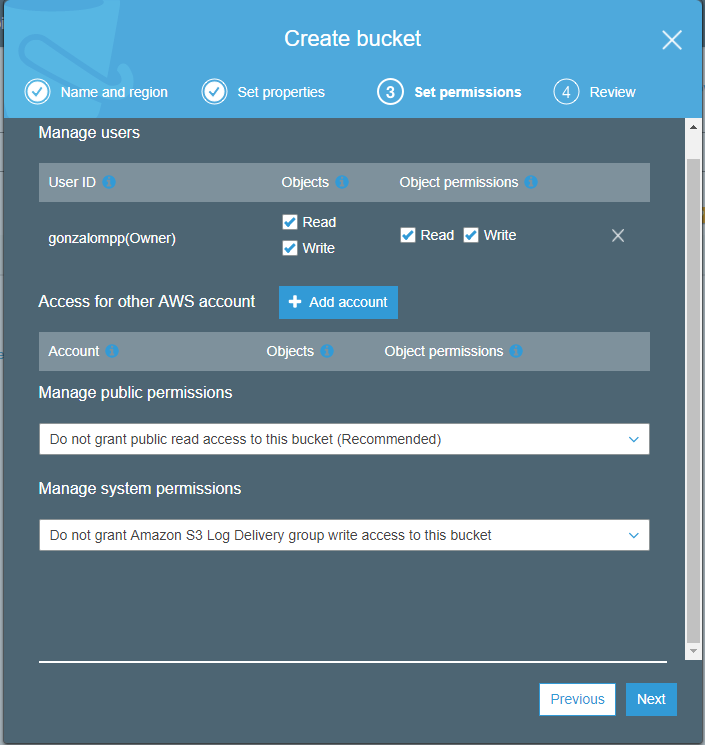
Step 2: Create a Bucket
Go to “Services/Storage/S3” and then click in “Create Bucket”.
Step 3: Creating a Node JS project an example file for upload
yarn add aws-sdk// index.js const AWS = require('aws-sdk'); const fs = require('fs'); const path = require('path'); //configuring the AWS environment AWS.config.update({ accessKeyId: "<Access Key Here>", secretAccessKey: "<Secret Access Key Here>" }); const s3 = new AWS.S3(); const filePath = "./data/file.txt"; //configuring parameters const params = { Bucket: '<Bucket Name Here>', Body : fs.createReadStream(filePath), Key : "folder/"+Date.now()+"_"+path.basename(filePath), }; s3.upload(params, function (err, data) { //handle error if (err) { console.log("Error", err); } //success if (data) { console.log("Uploaded in:", data.Location); } });
Availability zones, edge locations
Availability zones
Зона доступности AWS – это изолированное местоположение в регионе AWS. В каждом регионе AWS сервис S3 использует как минимум три зоны доступности, расстояние между которыми составляет несколько километров, что обеспечивает защиту от локальных стихийных бедствий, таких как пожары, наводнения и пр.
Хранилища классов Amazon S3 Standard, S3 Standard – IA и S3 Glacier реплицируют данные как минимум в трех зонах доступности для обеспечения защиты данных в случае полного выхода одной из зон доступности из строя. Это условие остается в силе и в регионах, где публично доступно менее трех зон доступности. Объекты, размещенные в хранилищах этих классов, доступны из всех зон доступности в регионе AWS.
Хранилища класса Amazon S3 One Zone – IA реплицируют данные в пределах одной зоны доступности. Данные, размещаемые в хранилищах этого класса, могут пострадать в случае повреждения зоны доступности.
Edge location
Each edge location is an Amazon datacenter (or colocation facility that has Amazon equipment somewhere in it)
- Europe Edge locations: Amsterdam, The Netherlands (2); Berlin, Germany (2); Copenhagen, Denmark; Dublin, Ireland; Frankfurt, Germany (8); Helsinki, Finland; London, England (9); Madrid, Spain (2); Manchester, England; Marseille, France; Milan, Italy; Munich, Germany (2); Oslo, Norway; Palermo, Italy; Paris, France (5); Prague, Czech Republic; Stockholm, Sweden (3); Vienna, Austria; Warsaw, Poland; Zurich, Switzerland
Bastion host
TIP
Узел-бастион (Bastion host) — так называют специально отведенный компьютер в сети, обычно расположенный на внешней стороне демилитаризованной зоны (ДМЗ) организации. Такой узел полностью открыт для атак, так как он не защищен ни фаерволом ни фильтрующим маршрутизатором. Узел-бастион нужно тщательно проектировать и настраивать, чтобы свести к минимуму вероятность взлома.
Узлы-бастионы часто используют как:
- Web-сервер
- DNS-сервер
- SMTP-сервер
- FTP-сервер
- Proxy сервер
- NNTP-сервер
- В качестве«ловушки»(Honeypot)
- VPN-сервер
Рекомендуется выделять таким узлам только одну из указанных функций. Чем больше функций выполняет сервер, тем больше вероятность оставить незамеченным слабое место в системе безопасности. Обеспечение защиты одной службы на узле-бастионе намного проще, чем если таких служб будет несколько. Сетевая архитектура с несколькими узлами-бастионами предоставляет организациям дополнительные преимущества.
In very simple terms, a bastion host is the only host or computer which is allowed public network access. The other common name used for a bastion host is ‘Jump Box’. This is usually a powerful server box with high network security as this is the only host which is allowed public access. System admins can use this machine to connect to other instances in the backend infrastructure via secure authentication mechanisms.
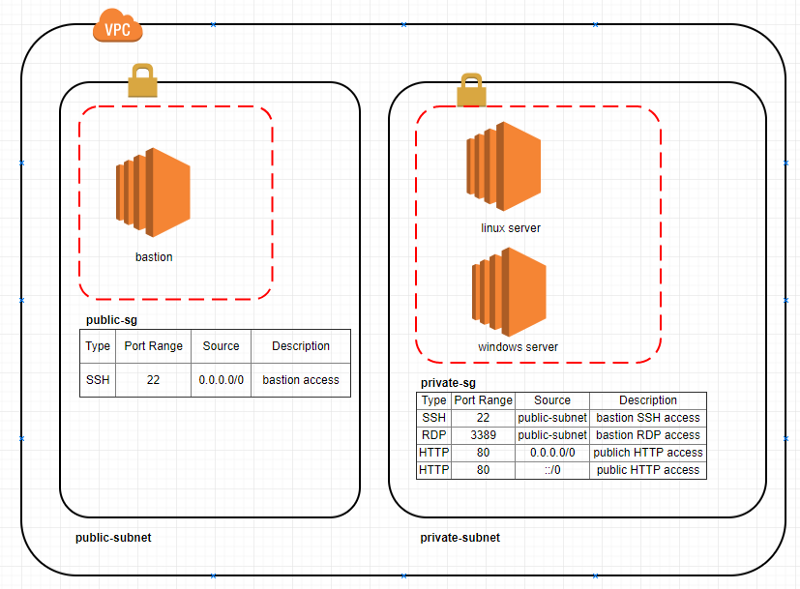
Here, we have one VPC with a public and a private subnet. Say, for example, your windows and linux server instances in the private subnet are running a web server.
- Assuming that the web servers on these windows and linux machines are running on default ports, we need to enable public access to port 80. All other ports should be blocked. Bastion host needs access to the SSH port 22 on linux server and RDS port 3389 on the windows server so that it can be used for remote access to these machines. For this example, I have created one security group for both types of instances. As an alternative, you can have a security group for windows with only RDP port 3389 access, and another security group for linux with only SSH port 22 access. The other accesses will still be the same for both security groups. (NOTE: Assumption here is that you are using the default Network Access Control List(NACL) for the subnets which allows all the traffic. If it’s not a default NACL, you will have to configure the NACL to allow access too.)
- Bastion host needs to be accessible from the internet so the system admins can log in. In this example, the access is open to all IP addresses, but in a real scenario, you should restrict the IP addresses who can access to a range of IP addresses which you know are white-listed. (NOTE: To allow access to a set of IPs in a private corporate network, you should setup VPN connection with the corporate data center, and allow access to only the system admin team’s IP address range).
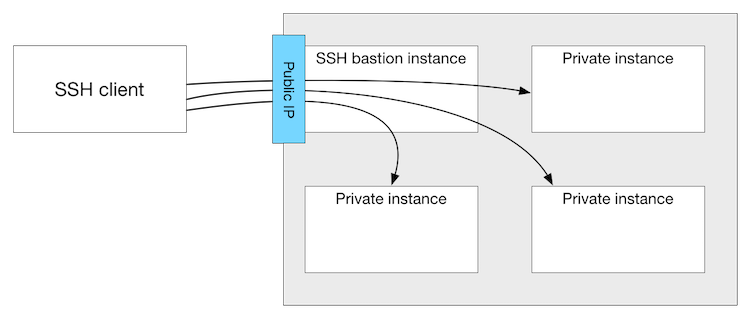
SSH bastion host. In this sort of arrangement, SSH traffic to servers that are not directly accessible via SSH is instead directed through a bastion host, which proxies the connection between the SSH client and the remote servers.
At first, it may sound like the use of an SSH bastion host is a pretty specialized use case. In reality, though, I believe this is a design pattern that can actually be useful in a variety of situations. I plan to explore the use cases for an SSH bastion host in a future blog post.
This diagram illustrates the concept of using an SSH bastion host to provide access to Linux instances running inside some sort of cloud network (like an OpenStack Neutron tenant network or an AWS VPC):
First, you’ll want to ensure you have public key authentication properly configured, both on the bastion host as well as the remote instances. This is a topic that has been discussed extensively in other locations, so I won’t cover it here in any great detail. You can use the same key for both the bastion host and the remote instances, or different keys; you’ll just need to ensure that the keys are loaded by ssh-agent appropriately so they can be used as needed. (Note that the use of public key authentication isn’t strictly required, but it’s something you really should do.)
Next, you’ll want to ensure that name resolution is working—both from the client to the bastion as well as from the bastion to the remote instances. The bastion host is going to use the hostname specified on the ssh command line, so if it can’t resolve the name the connection will fail.
Finally, you’ll want to configure the ProxyCommand setting for the remote instances in your SSH configuration file. For example, let’s say that you had a remote instance named “private1” and you wanted to run SSH connections through a bastion host called “bastion”. The appropriate SSH configuration might look something like this:
Host private1
  IdentityFile ~/.ssh/rsa_private_key
  ProxyCommand ssh user@bastion -W %h:%p

Host bastion
  IdentityFile ~/.ssh/bastion_rsa_key
With this configuration in place, when you type ssh user@private1 SSH will establish a connection to the bastion host and then through the bastion host connect to “private1”, using the specified keys. The user won’t see any of this; he or she will just see a shell for “private1” appear. If you dig a bit further, though (try running who on the remote node), you’ll see the connections are coming from the bastion host, not the original SSH client. Handy, eh?
In a future blog post, look for me to explore one or more examples of where using an SSH bastion host might be very useful (or even necessary).