Expert
Web-components
Web componentsare a set of web platform APIs that allow you to create new custom, reusable, encapsulated HTML tags to use in web pages and web apps. Custom components and widgets build on the Web Component standards, will work across modern browsers, and can be used with any JavaScript library or framework that works with HTML.
- имя компонента должно содержать хотя бы 1 дефис
- нельзя создавать самозакрывающие теги
<slot>element — part of the Web Components technology suite—is a placeholder inside a web component that you can fill with your own markup, which lets you create separate DOM trees and present them together.
HTML templates
It defines a new <template> element, which creates chunks of HTML.
Templates allow declaration of markup fragments which are parsed by the browser as HTML and are not interpreted at page load time, but can be used at a later stage.
These templates can be instantiated, cloned and reused. Everything inside a <template> tag is considered as inert by the browser. That means that any elements that refer to other resources for ex. <img>, <video> etc. do not make a http request to the server and <script> tags inside this template are not executed.
Hello There. I m a template
custom elemets
Custom elementsAPI provides developers with the ability to create fully-featured standalone DOM elements having their own behavior and CSS styling
class XSpoiler extends HTMLElement {
  constructor() {
    super();

    this.text = {
      "when-close": "Развернуть",
      "when-open": "Свернуть",
    }

    this.innerHTML = `
      <button type="button">${this.text["when-close"]}</button>
      <section style="display: none;">${this.innerHTML}</section>
    `;

    this.querySelector("button").addEventListener("click", () => {
      const opened = (this.getAttribute("opened") !== null);

      if (opened) {
        this.removeAttribute("opened");
      } else {
        this.setAttribute("opened", "");
      }
    });

    // lifecycle
    attributeChangedCallback(attrName, oldVal, newVal) {}
    connectedCallback() {}
    disconnectedCallback() {}

    // customEvents для передачи данных наружу
    // this.dispatchEvent(this.events[opened ? "open" : "close"]);
    this.events = {
      "close": new CustomEvent("x-spoiler.changed", {
        bubbles: true,
        detail: {opened: false},
      }),
      "open": new CustomEvent("x-spoiler.changed", {
        bubbles: true,
        detail: {opened: true},
      }),
    };
  }
}
// Define the new element
window.customElements.define('x-spoiler', XSpoiler);
image-slider {
  /* css rules */
}

*:not(:defined) {
  display: none;
}
There are a few lifecycle callbacks available with custom elements
connectedCallback— called every time the element is inserted into the DOM.disconnectedCallback— called every time the element is removed from the DOM.attributeChangedCallback— the behavior occurs when an attribute of the element is added, removed, updated, or replaced.
customElements API
- customElements
.define(name, class) - customElements
.get(name)- вернёт конструктор пользовательского элемента, зарегистрированного под именем name, если такой есть, либо undefined. - customElements
.whenDefined(name)вернёт промис, который будет выполнен успешно тогда, когда элемент с именем name будет зарегистрирован, или незамедлительно, если элемент уже зарегистрирован. Особенно удобно это с использванием await, но это уже другая тема.
NOTE
можно наследоваться не от HTMLElement, а, например, от Input и т.д., важно не забывать вызывать super.methodName() в первой строчке своих методов
shadow DOM
A shadow tree is a node tree whose root is a shadow root. (defines how to use encapsulated style and markup in web components.)
TIP
Shadow DOM provides style and markup encapsulation.
- разметка игнорируется
childNodeиquerySelector, например тег<video>, который содержит внутри несколько<source>
To create shadow DOM, select an element and call its createShadowRoot method which returns a fragment to which you can append content. This fragment returned is called as Shadow Root. The shadow root and its children are not visible to the user, but browser renders them when it encounters our tag. It allows to isolate DOM of our component and scope and simplify CSS.
shadow DOM as a scoped subtree inside your element. A Shadow root is a document fragment that gets attached to the host element. When the shadow root is attached that is how the element gets its shadow DOM.
const imageSlider = document.createElement('image-slider');
const shadowRoot = imageSlider.attachShadow({ mode: 'open' });
shadowRoot.innerHTML = '<h1>Hello Shadow DOM</h1>';
В любой элемент времени мы можем добавить теневой DOM с помощью метода attachShadow(). В этот момент вместо обычного DOM-дерева у элемента появляется сразу три других: Shadow DOM, Light DOM и Flattened DOM.
Light DOM— это то, что раньше являлось обычным DOM-деревом элемента: все элементы, которые доступны через обычные innerHTML, childNodes или по которым ищет метод querySelectorAll.Shadow DOM— это DOM-дерево, которое лежит в свойстве shadowRoot элемента. Сразу после вызова attachShadow свойство shadowRoot пустое, но мы можем задать какую-либо разметку через стандартные innerHTML, appendChild или другие способы работы с DOM, вызывая их относительно this.shadowRoot.Flattened DOM— это результат объединения Shadow DOM и Light DOM. Это то, что пользователь в действительности видит на экране. Это искусственное понятие, необходимое только для понимания механизма работы Shadow DOM. Если получить разметку Light DOM можно через element.innerHTML, разметку Shadow DOM можно через element.shadowRoot.innerHTML, то на Flattened DOM можно только посмотреть в окне браузера. Flattened DOM строится на основе Shadow DOM и в самом простом варианте использования строго ему равен.
this.shadowRoot.querySelector("button")
Если в Shadow DOM находится тег
<style>, правила из него распространяются только на содержимое Shadow DOM
Псевдоклассы:
:host- соответствует самому элементу:host-context(.red)- будет применяться к пользовательскому элементу только тогда, когда он вложен в элемент с классом .red.::slotted(.title)
для стилизации извне - стили на тег компонента x-spoiler {} будут перебивать те, что висят на ::host
Доступ к Shadow DOM открыт любому JavaScript-коду при условии, что Shadow DOM был добавлен с опцией {mode: "open"}.
HTML imports
HTML imports allow to import templates from different HTML files. You can organize your templates in different files and then import them:
<link rel="import" href="mydocument.html">
Spellcheck
<element spellcheck="true|false">
Указывает браузеру проверять или нет правописание и грамматику в тексте. The spellcheck attribute specifies whether the element is to have its spelling and grammar checked or not.
The following can be spellchecked:
- text values in input elements (not password)
- text in
<textarea>elements - text in editable elements (
contenteditable=true)
обычно для textarea и contenteditable этот атрибут включен по умолчанию
<p contenteditable="true" spellcheck="true">This is a paragraph.</p>
Custom scheme handlers
The Navigator method registerProtocolHandler(protocol, url, title) lets web sites register themselves as possible handlers for particular protocols.
Chrome, Firefox
safelisted schemes (безопастные схемы)
- bitcoin, geo, magnet, mailto, mms, news, sms, ssh, tel, xmpp
custom scheme:
- starts with
web+ - only-lowercase letters
- at least 5 characters long
Example:
we have app is located at http://burgers.example.com
we can register custom protocol handler:
navigator.registerProtocolHandler("web+burger",
                                  "https://burgers.example.com/?burger=%s",
                                  "Burger handler");
This creates a handler that allows web+burger:// links to direct the user to your web application,
WebGL
TIP
Технология WebGL позволяет рисовать графику в браузере, используя возможности видеокарты, тогда как раньше мы могли использовать только процессор.
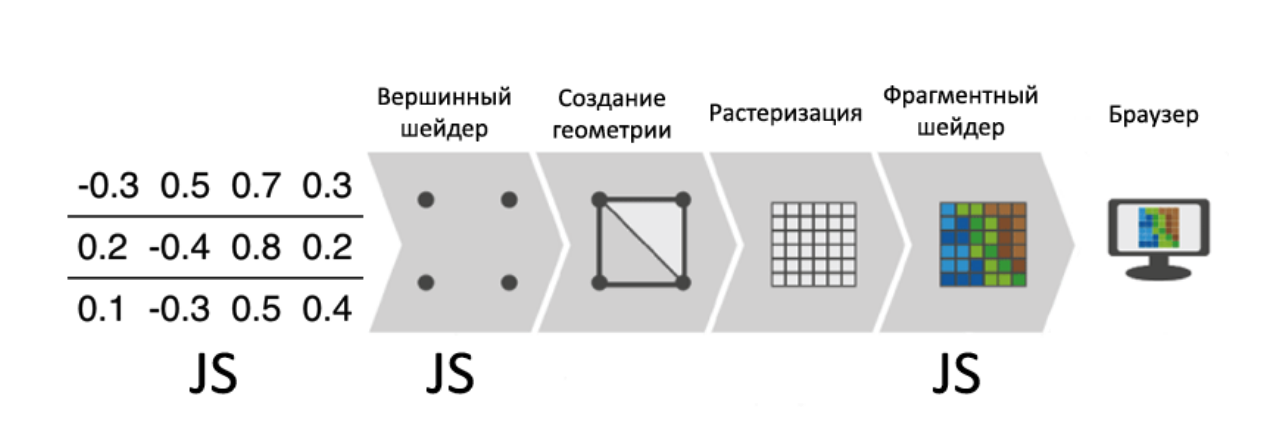
WebGL is an API for rendering 3D graphics on the web. It’s how we’re able to draw graphics within the browser in real time. WebGL applications are written in Javascript and GLSL, a language designed for rendering graphics. While Javascript is generally pretty readable, GLSL is (in my opinion) unintuitive and hard to understand at first. Thus, people have created WebGL frameworks such as Threejs to help people create web applications, without having to deal with a lot of the ugly code behind the scenes.
WebGL cares about two things: vertex position and color. This makes sense because the GPU only needs to know where the vertices of a shape are and what color each pixel needs to be.
Thus, WebGL program has two shaders: a vertex shader and a fragment shader (a “shader” is just a program.. a set of instructions). The vertex shader tells the GPU where the vertices are, and the fragment shader tells the GPU what color each pixel should be. Let’s look at a basic vertex and fragment shader:
WebGL is just a rasterization engine. It draws points, lines, and triangles based on code you supply. Getting WebGL to do anything else is up to you to provide code to use points, lines, and triangles to accomplish your task.
WebGL runs on the GPU on your computer. As such you need to provide the code that runs on that GPU. You provide that code in the form of pairs of functions. Those 2 functions are called a vertex shader and a fragment shader and they are each written in a very strictly typed C/C++ like language called GLSL. (GL Shader Language). Paired together they are called a program.
A vertex shader's job is to compute vertex positions. Based on the positions the function outputs WebGL can then rasterize various kinds of primitives including points, lines, or triangles. When rasterizing these primitives it calls a second user supplied function called a fragment shader. A fragment shader's job is to compute a color for each pixel of the primitive currently being drawn.
For each thing you want to draw you setup a bunch of state then execute a pair of functions by calling gl.drawArrays or gl.drawElements which executes your shaders on the GPU.
There are 4 ways a shader can receive data
Attributes and Buffers
Buffers are arrays of binary data you upload to the GPU. Usually buffers contain things like positions, normals, texture coordinates, vertex colors, etc although you're free to put anything you want in them.
Uniforms
Uniforms are effectively global variables you set before you execute your shader program.
Textures
Textures are arrays of data you can randomly access in your shader program. The most common thing to put in a texture is image data but textures are just data and can just as easily contain something other than colors.
Varyings
Varyings are a way for a vertex shader to pass data to a fragment shader. Depending on what is being rendered, points, lines, or triangles, the values set on a varying by a vertex shader will be interpolated while executing the fragment shader.
WebGL only cares about 2 things: clipspace coordinates and colors. Your job as a programmer using WebGL is to provide WebGL with those 2 things. You provide your 2 "shaders" to do this. A Vertex shader which provides the clipspace coordinates and a fragment shader that provides the color.
Clipspace coordinates always go from -1 to +1 no matter what size your canvas is.
const gl = canvas.getContext('webgl');
- In fact, most 3D engines generate GLSL shaders on the fly using various types of templates, concatenation, etc.
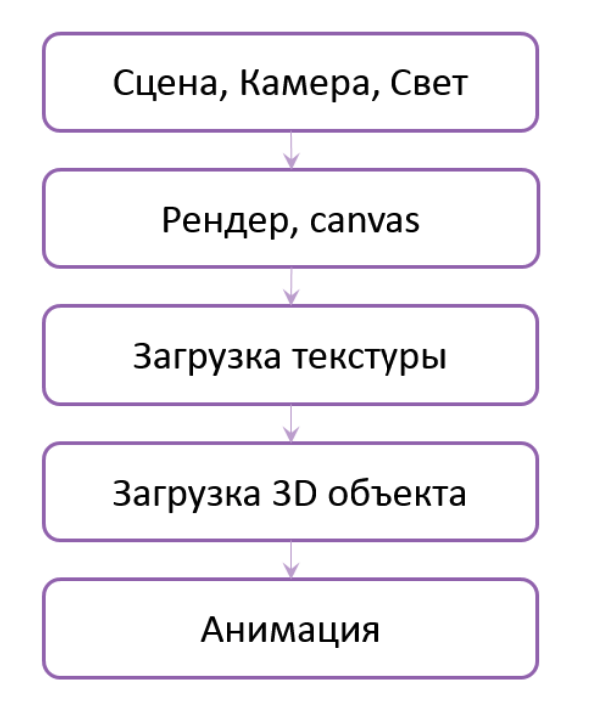
Библиотеки - Three.js, Babylon.js
SVG
TIP
SVG (Scalable Vector Graphics) — язык разметки векторной графики, созданный W3C, подмножество языка XML
хранится не само изображение, а инструкци его постороения по точкам и кривым
- фигуры, изображения и текст
- Масштабирование: в отличие от растровой графики, SVG не теряет в качестве при масштабировании.
- Малый размер: объекты SVG весят намного меньше растровых изображений.
- SVG defines the graphics in XML format
Способы подключения
картинка
<img src='picture.svg' alt='logo' />фон CSS
.picture {
  background-image: url(picture.svg);
}
Object
работают скрипты, анимации - если описаны в svg
<object type='image/svg+xml' data='picture.svg'>
  <img src='picture.png' /><!-- если не поддерживает svg -->
</object>
тег svg
<svg width='20' height='20'>
  <rect fill='#fc0' width='20' height='20' />
<svg>
Examples
<!-- line -->
<svg>
  <line
      x1="0" y1="0"
      x2="200" y2="200"
      stroke-width="1"
      stroke="rgb(0,0,0)"
  />
</svg>

<!-- rectange -->
<svg>
  <rect
    width="200" height="200"
    fill="rgb(234,234,234)"
    stroke-width="1"
    stroke="rgb(0,0,0)"
  />
</svg>

<!-- circle -->
<svg>
  <circle
    cx="102" cy="102"
    r="100"
    fill="rgb(234,234,234)"
    stroke-width="1"
    stroke="rgb(0,0,0)"
  />
</svg>
HTML performance
Repaints
A repaint occurs when changes are made to elements that affect visibility but not the layout. For example, opacity, background-color, visibility, and outline. Repaints are expensive because the browser must check the visibility of all other nodes in the DOM — one or more may have become visible beneath the changed element.
Reflows
Reflows have a bigger impact. This refers to the re-calculation of positions and dimensions of all elements, which leads to re-rendering part or all of the document. Changing a single element can affect all children, ancestors, and siblings.
- Adding, removing or changing visible DOM elements
- Adding, removing or changing CSS styles
- CSS3 animations and transitions
- Using offsetWidth and offsetHeight
- User actions (:hover)
Recomendations
- Use Best-Practice Layout Techniques (semantic, don’t use inline styles or tables for layout!)
- Minimize the Number of CSS Rules (Unused CSS, uCSS for detection unused CSS rules)
- Minimize DOM depths
- Update Classes Low in the DOM Tree
- Remove Complex Animations From the Flow (position: absolute | fixed)
- Modify Hidden Elements
- Update Elements in Batch
- Limit the Affected Elements
- Recognize that Smoothness Compromises Performance
- Analyze Repaint Issues with Browser Tools (Timeline tab)
Canvas
// create canvas
var c = document.getElementById("myCanvas");
var ctx = c.getContext("2d");
Draw Linear Gradient
const gradient = ctx.createLinearGradient(0, 0, 170, 0);
gradient.addColorStop(0, "black");
gradient.addColorStop(0.5 ,"red");
gradient.addColorStop(1, "white");

// Fill with gradient
ctx.fillStyle = gradient;
ctx.fillRect(20, 20, 150, 100);
Use the addColorStop() method to specify different colors, and where to position the colors in the gradient object.
Draw Circular Gradient
const gradient = ctx.createRadialGradient(75, 50, 5, 90, 60, 100); // (x0, y0, r0, x1, y1, r1)
gradient.addColorStop(0, 'red');
gradient.addColorStop(1, 'white');

// Fill with gradient
ctx.fillStyle = gradient;
ctx.fillRect(10, 10, 150, 100);
Draw Image
method draws an image, canvas, or video onto the canvas
context.drawImage(img,x,y)
const img = document.getElementById("scream");
ctx.drawImage(img, 10, 10);
Optimization pages for searching systems (one of google/yandex/yahoo/bing)
- How search engines indexes pages (google or yandex for example)
- rules for following to be indexed by bot
- single page application and potential problems with search engines
- ways to address SPA issues with search engines
- web components and search engines
Googlebot - the Google search engine crawler
- можно использовать тулу
Fetch as Google toolчтобы получить результат, как получает его бот - Mobile friendly test by Google
- Googlebot will wait at least 20 seconds for asynchronous calls to complete!
- server-side rendering and prerendering (в SPA нет ссылок, ко которым может ходить бот, это ухудшает сео)
- Use "feature detection" & "progressive enhancement" techniques to make your content available to all users
- Avoid using "#" in URLs (outside of "#!"). Googlebot rarely indexes URLs with "#" in them. Use "normal" URLs with path/filename/query-parameters instead, consider using the History API for navigation.
For React
- react-snap
- ssr
SEO signals in the DOM (page titles, meta descriptions, canonical tags, meta robots tags, etc.) are respected. Content dynamically inserted in the DOM is also crawlable and indexable. Furthermore, in certain cases, the DOM signals may even take precedence over contradictory statements in HTML source code. This will need more work, but was the case for several of our tests.